-
Article
-
Channel
-
Region
-
Season
-
Tag
Articles
-
 Video article 4:56
Let’s Spin Some Traditional-Style Tops! Learn How to Wrap It, Spin It, and Even Some Cool Tricks!
Things to Do- 3.18K plays
- YouTube
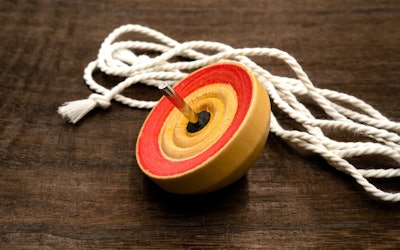
Explaining how to spin a top The video “How to Spin the Top(【改訂版】コマのまわし方(ヒモの巻き方)【 How to spin the top 】)” was created by “Seiai Kindergarten - Fussa, Tokyo” and it explains how to wrap a string and how to spin a top. The video is for kids, so the basics of how to play with the top is easy to understand. This article introduces how to wind a top up and spin it. Be sure to follow along with the video! Traditional Japanese Tops Photo:Old-fashioned top Traditional Japanese tops are a toy played with by attaching a spindle to a circular piece of wood and using a string to spin it. The tip of the stem is thin, maintaining the balance in the center while the top spins. There are tops all around the world and each country has their own version with unique characteristics. For example, there are gasing in Malaysia that adults use and make bets with, diabolos in China that are known for their acrobatics, and spinning tops, used in performances, in Japan. The top has a very long history and it is said that they originally started from the spinning of snail shells. The oldest top in the world, was found in Egypt, and said to have been used around 2000 to 1400 B.C. It is believed that “finger twirling,” tops twisted using one's fingers, were the first kinds of tops invented. In fact, the oldest top is a simple hand-spun top made of carved wood. The whip top is still created as a Japanese folkcraft and wooden toy in Japan. How to Wind up and Spin a Top Source :YouTube screenshot As you can see in the video from 0:03, hold the top in your left hand and the string in your right. The string will have a knot at the end. Put the string on the left side of the stem and pull the knot towards your body on the right side of the stem. From there, place the long end of the string over the knot that you just pulled to the right side of the stem. It's difficult to explain, but you can see this at 0:18 in the video. Then, turn the top to the side while keeping the string tight, and hook the string on the stem on the bottom of the top. After wrapping the string tightly twice on the bottom stem, gradually wrap the rest of the string to cover the bottom of the top. When wrapping the string, it's easier to move the top to wrap it, as opposed to wrapping it using the hand holding the string. When you've finished wrapping it, you'll know you did it correctly by the nice pattern on the bottom of the top. How to Spin and Throw the Top Source :YouTube screenshot After winding the top up, it's finally time to let it rip! As shown in the video, hold the top in your left hand and dangle a bit string. Hold the dangled string between your right ring and pinky fingers, and make a fist around the string. Make a finger gun with your hand and hold the top with your thumb and index finger. After that, face the direction where you want to throw the top, open your legs slightly wider than your shoulder, lower your body and throw that sucker! It is better to throw it as horizontally as possible. Be careful not to throw it straight down as it won't spin and you might break your top with the force. You can watch how to throw it starting from 2:45 in the video. You can see man in the video doing tricks, such as placing the spinning top on the palm of his hand, and rope-walking, from 4:14. Summary of Japan's Traditional Tops Photo:Whip Top The video “How to Spin the Top,” created by “Seiai Kindergarten - Fussa, Tokyo,” introduces how to spin a top, a toy often used during New Years in Japan. The video explains how to wrap the top string as well, so it's great for beginners. It can also be enjoyed by advanced top users since there are difficult tricks in the video. -
 Video article 2:10
How to Put on a Yukata for Men! A Must for Any Guy Looking To Wear a Yukata During Summer in Japan!
Traditional Culture Life & Business- 1.43K plays
- YouTube
Video Introduction This video, titled "[Kazumi Style] How to Put on a Yukata for Men" (Kazumi流男ゆかたの着かた How to put on Yukata for men), was uploaded by "kazumiryu." There are few chances to wear yukata in Japan, summer festivals, fireworks displays, and other summer events, are a few such occasions. You might also get the chance when staying at a ryokan (traditional Japanese inn) or hotel during a vacation. However, since there are so few opportunities to wear yukata, even in Japan, when it comes time to put one on it can be quite the challenge. Being able to wear a yukata cool and comfortably will make you look nice and stylish! If you're looking to learn how to put on a men's yukata, then you came to the right place! Be sure to check out the video as you follow along! How to Properly Put on a Yukata. Right? Left? Which Side Goes on the Outside? Photo:A man and woman wearing yukata at a hot spring inn Yukata are always provided when staying at a hot spring resort in Japan. Many people do not know how to properly wear one, so they just throw it on and call it good. Some may say, "Well, no one's watching so, who cares?", but there is one point you need to be aware of. While it might be okay to throw it on without caring about how well it's shaped, you should at least know which side goes in and which side goes out. As long as you remember right hand in, left hand out, you shouldn't have too many problems. It may be easy to make a mistake when wearing a yukata or kimono if you're not used to the undergarments, etc. In the case of yukata, kimono, and other Japanese-style clothing, it's said to be bad luck to wear the left side in and the right side out. This is because this is how the deceased would be dressed in burial clothes. Be careful not to make this mistake! Wearing a yukata at a ryokan is fairly easy, but it's important to first select a yukata that is appropriate for your height. Since the length of the yukata is can't be adjusted like women's yukata, choose a size that sits above your ankles when worn. 1. Wear the robe so that it is evenly distributed on both sides. 2. Wrap the right side of the robe around the left hip while holding both sides of the yukata. While doing this, hold the left side firmly so your other hand is taut. 3. Wrap the left side of the yukata around the right hip, and tie the obi (sash) in a bow above the hip bone or below the belly button. 4. If you are a man and want to wear the yukata in a cool way, turn the knot clockwise and shift it to either the left or right side of the back. Be careful not to turn the obi around to the opposite side, as this will cause the yukata to become loose. Everything You Need for Wearing a Men's Yukata! Photo:Yukata at a hot spring inn Next, we'll go over how to make a yukata look more dignified. we'll explain, how to look cool while wearing a men's yukata. First, here's what you'll need in order to put on a yukata: ・Yukata ・Hadagi (undergarments) ※If you don't have hadagi, a v-neck shirt will do ・Koshi-himo (waist cord) It's recommended that you wear undergarments that fit to prevent the yukata from clinging to your body due to perspiration. A koshi-himo (waist cord) will keep the yukata firmly in place and keep the yukata looking great without falling out of place. In recent years, there are elastic waist cords whose length can be adjusted as well. Tips for Putting on a Yukata for Men Photo:A man wearing a yukata There are several points to keep in mind when wearing a yukata as a man. Let's look at them together. ・Right Side In As mentioned above, the yukata should be worn with the right on the inside. Be careful not to get this backwards. ・Wear a Yukata Appropriate for Your Height For men, it's especially important to choose a yukata that is appropriate for their height. This is because men's yukata are not adjustable like women's yukata. ・Be Careful Where You Tie the Waist Cord The waist cord should be tied above the hip bone or below the belly button. If you tie it too high, it will look childish. How to Put on a Yukata for Men + Pointers Photo:Putting on a yukata Now that you have everything you need to wear a yukata and you're familiar with some of the do's and don'ts, it's time to put it on. Below we will tell you how to put it on, along with some tips. In particular, a beautiful V-line around the neck will make you look cool in a yukata. 1. Put on the undergarments. 2. Put on the yukata and keep the waist cord over your right shoulder. 3. To wrap the yukata tightly around the hips, grasp the collars firmly with both hands and pull them forward. At this time, make sure the left side seam is hanging straight down. 4. Check the position of the yukata in your left hand, as this will be the side that goes on the outside. Once the yukata is in place, return your hands to their original positions while making sure that the height does not change. 5. Pull the yukata held in your right hand diagonally down to the left, and hold it around your left waist with the side held in your left hand on top, as if to cover the yukata. 6. Place the koshi-himo (waist cord) in front of the stomach, slightly above the hip, and wrap it around your waist on both sides. Cross it behind your back and tighten it once. When tightening, pull in your stomach and tighten it really tight so that it knocks a little bit of air out of you, and then bring the waist cord to the front. 7. Tie the waist cord in one knot on either side, avoiding the middle. The end of the cord should be tucked inside. 8. Finally, place your right hand inside the bosom of the yukata and lightly tap it downwards to adjust the shape of the yukata. A tight collar is recommended for beginners. Summary of How to Put on a Yukata for Men This video ends with only the dressing of the kimono, but on kazumiryu's channel, they explain and obi knot called "kai no kuchi." This knot is often used for men's yukata, be sure to check it out with us! If you want to wear a yukata to a festival, Bon Odori, fireworks display, or other traditional Japanese event, but don't have one, you can always use a kimono rental store. When you wear a yukata, you'll naturally look more graceful. Women tend to be noticed for their gorgeous yukata, but as a man, if you know how to wear a yukata properly, you'll stand out just as much. One of the most important parts is getting that defined v-line to make the yukata look even better. If you go out to one of Japan's summer festivals dressed in yukata while wearing geta shoes, you're sure to have a memorable experience! -
Video article 2:38
How to Use a Chimney Starter! Easy-To-Use Oga Charcoal That Holds Fire but Is Difficult to Light!
Things to Do- 494 plays
- YouTube
For Campers Who Have Difficulty Lighting a Campfire Making a fire gets easier the more you do it, but it can be difficult for novice campers. Campfires and barbecues are two of the best parts about camping and the outdoors. In this article, we'll introduce how to use a chimney starter so that those new to the outdoors and those who are finding it difficult to start a fire, can do so with ease. Video Introduction This video, titled "The Easiest Way to Start a Campfire|How to Light Charcoal Without Fail Even for Beginners" (1番簡単な火おこしのやり方|初心者でも絶対に失敗しない炭に火をつける方法), was uploaded by "Izu no Nushi Tsuri" (伊豆のぬし釣り). If you're like most campers you've probably struggled to light a fire at some point when camping or enjoying the outdoors. With the help of this video, you can learn how to easily light a campfire using a chimney starter. What is a Chimney Starter? Source :YouTube screenshot Chimney starters are also called charcoal starters. They're an excellent tool for easily starting a fire using the chimney effect (stack effect). In the video, a Uniflame Charcoal Starter is used. The video shows how easy it is to start a fire, even if you're new to using a chimney starter. This video shows how to start a fire without failure using a chimney starter. Using Oga Charcoal - Long Lasting But Hard to Start Photo:Oga Charcoal Although oga charcoal burns long and can be used for 2 to 3 hours, it can be difficult to light. In this video they use said oga charcoal. If you can master how to use it, you can start building fires efficiently. How to Use a Chimney Starter Source :YouTube screenshot So, without further ado, let's take a look at how to use a chimney starter. ・Stand the chimney starter up vertically and place the coals inside in an upright position. By placing the coals upright, they will burn more efficiently due to the rising air currents. [Video] 0:06 - Placing charcoal in the chimney starter ・Place the igniter under the chimney starter and light it. Underneath the chimney starter, there's a space for the igniter. After lighting the igniter, place the chimney starter on top of the igniter so that the flames rise into it. Then just let it sit for about 20 minutes. It's incredibly easy. [Video] 0:55 - Lighting the igniter The fire spreads from the igniter to the charcoal placed on top. Even a novice outdoorsman can light oga charcoal with a chimney starter. The idea behind the chimney starter is to use the air flow and the rising air currents to stimulate combustion. If you use the chimney starter to light a fire when you arrive at your campsite, you can start the BBQ (barbecue) when you've finished setting up your tent and other equipment. Use Air Flow to Efficiently Start a Fire Photo:A campfire When it comes to camping, outdoor cooking is what it's all about. Family campers and solo campers alike can enjoy cooking a variety of different foods. Some experienced campers make their own chimney starters using the chimney effect. However, beginners should start with a commercially available chimney starter. A chimney starter can start a fire in a short time and can be conveniently packed. The stainless-steel design also makes it rust-resistant. Summary of How to Use a Chimney Starter In this article, we introduced how to light charcoal using a chimney starter. You may have been surprised at how much easier this method can be. If you're struggling to build a campfire or not feeling confident about your fire making skills, it might be a good idea to have a chimney starter so you can enjoy your time camping in the outdoors while relaxing around a fire and eating delicious barbecue instead of worrying about getting your fire started. For some people, building a fire is one of the best parts of being outdoors, but if you prefer to prioritize mealtime over the time spent on starting a fire, consider picking up a chimney starter. -
Video article 12:11
A Beginner's Guide to Setting Up a Tent. Using the Popular Montbell Stellaridge Tent
Things to Do- 245 plays
- YouTube
A Camping Guide for Beginners Japan's camping boom was sparked by the Corona pandemic. Even people who had never been interested in camping before began to show interest in the activity. In this article, an advanced camper carefully demonstrates how to set up a tent for beginner-level campers. Video Introduction This video, titled "Setting Up a Tent for Beginners (Stellaridge) [Sora no Shita]" (初心者のためのテント設営(ステラリッジ)【そらのした】), was uploaded by "Outdoor Gear Rental Sora no Shita" (アウトドアギアレンタルそらのした). Tools Needed to Set Up a Tent Source :YouTube screenshot If you're new to camping or other outdoor activities, let's first review what you'll need to set up your tent. [Video] 0:08 - What you need to set up a tent Below is a list of tools needed to set up a tent. ・Tent ・Tent poles ・Stakes ・Four guy lines ・Flysheet ・Guy line tensioners ・Groundsheet It's important to make sure you have these items before assembling your tent, let alone leaving for camping so you don't get stuck with a half-assembled tent when camping. Assembling the Body of the Tent Source :YouTube screenshot Now, let's look take a look at the steps to set up a tent. 1. stand upwind from the tent and unfold the body of the tent. The trick is to keep the door of the tent as far downwind as possible. [Video] 0:12 - Unfolding the body of the tent. 2. Fasten the poles together. The poles are connected together with bungee cords, so they are easily connected. [Video] 0:45 - Connect the tent poles 3. Thread the poles through the sleeves attached to the tent diagonals so that the two poles are crossed. 4. Connect the poles to the rings. Connect the ends of the poles to the rings at the four corners of the tent. Connect the two adjacent poles first. [Video] 2:45 - Connecting the poles to the rings at the tent's corners. [Video] 2:53 - A close-up view on how to connect the poles to the corner rings. From the third pole, the poles will start to bow when connecting them. Connect the poles to the rings while keeping the poles in contact with the ground. This keeps the tent from standing makes it stable when setting it up. [Video] 3:15 - Connecting from the third pole 6. When the fourth pole is connected the poles will bow and the tent will stand up at this point. You've now finished setting up the body of the tent. Once the tent is standing, it can be easily moved, so at this stage, it may be moved to a place where you'll actually be sleeping in it. When deciding on a place to set your tent up, consider whether the ground is level and free of unevenness, as well as distance from facilities, such as restrooms, shade from trees, and vantage points. How to Anchor a Tent Source :YouTube screenshot Once you've decided where you want to position your tent, it's time to secure it in place. 1. hammer the stakes into the ground. If the ground is hard, use rocks or other objects to hold the tent in place instead of trying to force the stakes into the ground which can cause them to bend or break. [Video] 4:13 - Hammering the stakes 2. Next we'll secure the tent with ropes. Take out the four guy lines and secure the tent. There are loops located about halfway up the tent sleeves, to which the guy lines will be tied. The key is to use a bowline knot, as reef knots can be difficult to untie. If you don't know how to tie a bowline know, be sure to watch the video to learn how. Make a loop in the middle of the guy line and pass the end of the guy line through the loop. Then, pass the end of the guy line through the loop again, and pull it through to complete the knot. [Video] 5:40 - How to Tie a Rope Knot (Bowline Knot) How to Set Up a Fly Sheet Source :YouTube screenshot 1. Check the position of the zipper and apply the flysheet with the zipper facing the entrance of the tent. [Video] 8:12 - Hanging the flysheet over the body of the tent 2. Pass the guy lines attached to the body of the tent through the slits in the flysheet. The video shows how to thread the guy lines through the slits in the flysheet, so beginner campers should be sure to watch this part. [Video] 9:03 - Threading the guy lines through the flysheet slits 3. Connect the four corners of the flysheet to the four corners of the body of the tent as shown in the video. Pass the poles through the rings attached to the four corners of the flysheet. [Video] 10:35 - Connecting the body of the tent to the flysheet 4. Secure the entrance of the tent with stakes. After that, the tent sides are also tensioned with stakes to create space and improve airflow in the tent. 5. Secure the guy lines with stakes or rocks to finish setting up the tent. In this case, the use of guy line tensioners makes it easier to create tension. Things a Beginner Outdoorsman Should Know Photo:Camping equipment Next, we'll go over some things that a beginner outdoorsman who will be camping for the first time should know. First of all, it's essential to prepare tools for camping, practice setting up a tent, and research the location where you'll be camping. Although this sounds obvious, beginners to camping should start by getting their tent and other equipment all ready to go. Research how much you need to spend to get started camping. After you have a complete set of equipment, what you don't want to do is spend so much time setting up your tent when you arrive that you have no time to enjoy the camping trip itself. After purchasing a tent, we recommend that you watch videos and practice setting up your tent. Camping is a great way to enjoy nature and it's not like staying in the city; there are dangers to be aware of. Care should be taken to avoid dangerous areas, such as cliff bottoms. In general, you should enjoy outdoor activities, such as camping, in a safe place. Depending on the weather, rivers may rise and other environmental disasters can occur. This is not limited to beginners in outdoor activities. You should gather necessary information on the weather and surrounding conditions to the best of your ability in advance. Summary If you're a beginner outdoorsman who is just starting to camp, be sure to refer to the video and learn the steps for setting up a tent. Whether or not you can enjoy camping will depend on whether or not you can set up your tent without hassle. In Japan, there are many attractive campgrounds where you can enjoy nature and explore the outdoors. There are many outdoor activities and camping experiences in Japan that you won't find in other parts of the world. We hope you have a great time camping in Japan! -
Video article 15:31
20 Camping Manners for Beginner Campers in Japan! Learn Proper Manners to Enjoy the Outdoors and Nature!
Things to Do- 67 plays
- YouTube
Japan's Camping Manners Camping is a leisure activity that allows people of all ages to enjoy a priceless time in nature. Japan is currently experiencing a camping boom. However, the sad reality is that some campgrounds have closed down due to lack of good manners, such as campers not picking up their trash. In this article, we'll go over Japanese camping manners to be careful of. Camping Manners Video Introduction This video, titled "20 Camping Manners for Beginners and New Campers Alike! [How to Get Started Camping: Camping Manners]" (キャンプ初心者さん、これからキャンプを始める方に伝えたいキャンプマナー20選 嫌だ!〜こんなキャンパー〜【キャンプのはじめかた:キャンプマナー編】), was uploaded by "Camp Lab" (キャンプ研究所). The video introduces useful camping etiquette, and is recommended for those who are just starting to enjoy outdoor activities, such as camping, as well as experienced campers. 20 Camping Manners to Know When Camping in Japan Photo:Camping manners Although manners vary from country to country and campground to campground many of these are useful no matter where you're camping. There's no one better to learn from than an advanced camper who's been doing it for years, someone who has experienced bad camping manners themself. Let's take a look at these 20 camping manners to keep in mind when camping in Japan! 1. Choose a Campsite After Checking In It's bad camping etiquette to have your friend or other campers that you came with hold a site for you while you check in. It's standard etiquette that you should only choose a campsite after you finish checking in to the campground. [Video] 1:16 - Choosing a Campsite 2. Set Your Tent Up Away From Other Campers Photo:A campground Setting up a tent right next to an already pitched tent is bad manners, especially when the site is large and there are many other places to set up a tent. Moreover, setting up a tent in such a place may spoil the scenery for other campers. When choosing a place to set up your tent, you need to consider the scenery of the tents that are already set up, as to not obstruct their view. [Video] 1:36 - Setting Up Your Tent 3. Avoid Cutting Through Other Campsites Care should also be taken to avoid entering other plots. While it's OK if you just cut a corner through a campsite, you should avoid doing it too frequently and avoid crossing through the middle of a campsite to avoid disturbing other campers. [Video] 1:56 - Other Campers' Plots 4. Avoid Taking Up Too Much Space It's also a violation of camping etiquette to take up too much space in a free site. This is a common sight at group campsites, where group tents are set up so far apart that other campers cannot easily fit in between them and will have to find other places to pitch their tents. On busy days, it can be difficult to find a place to pitch your tent. When setting up your tent, please be sure to take into consideration the crowded conditions, and make sure that the distance between tents is the same as other campers. [Video] 2:19 - Avoid Taking Up Too Much Space 5. Avoid Late Night Setups and Early Morning Takedowns Photo:A campground at morning Any activity that interferes with other campers' peaceful sleep late at night or early in the morning is also taboo. Driving stakes into the ground while others are sleeping can be disturbing. Even if you unintentionally arrive at the campground late at night, consider the time before loudly setting up. [Video] 2:56 - Late Night Setups/Early Morning Takedowns 6. Don't Leave Children Unattended Do not leave small children unattended. Campsites can be dangerous places, and they could get into some serious trouble. You wouldn't want to see them get seriously injured or badly burned by a campfire or other fire because you lost sight of them. [Video] 3:28 - Camping With Children 7. Be Careful When Playing With Flying Objects, Such as Balls, Frisbees, Drones, Etc. Photo:A drone Playing with flying objects is another thing to be careful of. When playing with balls, frisbees, drones, etc., you should always be careful to make sure that no one is around. Be sure to play in designated areas. You wouldn't like it if someone else's frisbee kept flying into your campsite, right? [Video] 4:16 - Flying Toys 8. Avoid Trouble With Your Kids At campsites, in order to avoid trouble, parents may need to find a place for their children to play in advance, or if the campsite does not have an open space, you might need to take measures to avoid your children from being scolded, such as not bringing play equipment that is unsuitable for that location (i.e., flying toys in small areas). [Video] 5:13 - Be Aware of Your Children 9. Avoid Causing Noise Pollution Noise is a common cause of trouble, as loud noises can be annoying. Adjust the volume when enjoying music or movies, and be considerate of the time of day. Remember that the campground is a public place. [Video] 5:40 - Noise Pollution 10. Be Careful When Consuming Alcohol Photo:Enjoying drinks while camping The video also touches on drinking manners. Don't mistake the campground for a bar/izakaya and overdo it. It's important to be aware of the time of day, and to be aware that you may disturb other campers while they're sleeping. Video] 6:35 - Manners for Consuming Alcohol 11. Keep the Cooking Area Clean It's bad camping manners to make a mess in the cooking area. Leaving food scraps and other debris in the cooking area drains is disrespectful to other campers. When washing cooking utensils, bring detergent, sponges, and plastic bags. [Video] 7:22 - Keeping the Cooking Area Clean 12. Be Careful of Sparks From Campfires Photo:A campfire When enjoying a campfire, be careful of sparks. Sparks can fly not only on your tent, but also to neighboring campers' tents and other gear. Sparks may scorch your tent or other items, so please be careful. [Video] 8:07 - Campfire Sparks 13. Open Flame Cooking Is Not Allowed at All Campgrounds Don't perform open flame cooking in an area where open flame cooking is prohibited. It's a violation of both manners and rules. It may even lead to a wildfire in some places. [Video] 9:07 - Check if Open Flame Cooking Is Allowed 14. Don't Burn Garbage in Campfires Burning garbage in a campfire is another violation of camping manners. Burning trash creates unwanted smoke and odors. [Video] 9:44 - Don't Burn Garbage in Campfires 15. Be Respectful Even When Staying in a Car Photo:Sleeping in a car Be careful not to leave the engine running overnight when staying in a car. The noise can disturb other campers. Overnight stays in a car should be done in a parking lot. [Video] 10:18 - Manners for Overnight Stays in a Car 16. Manners Regarding Pets The video touches on manners regarding pets as well. It's bad manners to release pets without a leash. Pets can bite other campers and cause major problems. [Video] 11:04 - Pet Manners 17. Be Aware of Your Surroundings When Setting off Fireworks Do not disturb others with fireworks. Sparks may fly and scorch tents and other objects. [Video] 11:56 - Fireworks Manners 18. Separate Garbage Properly Photo:Camping manners In Japan trash is separated by type. Be sure to properly separate trash, even at campsites. [Video] 12:26 - Separating Trash 19. Leave Your Campsite Cleaner Than It Was When You Got There It's also bad manners to leave your campsite messy when you're finished camping. Make sure you don't leave behind any garbage or charcoal. Try to leave your campsite cleaner than it was when you arrived. [Video] 12:48 - Clean Your Campsite 20. Everyone Has Their Own Way of Enjoying Camping Everyone enjoys camping in their own way. It's also bad manners to impose your own values on other people. [Video] 13:12 - Camping Is Different for Everyone Enjoy Camping in Japan With Proper Manners! When camping, it's important to have good manners as well as to follow the rules of the campground. It's also important to gather information about prohibited items and equipment at the campground in advance. Trouble can be caused by violations of manners regarding garbage disposal, illegal dumping, noise in common spaces, and many other factors. When camping in Japan, it's important to respect nature, have good manners, keep other campers in mind to avoid any problems. -
Video article 3:36
Camping in Japan - How to Clean Up After a Campfire! Key Points for Campfire Cooking in Japan!
Things to Do- 101 plays
- YouTube
Only You Can Prevent Wildfires Japan is currently experiencing an outdoor boom. As an island nation surrounded by the sea, Japan is also blessed with abundant nature. Because of this, it's possible to travel from the heart of Tokyo to a campground surrounded by nature in just a couple hours, and new styles of camping, such as solo camping, are on the rise. Camping is a lot of fun, but it's important to remember to clean up after your campfire to prevent wildfires and other accidents. In this article, we'll take a look at how to clean up a campfire. Video Introduction: Cleaning Up After a Campfire Photo:A campfire This video, titled "How to Clean Up After a Campfire at a Campground" (キャンプ場での焚き火の後片付け方), was uploaded by "Hiro, Camping" (ヒロ、焚き火). Campfires are used for a variety of purposes, including cooking and warmth. Some people simply like relaxing and getting lost in the flames of a campfire. That being said, cleaning up after a campfire is a necessary part of a safe and enjoyable camping trip in Japan. If you fail to clean up after a campfire, it can cause wildfires and other problems for many people. It's important to extinguish fires properly to protect our rich natural environment. Some Campgrounds Allow Open Flame Cooking, Others Don't Some campgrounds allow campfire cooking, while others do not. Be sure to check if the campground you're using allows open flame cooking. If open flame cooking is not allowed, you'll need your own campfire pit, fire sheet, etc. How to Clean Up Charcoal and Ashes After a Campfire Source :YouTube screenshot First, any coals and wood should be burnt down as much as possible. The extinguished coals and ashes can then be placed on a 60-micron aluminum foil. After that, clean up the surrounding area, picking up anything that has dropped under the fire pit. Restore the area to its original state as best as possible. [Video] 0:08 - Picking Up Ashes Water can then be poured over the collected charcoal and ashes. From there, you can wrap the remains in the aluminum foil compactly, removing as much air as possible. Then, wrap that in another sheet of foil and finally, place it in a plastic bag. If ashes from your campfire are scattered nearby, be sure to pick them up as well. Leaving ashes behind is a known cause of environmental pollution. The ashes, as well as the remaining charcoal will not decompose and be replaced by soil, so please do not bury them in the ground. After gathering the remaining ashes, pour water over them. Check the temperature of the ground around you just to be sure as well. Reducing the risk of fire as much as possible will not only protect you, but also other campers and the environment. Dispose of garbage from any meals you made while camping, as well as ashes and charcoal from campfires, in areas designated by the campground. Camp Fire Cleanup Summary Photo:Campfire remains When building a campfire at camp, clean up after the fire properly. Don't leave any ashes or coals behind with the mistaken belief that they will decompose. Failure to ensure that you clean up after a campfire could lead to a wildfire or other major problems. Keep in mind that even the slightest amount of carelessness can lead to a major accident. Everyone has their own way of enjoying camping and other outdoor activities, but remember that you're in a public place and should observe rules and manners. If you go to a campground that prohibits open flame cooking, don't forget to prepare a fire pit and other outdoor equipment. Please make sure to keep the cleanup of bonfires in mind with the video introduced here, and by all means, enjoy the rich nature of Japan while camping! -
Video article 5:00
A Popular Watercolor Instructor Teaches Watercolor Painting in 5 Minutes! Learn to Paint Beautiful Japanese Landscapes in Watercolor!
Art & Architecture- 28 plays
- YouTube
This video, titled "[Eng sub] 5min Easy Watercolor | Tree Painting tutorial," was released by "Watercolor by Shibasaki." In this lesson, Harumichi Shibasaki teaches tips for watercolor painting that are easy to understand even for beginners. In this lesson, you'll learn how to paint a realistic watercolor painting of a broad-leafed tree, such as the zelkova. The key to painting trees realistically is to be aware of the areas where the light from the sun hits and the areas in shadow. Then, using the dry brush strokes of a drained dry brush, I rough out the shape of the leaves. Enjoy how the colors gradually deepen on the canvas as if by magic. -
Video article 2:30
How to Fold a Kimono! A Simple Guide to Folding a Kimono Quickly and Compactly, Even With Little Space!
Traditional Culture Life & Business- 137 plays
- YouTube
Kimono/Yukata Folding: Video Introduction This video, titled "[Kazumi Style] How to Fold a Kimono (Men's and Women's)" (Kazumi流きもの/浴衣の畳み方(男女)How to fold Kimono/Yukata), was uploaded by "kazumiryu." This is a very clear and detailed explanation of how to fold kimono and yukata, which many people have trouble with. We hope it can be of use! A Surprisingly Simple Method for Folding Kimono/Yukata! Photo:Kimono Maybe you've worn a kimono/yukata before, or perhaps you even own one but aren't sure how to properly fold it. It can seem difficult at first, but once you get the hang of it, it is surprisingly easy to do. Folding a kimono properly not only makes it compact, but also prevents wrinkles. Also, when washing a yukata at home after it has been worn, folding it and putting it in a net before washing will help prevent wrinkles. The video shows how easy it is to fold a yukata, even in a small space where you've only got about a bed's worth of space. How to Properly Fold a Kimono + Correct Folding Order Photo:A folded kimono and folding paper Let's take a look at how to fold a kimono/yukata, even in a small space. The method for folding kimono and yukata is the same for men and women too, so don't worry about that! [Folding a Kimono/Yukata] ●Folding the Bottom Half of the Kimono ・Sit in front of the kimono and place the collar on the left side ・Hold the right half (wakisen, 脇線) with both hands and fold up along the seam ・Fold the okumisen (衽線) towards your body ・Fold the left side of the kimono over the right side that you folded towards your body ・Using both hands, fold the left half completely over the right half ・Check that the seam at the center back of the kimono is straight ・Fold up the bottom part of the kimono twice ●Folding the Top Half of the Kimono ・Bring the top half of the kimono to the front ・Place the left side over the right side as you did before ・Make sure the center of the back is straight ・Fold the collar inwards a few centimeters in a triangle shape ・Fold the left sleeve over the kimono and the right under the kimono Be sure to check out the video to see a detailed, easy-to-understand video demonstration on how this is done. [Video] 0:07 - How to Fold a Kimono Kimono and yukata can be stored with care if they are properly stored. Depending on how they are stored and other factors, they may be folded two or three times. In the two-fold method, the lower half of the kimono is raised to the top to make it half the length. For a three-fold, the hem is folded once around the bottom of the sleeve to prevent wrinkles in the sleeve, and then folded in half again to make a three-fold. If you fold a kimono in the way shown in the video, you can fold it compactly even in a small space such as on a bed or table. No Floor Space? Learn Sode-Datami, a Method for Folding Kimono While Standing Up! If you've gone somewhere and you're unable to lay your kimono on the floor to be folded, there's a method called sode-datami that allows you to temporarily fold your kimono. If you learn to do this, you can temporarily fold your kimono even without a table, which is very convenient. [Sode-datami Folding Method] ・Put the kimono on backwards, with the back facing forward ・Align the sleeves by putting your arms through the cuffs ・Pull your arms out one side at a time so as not to shift the cuffs ・Hold the corner of the sleeves with one hand and the body of the kimono with the other hand from the top ・Fold the sleeves over the front of the body of the kimono ・Hold the kimono with both hands and adjust the kimono so that it is straight ・Hold the top and bottom of the kimono so that it does not fall apart, and fold the top part of the kimono towards the bottom half ・Fold it in half once more to complete the sode-datami folding method Sode-datami is a method of folding yukata and kimono for temporary storage. For example, when you are out and have little time. However, when you return home, you should fold the kimono properly before storing it. [Different Methods for Folding Kimono] There are several methods for folding kimono: ・Hon-datami ・Sode-datami ・Yogi-datami ・Juban-datami ・Haori-datami Summary of How to Fold Kimono/Yukata Photo:A woman wearing a yukata In addition to wearing yukata to fireworks displays and summer festivals in Japan people also wear kimono for occasions like Miyamairi (a shrine visit for newborns), Shichi-Go-San, Coming-of-Age Day, graduation ceremonies, and even weddings. Although you might have the chance to wear a kimono, you might not have the chance to fold one. Especially in the case of rental items, stores generally take care of the cleanup afterwards, so there are even many Japanese people who have never seen how to fold kimono. Kimono and yukata have an image of being somewhat difficult to fold, so start by practicing sode-datami. From there you can learn to fold a kimono properly with the help of a video or something. Once you get the hang of it, it is surprisingly easy to fold a kimono! The kimono folding method introduced here can also be applied to furisode and nagajuban. If you ever find yourself trying to fold a kimono, be sure to use this article/video as a guide! -
Video article 12:47
Let's Draw Some Japanese Style Pictures! Refine Your Artistic Ability! Learn to Color With a Japanese Painter's Sketchbook!
Art & Architecture- 30 plays
- YouTube
This video, titled "【ENG Sub】How to make Japanese Painting "NIHONGA" -from Sketching to completion-," was released by "Nihonga Painter Miwa Hiduki." The process for making great pictures is 1. Sketching 2. Rough outline 3. Tracing 4. Outlining 5. Coloring After deciding on a motif, you can start sketching. Try expanding on the motif shown in the video and sketching. In the video she uses tracing paper and transcribes the rough sketch. The next step is to outline, an important step in Japanese painting. Once the outlining is complete, the coloring begins. Check out the beautiful sketches shown in the video. It will stimulate your creativity! -
Video article 5:54
CB Cans - A Cheap, Easy-To-Use, and Convenient Alternative to OD Cans When Camping IF You Know Their Limitations…
Things to Do- 45 plays
- YouTube
The Two Types of Gas Canisters for Camping in Japan Whether it be solo camping or family camping, the number of campers in Japan is increasing rapidly. Gas canisters, both CB cans and OD cans, are a must-have item when it comes to cooking while camping. In this article, we'll focus on the advantages of CB cans for beginners who aren't familiar with the differences between Japan's different gas canisters. Video Introduction: CB Cans - Readily Available at 100-Yen Shops All Across Japan This video, titled "[Gas] The Difference Between CB and OD Cans (Which is Better for Camping? Explaining the Key Differences Between the Two)" (【ガス】CB缶とOD缶の違いについて(キャンプでは結局どっちがいいのか? 使い分けのポイントについて解説)), was uploaded by "sugita outdoor channel" (杉田アウトドアch / sugita outdoor channel). Sugita, the camper in the video, enjoys solo camping and auto-camping in small groups. He explains the advantages of CB cans, which are cheap and easily obtainable in Japan, and how they're different from OD cans. CB Cans Photo:A gas stove A CB can, short for "Cassette Gas Bombe," is a gas canister often used in household stoves in Japan. It has the following characteristics: ・Pros The advantage of choosing CB cans is that they are inexpensive, costing only about 100 yen per canister. Their thin and compact shape makes them easy to store, and they can be easily purchased at convenience stores and supermarkets in Japan. Furthermore, in the past, there were not many burners that could be used with CB cans, but the number of burners compatible with CB cans has increased dramatically in recent years, making them more accessible. ・Cons When the temperature of the canister drops below 5°C, a pressure drop occurs that causes the output of the can to decrease. In severe conditions, such as below freezing temperatures, CB cans may become unusable. Those planning to camp in winter should be especially careful. [Video] 0:42 - CB Cans OD Cans Photo:An OD can An OD can, short for "Outdoor can," is a gas canister designed for outdoor use. Compared to CB cans, which are long and narrow, OD cans are characterized by their sturdier shape. ・Pros OD cans can be used in colder conditions, such as during the winter or when climbing high-altitude mountains. Those camping in the dead of winter or climbing mountains at high altitudes will want to bring OD cans with them. ・Cons OD cans are more expensive than CB cans, costing about 500 yen per can, and they are larger than CB cans, making them difficult to store. Another disadvantage is that they are difficult to obtain, being purchasable only at outdoor specialty stores or online. Useful Items to Have With CB Cans Photo:Solid fuel Sugita, the video creator, says that he has never experienced any trouble using CB cans when camping. However, he mentions that he actively prepares so that he can avoid problems when using CB cans. In order to prepare for situations where you can't use a CB can, such as on a cold morning, here are some useful items you can take with you. ・A Heater To keep the CB cans in usable condition, they should be kept from the cold as much as possible. To aid in this, a heater is a useful item to have. Even in the worst-case situation where a CB can is not available, you can still boil water on the top of the heater. It's also a good idea to protect the gas canister by wrapping a cloth around it to prevent it from getting cold in the open air. ・Solid Fuel You can also bring solid fuel just in case you need to boil water for making hot beverages. They're quite compact, so be sure to bring several. ・OD Cans It is a good idea to have at least one OD can with you in case of an emergency. It will also be useful in the early morning when the temperature is lower. ・Fire Starter It's hard to keep warm when it's cold. We recommend bringing items that can easily start a fire. Gas Canisters and Expiration Dates When storing CB and OD cans, care should be taken to avoid gas leaks and you should also be weary of expiration dates. Gas canisters deteriorate over time. While they have a long shelf life (approximately 7 years from the date of manufacture), you should be sure to check the manufacture date on the bottom of the can. Also, if there are any deformities or rusting on the lid or the cylinder, it's possible the cans are deteriorating at a faster rate than normal. Storing Gas Canisters Photo:A gas canister Gas canisters should be stored away from fire and direct sunlight, and in a dry place below 40°C (104°F). It's also dangerous to place them near cooking areas where fire is present, on the ground under the scorching sun, or in a car, even if you're camping or do other outdoor activities. Properly Disposing of Gas Canisters When disposing of CB or OD cans, be sure to use them up before discarding them. Whether or not to puncture the gas cans after they are used up depends on the local government. Check the disposal method of the local government in advance and dispose of the cans accordingly. Summary of Japan's CB Cans, a Convenient Piece of Camping Equipment CB cans are cheap, available at most supermarkets in Japan, and are very useful! However, if you purchase them without knowing how they work, you might find yourself in an undesirable or possibly even dangerous situation. Be especially careful when camping in winter. Don't forget to prepare other items to keep the gas canisters from getting too cold and also backup items in case it does happen. OD cans are another great item to have in case it gets colder than you were expecting. There are many awesome campgrounds in Japan. Enjoying hot meals and warm drinks while camping in the crisp, clean air of winter is truly a unique experience as well. Be sure to check the weather conditions on the day of your camping trip so you can be well equipped and ready to go! -
Video article 6:10
How to Make a Chopstick Rubber Band Gun: An Easy to Follow Tutorial Video for the Handmade Toy. All You Need Is Rubber Bands and Chopsticks to Create a Powerful, High-Quality Toy!
Things to Do- 2.02K plays
- YouTube
Chopstick Rubber Band Guns! This video is titled "Easy★How to Make Chopsticks Rubber Guns★Handmade Toy" (簡単★ 割り箸ゴム鉄砲の作り方 ★手作りおもちゃ). The chopstick rubber band gun is a popular toy among Japanese children. It uses chopsticks, which is a very familiar item for Japanese people, to create a gun shape by tying them together with rubber bands. They're not too difficult to make, so try to follow along and make your own as we explain the process. Making a Chopstick Rubber Band Gun Source :YouTube screenshot First, prepare 3 wooden chopsticks, a few rubber bands and a pair of scissors. If the chopsticks are still stuck together, break them apart so we can begin making the rubber band gun. As you can see at 0:37 in the video, we'll be using the chopsticks and rubber bands to assemble it. The grip of the gun is made by cutting the chopsticks into pieces with scissors. This is shown at 2:11 in the video. The firing mechanism of the chopstick rubber band gun is simple, and you can make the rubber band fly far by hooking one to the finished gun and shooting. When you finish making one, use a laundry clip as a scope to aim at your target. You can see the rubber band gun being shot at 5:45 in the video. Making a Strong Chopstick Rubber Band Gun Photo:Chopstick Rubber Band Gun You can make cool handmade guns other than the one in the video, such as a laundry clip pistol, a multi-fire pistol, dual handguns, and a gatling gun. There are even crazy strong guns like machine guns, sniper rifles, and semi-automatic gun. Use the internet to search how to make the more advanced rubber band guns and try making one with your friends! These days, there are classes and workshops for chopstick rubber band guns. We recommend giving one a try! Rubber Band Gun Competitions The Japan Rubber Band Gun Shooting Association was established in November 2000. It is an organization that aims to popularize rubber band guns, including the chopsticks rubber band gun variation. The Japan Rubber Gun Shooting Association has established three rules: Matchbox, Fly Shoot, and Coin Pendulum, as official rubber band gun competitions, and there are also events and competitions held. Summary of Rubber Band Chopsticks Source :YouTube screenshot In this article we talked about how to create chopstick rubber band guns. The chopsticks rubber band gun is a handmade toy that can also be enjoyed by adults. We recommend making one during your summer vacation! Check out the video to see how to make chopstick rubber band guns and try to create a powerful device! 【Official Website】Japan Rubber Band Gun Shooting Association http://www007.upp.so-net.ne.jp/jrbgsa/syagekitop.html -
Video article 5:37
Beigoma - The Traditional Japanese Spinning Top Loved by Children and Adults Alike! Become a Beigoma Master With the Help of This Video!
Things to Do- 1.36K plays
- YouTube
Beigoma - Traditional Japanese Tops! This video, titled "[Beigoma- 1. Tie it 2. Wind it 3. Hold it 4. Let it rip! - Tokyo Beigoma]" (「ベーゴマの、1.ヒモの作り方、2.ヒモの巻き方、3.持ち方、4.投げ入れ方 | 東京ベーゴマ」), is created by "Tokyo Beigoma" (東京ベーゴマ). The video is an introduction to Beigoma for beginners. This video clearly explains how to play with Beigoma and also teaches basic techniques for spinning Beigoma that are often difficult for beginners. After watching the video, you'll be on your way to becoming a Beigoma master in no time! If you're a total beginner, don't worry, this video has you covered! Traditional Japanese Beigoma Photo:Beigoma showdown Koma are ancient Japanese toys said to have originated in Heian period (794-1185) Kyoto when people played by spinning shells with string. Beigoma is a kind of Koma (Japanese spinning top) made of cast metal. It was a popular toy among kids from the Taisho period (1912-1926) to Japan's economic boom. To play Beigoma, you make a playing board by stretching a thick fabric sheet partially over a bucket or a barrel, and players spin their Beigoma onto the surface and have them bang against one another. Although Beigoma is an old toy, there have been many more people playing with Beigoma, Menko (an old Japanese card game), and other old-fashioned toys, due to a revived interest in old‐fashioned goods. Also, there are "new" Beigoma based toys such as Beyblade (ベイブレード) and Beigoma Spin Heat (ベイゴマスピンヒート), which are very popular among kids and sold at toy stores and online. Beigoma competitions are also becoming popular. The smartphone app "Beigoma Stadium" (ベイゴマスタジアム) is popular among adults as well. There are various types of Beigoma. Pecha (ペチャ) is the thinnest Beigoma and is harder to control but quite strong. Pe-oh (ぺ王) is the most difficult to control but is the most powerful. Chu-daka (中高) is short but easy to spin. Maruroku (丸六) is the best for beginners. Kakuroku (角六) is easy to spin and is also quite strong. Taka-oh (高王) is about 1.5 times the size of Maruroku, and Bay (バイ) is easy to spin and lasts a long time. Beigoma players also modify their Beigoma and make their own original versions. How to Play Beigoma Source :YouTube screenshot Now we'll introduce how to play Beigoma. First, make a string to wrap around the Beigoma (video 0:07). Tie the string and make a few knots. Next up is the winding process. There are several ways to wind the string, such as Onnamaki (女巻き), Otokomaki (男巻き), and Jujimaki (十字巻き). In this video, we'll learn Onnamaki. (~2:14). First, make sure the tip of the Beigoma sits between the knots on the string. From here, press and hold the end of the string onto the Beigoma with your thumb, and wind the string around the beigoma while keeping the pointed tip of the Beigoma between the knots. Next, wrap the string counterclockwise around knots while holding the string tightly with your fingers to prevent it from unraveling. Wrap it slowly in a circle, and your done! Next we'll learn how to hold the Beigoma. Hold it with your thumb and index finger, and wrap the rest of the string around your pinky and grab ahold of it. (~3:34) Source :YouTube screenshot Finally, let your Beigoma rip! (~4:11) Make sure not to throw it at an angle when launching it onto the playing board. Place your right foot close to the board, making sure to launch the Beigoma on the board, and as soon as you launch it, pull the string tightly. Summary of Traditional Japanese Beigoma Photo:Beigoma Did you enjoy learning about Beigoma? The video gives simple instructions on how to play with Beigoma, so even if you've never done it before, don't be shy! You'll be able to throw some awesome Beigoma in no time! If you're interested in traditional Japanese toys, be sure to check out the video! -
Video article 4:17
Cute Akita Dogs Bring a Smile to Anyone’s Face! The Cute, Gentle, and Loyal Dog, Native to Japan, Is Becoming a Popular Breed Around the World!
Living Things- 341 plays
- YouTube
The Cute Akita Dogs of Japan This video, titled "Akita dogs - Loyal Japanese Dogs" (秋田犬 〜忠誠心に厚い日本の犬〜), is an introductory video that shares the charm of Akita dogs, famous for Shibuya Station’s Loyal Dog Hachiko. The video was produced by "JVT Channel." The Akita is a Japanese dog that has been designated a national natural treasure and is very familiar to the Japanese people. Loyal and gentle, the Akita is a popular dog in other countries as well. In this article, we'll take a look at the adorable Akita! The Akita Photo:Akita dog Akita, not to be confused with the prefecture of the same name, are a Japanese dog breed. Their gentle and loyal nature has made them a popular dog around the world. They have a lovely round face, triangular ears, and a curled-up tail. The Akita Dog comes in a variety of coat colors, such as brindle, but the most common color is red fawn. The red variety has a reddish-brown tinge around the forehead and on the back. They are sold at pet stores at prices ranging from 60,000 to 120,000 yen. It is the only large dog among the six types of dogs native to Japan and stands about 61-67 cm tall, with a life span of 10-13 years, which is the average for large dogs. Contrary to its larger size, their gentle characteristic are one of the main reasons for their popularity. You can see the features of the Akita dog at 0:07 in the video. The Akita dog's ancestors lived in the city of Odate, Akita Prefecture, in the Tohoku region of Japan. After dogfighting became popular in Japan, the Akita was crossed with the Tosa Inu and Mastiffs and became larger, which led to their current form today. Since they are large dogs, they need to be trained from when they are puppies and need to be walked regularly, as they were originally hunting dogs. The Charm of Akita Dogs - Obedient and Energetic Pets Photo:Akita Dog The charm of Akita dogs are their cute faces and gentle nature. There are several types of Japanese dogs, including the small Shiba Inu (dog), and the medium-sized Kishu inu, Shikoku inu, Hokkaido inu, and Kai inu, but among them, Akita dogs are considered the most loyal and gentle. At 0:47 in the video, you can see the bronze statue of Hachiko in front of Shibuya station in Tokyo, where he waited for his master every day, for nearly 10 years after his master had already passed away. His loyalty is still praised today. The original Akita dog was bred as the Akita Matagi (a hunting dog), but the number of Akita dogs has declined dramatically in recent years due to the growing popularity of small, easy-to-keep dogs and other indoor breeds. However, in recent years, the Akita has begun to attract attention again! There was a news that an Akita dog was sent as a gift to the Russian figure skater gold medalist Alina Zagitova, and she named it "Masaru." In addition to Zagitova, many foreigners have become fascinated by the Akita, and more and more people are adopting them as pets. Source :YouTube screenshot The city of Odate in Akita Prefecture, the birthplace of the Akita dog, is also working to promote the dog's appeal to a wider audience. They visit nursing homes and elementary schools to allow communities to interact with them. You can see this at 2:10 in the video. In Odate, you can also visit Akita Inu no Sato (Akita Dog Visitor Center) and interact with the dogs. Summary of the Cute and Gentle Akita Dogs Photo:Akita Dog The video, "Akita dogs - Loyal Japanese Dogs," produced by "JVT Channel" is an introductory video that shares the charm of Akita dogs. Although the number of Akita dogs is decreasing due to the popularity of small, easy-to-keep dogs, the Akita is by far the cutest and most loyal. They are loyal to their owners, and their gentle nature attracts many people. If you're a dog lover, this video is a must watch! -
Video article 3:07
Japan's Vending Machines Are Evolving Every Year! Introducing the Latest Vending Machines Using Touch Screens and E-Money, That Can Only Be Found in Japan!
Shopping Things to Do- 439 plays
- YouTube
Japan's Amazing Vending Machines! The video we’ll introduce this time is titled "Japanese Vending Machines are AWESOME 日本の自販機すごい!!" It introduces some of the awesome vending machines you can find throughout Japan! The vending machines shown in the video can only be found in Japan, so be sure to check them out! The Vending Machines in the Video! Photo:Digital signage As you can see from 0:26 in the video, many of the vending machines placed in Japanese stations can accept not just cash, but train cards (electronic money such as Suica, etc.) as well. You can purchase coffee, tea, and juice just by tapping your card against the vending machine, so there's no need to carry any bothersome change. Japanese vending machines sell cold drinks, and in the winter there are hot drinks as well. This is a unique characteristic of Japanese vending machines that you won't find in other countries. A vending machine at Akihabara station is introduced at 2:05 in the video as well. This vending machine has a touchscreen and the description of each drink is displayed on the screen. There's also a vending machine for ice cream shown at 2:35 in the video. Features of Japan's Futuristic Vending Machines Photo:Vending machine Vending machines are handy machines where you can purchase a drink at the push of a button. The drinks are cheap too, costing only about 100-160 yen. Japan is said to be the vending machine superpower of the world, and there are about 2.56 million vending machines in Japan, which generate a whopping 2.2 trillion yen annually. They’re placed in various places throughout towns, and places like stations and offices, so you can grab a drink whenever you like. Types of Vending Machines and the History of the Vending Machine Vending machines were invented in Japan more than 100 years ago in 1890. Thereafter, from the Showa period (1926-1989) to the Heisei period (1989-2019), the types and provided services of vending machines continued to evolve. In recent years, there are even vending machines where you can purchase hot meals that include things like Takoyaki, and there are also vending machines that are used to take orders and dispense tickets at restaraunts. You can even get train tickets with vending machines. There are a fixed set of rules regarding the location and height of Japan’s vending machines, and they are placed according to these safety standards. Summary of Japan's Vending Machines Photo:Vending machine This article introduced talked about the different types of vending machines that can be found throughout Japan, and how to buy products from them. The functions of vending machines continue to evolve year after year and there are an increasing number of them making it more convenient to get what you need, and it's even gotten easier to pay thanks to things like electronic money. The vending machines that Japanese people use in their day to day lives are often seen as amazing futuristic devices. If you're planning on visiting Japan, be sure to keep your eyes peeled for some amazing vending machines! -
Video article 3:10
The Urasenke School of Tea Has Detailed Rules on Not Only How To Drink Tea, but Also on How To Take Sweets! Experience the Hospitality of Japan's Ancient Tea Ceremony!
Traditional Culture- 1.17K plays
- YouTube
The Etiquette of Light Tea and Sweets in the Urasenke School of Tea Ceremony This video, titled "【Urasenke Chado】Usu-cha and Light Sweets (【裏千家茶道】お菓子と薄茶のいただき方), was released by "Koko Chashitsu." In the traditional Japanese tea school of Urasenke, there is etiquette that says one must have omogashi (main sweets) with koi-cha (thick tea) and higashi (dried sweets) when drinking usu-cha (thin tea). Let’s check out the etiquette of Urasenke’s light tea and sweets by watching this video. The Etiquette of the Urasenke School of Tea Ceremony Photo:Matcha and Wagashi After the tea has been served by the host, the guest of honor will say "お先に" (O saki ni "Please excuse me for drinking first") while bowing to the second guest of honor, then place the tea bowl in front of their knees and say "お点前ちょうだいします" (O te mae choudai shimasu "Thank you for the tea"). This can be seen from 0:06 in the video. Following this, they take the tea bowl in their left hand, put their right hand on the side of the bowl, and drink after having rotated the bowl clockwise twice. The last sip will be sipped while making a slurping sound, cleaning off the drinking area with one's index finger and thumb, then cleaning the fingertips with a special paper called kaishi. After that, the tea bowl is placed on the outside edge of the tatami mat, returning it with both hands. One of each kind of the higashi that are served in the sweets container should be taken by hand and eaten after bowing once. If there are 2 types of higashi, proper etiquette is to take the one furthest away from you first and then the one closest to you. You can see the higashi being eaten from 0:16 in the video. The Tools Used by the Urasenke School of Tea Ceremony Photo:Tea Ceremony Other than the tea bowl, there are various tools used for tea ceremony. In the Urasenke school of tea ceremony, these include the "chasen" (茶筅, bamboo tea whisk), "hishaku" (柄杓, ladle), "chashaku" (茶杓, bamboo tea spoon), "mizusashi" (水指, container for fresh water), "kensui" (建水, container for waste-water), "futaoki" (蓋置, rest for the lid of a teakettle), and the "chakin" (茶巾, tea cloth). The tea bowl is placed before the knees and the brazier is placed directly in front of the "Katomado" (bell-shaped window). As for the "fukusa" (silk cloth) which is used when handling tools in the Urasenke school of tea ceremony, women use red or plain vermilion colors and men use a plain purple color. In addition, in tea ceremony, there are detailed teachings on the meaning of the tools and how to properly handle them, such as the "Shikaden" (四カ伝 "four transmissions"). More About the Urasenke School of Tea Urasenke is one of the grand master tea schools of tea ceremony. The name Urasenke was given because as opposed to the main family Omotesenke (omote = front) who succeeded Sen no Rikyu, Konnichian was seen from the back (ura) when looked at from the street. The Urasenke school of tea ceremony, as well as Omotesenke and other schools all have detailed differences in etiquette regarding usu-cha and koi-cha and the order in which things are done. There are events such as Ryurei and Hatsugama at the grand master tea schools, so if you're interested consider checking these out as well. Summary of Urasenke's Tea Etiquette Photo:Tea Ceremony The video goes over the method of drinking tea according to the Urasenke shool of tea ceremony. Tea ceremony may seem difficult, but there is a point in learning the etiquette, so it's easy to get hooked once you experience it. There are tea ceremony schools giving lessons all over Japan, so if you are interested, consider checking out their websites, looking for a school nearby, and learning how it's performed? You may even find yourself receiving a certificate if you study hard! 【Official Website】Urasenke Official Website http://www.urasenke.or.jp/texte/index.html -
Video article 10:31
How to Clean and Dry a Tent After Camping in the Rain! Useful Tips and Appliances for Camping in Japan!
Things to Do- 122 plays
- YouTube
Enjoy Camping Even During Japan's Rainy Season Japan has four distinct seasons, each of which has its own variety of natural beauty to enjoy, such as cherry blossoms and autumn leaves. However, after spring comes the rainy season, otherwise known in Japanese as "tsuyu." Camping is experiencing a big boom in Japan right now, and so, in this article, we'll introduce how to clean up when it rains during a camping trip. Video Introduction: How to Clean Up After Camping in the Rain and Useful Appliances Photo:Camping in the rain This video, titled "How to Clean Up After Camping in the Rain and Useful Appliances" (雨キャンプ後のテント片付けと、便利な物を紹介), was uploaded by "HIRO channel," a channel focused on introducing various camping-related videos. Have any of you ever had the experience of being rained out during a camping trip? Tents are already a pain to pack up and clean, but this is especially true if it rains when camping. Mud and dirt get stuck to your tent and other equipment making it a hassle to clean. Perhaps you don't even want to try camping in the rain because of how difficult it may seem. Well, this video will show you how to easily clean up your tent and tarps after camping in the rain, as well as some useful tips to make cleaning your camping gear easier. Be sure to check out this quick 10-minute video to learn how to easily clean up and maintain your tents and other equipment. What to Do When It Rains While Camping Photo:A campground In Japan where it's said to rain on average about once every three days, it's not uncommon that the weather turns to rain on the day you're going camping. Thus, although not mentioned in the video, we'll first introduce a few measures to take when camping in the rain. First, when camping in the rain, be careful where you set your tent up. Avoid camping near rivers and set up your tent on gravel or other areas with good drainage. Next, when setting up your tent, hang the tarp first, then the tent. This creates a space to keep out the rain and makes the process go more smoothly. If it's raining when you're packing up to leave, we recommend putting the tarp away last. In addition, to combat the rain, tents and tarps should be coated with a water repellent to keep rainwater off them, which will make your job easier when it comes time to take them down. Finally, place a sheet under the tent to combat the rain. This will prevent water and dirt from getting into your tent and make cleanup easier. Knowing the above measures will help you safely enjoy a camping trip even in the rain. Pack It in a Dry Bag and Head Home Source :YouTube screenshot Cleaning up a tent after camping in the rain can be very difficult. It can be especially difficult to take home a tent that is covered in dirt or sopping wet. That being said, if your tent or tarp is large and you have a lot of stuff, pack it wet in dry bag, such as the "Coleman 110L Dry Bag." The large capacity makes it very convenient, especially when compared to carrying several smaller garbage bags made of thicker material. Rinse With Water After You Get Home When you arrive home, first wash your tent or tarp with water. The dirt will be even harder to remove once it dries, so it's important to wash it before the dirt has a chance to dry. After washing off the dirt, hang the tent outside in a covered area, such as under the eaves of your roof or on a balcony, or inside in a bathroom. Dry in the Sun or With Convenient Appliances Source :YouTube screenshot Once water is no longer dripping from the tent/tarp, allow it to dry. Make sure to dry it thoroughly, as, if not properly dried, mold can start to grow. As for drying, if the weather is good, dry it in the sun. If it's difficult to dry in the sun due to rain, a clothes dryer or futon dryer can be used. If you put a washed tent or other items in a drying bag, a tent will dry in about 4 hours. If you place a sheet or mat on or under the bag, you can kill two birds with one stone by drying them together. Even if not directly wet from the rain, sleeping bags and other items may be damp as well, so we recommend that you dry them in a bag made for drying bedding. This is a really handy trick for cleaning up after a rainy camping trip. And That's How You Handle Camping in the Rain As shown in the video, the first thing to do when you finished camping during a rainy camping trip is to quickly bring back the we gear and dry them thoroughly after rinsing them with water. In addition, if you make use of some convenient household appliances, cleaning up after a rainy camping trip will be a breeze. If you've had a bad experience camping in the rain and felt discouraged from going camping because of the cleanup, consider trying these methods to help make your camping trip one to remember! "HIRO channel" uploads a variety of videos. You can enjoy various camping videos, including introductions of camping gear, camping videos showing different areas, camping cooking videos, and more. Be sure to check them out! -
Video article 5:57
Hiyashi Chuka - A Delicious Japanese Chilled Noodle Dish! Learn How to Make These Refreshing Noodles and Stay Cool This Summer!
Food & Drink Traditional Culture Life & Business- 45 plays
- YouTube
Video Introduction This video, titled "Japanese Cold Ramen Noodles HIYASHI CHUKA RECIPE," was uploaded by "TabiEats," a channel that introduces food from various countries and travel destinations. Shinichi and Satoshi introduce how to make the Japanese dish hayashi chuka, and the video has tons of comments saying how great the recipe is. Hiyashi chuka is a dish of chilled Chinese noodles in a Japanese-style recipe. It's a popular Japanese dish both in Japan and around the world. In the comments section of the video, people even mention that it's a great recipe if you can't find many Japanese-style ingredients at your local supermarket. If you're looking for a refreshing noodle dish to cool off this summer, be sure to give this recipe a try! A Classic Japanese Summertime Dish: The History of Hiyashi Chuka and More! Photo:Hiyashi Chuka Hiyashi chuka is a Japanese noodle dish served chilled and topped with vegetables, Japanese-style omelet, ham, and other ingredients. Despite using Chinese noodles, the dish originated in Japan. In Japan's Kansai region, it is popularly known as "rei-men" (冷麺, lit. 'chilled noodles'). There are several theories as to how hiyashi chuka came to be. One theory is that a Chinese restaurant in Sendai, Miyagi, invented the dish to boost summer sales. Another theory is that a Chinese restaurant in Kanda, Tokyo, was inspired by a Chinese noodle dish and combined it with Japanese zaru soba (cold soba noodles). Hiyashi chuka is now a popular summer dish in Japan. Many restaurants serve it as a limited-time summer menu item. If a restaurant in Japan has started selling hiyashi chuka, you'll know summer has arrived in Japan! Hiyashi chuka is perfect for the hot summer months because it's cool and goes down smooth, and vinegar is used to stimulate the appetite. In Japan, hiyashi chuka has become a popular dish and is now sold at convenience stores and supermarkets. A Simple, Basic Recipe for Hiyashi Chuka! Photo:Hiyashi Chuka Ingredients Ingredients for hiyashi chuka are generally cucumber, ham, tomatoes, and tamagoyaki (Japanese omelet), but ingredients vary from restaurant to restaurant and home to home. You can choose whatever ingredients you prefer. For noodles, use ramen noodles; it is important to cool them thoroughly after boiling so they don't continue to cook. For sauce, soy sauce, vinegar, sesame sauce, and ponzu are commonly used. Recently, however, many different arrangements have been devised, and there's a wider variation in taste and appearance, from spicier flavors to recipes using different kinds of ingredients. Here, we'll go over the basic recipe for hiyashi chuka. [What to Prepare] (Noodle sauce) ・Soy sauce - 4 tbsp ・Sugar - 2½ tbsp ・Rice vinegar - 2 tbsp ・Water - 1 tbsp ・Sesame oil - 1 tbsp ・Grated ginger - 1/4 tsp (Ingredients) ・Eggs - 2 ・Sugar - 1 tbsp ・Salt - A dash ・Cucumber - 1/2 ・Tomato - 1/2 ・Ham - 3-4 slices (Noodles) ・Ramen noodles - 1 pack [Preparing Hiyashi Chuka] 1. Combine all the ingredients for the sauce, mix well, and refrigerate. 2. Add sugar and salt to beaten egg and fry thinly in a pan. 3. Thinly slice the cucumber, ham, and egg into thin strips. Cut the tomato into fourths. 4. Boil noodles until al dente or to your liking, then cool in ice water. Arrange the noodles on a plate, top with the ingredients, and pour the sauce over the noodles to complete the dish. You can see how the ingredients are cut in the video. [Video] 1:43 - Cutting ingredients into strips [How to Make Hiyashi Chuka Sauce] Mix the seasonings for the tare. The recipe for hiyashi chuka sauce is very simple! Simply mix the ingredients together. If you want to eat it chilled, make the sauce ahead of time and refrigerate it. Hiyashi Chuka - A Delicious Japanese Dish Using Chinese Noodles Photo:Hiyashi Chuka This is a nice and easy recipe for making hiyashi chuka chilled noodles. The appeal of hiyashi chuka is that you can easily change the flavor to your liking. You can also arrange it using your favorite ingredients and sauce, so we will introduce some simple ways to prepare it. ・Change the Ingredients You can use pork instead of ham, or a half-boiled egg instead of a thinly sliced omelet. You can also try using avocado or tuna. ・Add More flavors Using the same simple recipe above, add ground sesame, chili oil, mayonnaise, Japanese mustard, etc. for a different taste. ・Boil the Noodles Differently The way you boil the noodles changes how firm they are, so adjust the boiling time to suit your own preferences. ・Change the Sauce There are many different ways to make sauce for hiyashi chuka, but simply mixing the seasonings makes it easy to create a delicious sauce. When eating hiyashi chuka, ponzu or mentsuyu may be used as a base. Sesame sauce made with kneaded sesame is popular for its rich flavor. Summary of How to Make Hiyashi Chuka, a Japanese Chilled Noodle Dish In this article, we introduced a basic recipe video for hiyashi chuka, a chilled Chinese noodle dish made in Japan. The video shows exactly how to make the dish, so be sure to check it out. Sushi, ramen, tempura, sukiyaki, and other Japanese dishes are popular all around the world. Hiyashi chuka, a popular Japanese dish during the summer, can easily be made outside of Japan with a simple recipe. Beautifully arranged with a variety of colorful ingredients, hiyashi chuka is a delicious dish that looks great on Instagram. Be sure to look up hiyashi chuka to see some of the different ingredients and serving styles. Another appeal of hiyashi chuka is that you can change the flavor of the dish depending on the ingredients, sauce, and toppings. Why not make your own version of hiyashi chuka this summer and stay cool even in the summer heat? -
Video article 1:53
Feel the Spirit of Japan With the Beautiful Prayer "Kagura," at Ise Shrine in Ise, Mie Prefecture! Introducing Highlights of Popular Sightseeing Spots That You Won't Want to Miss When Visiting Ise-Shima!
Traditional Culture History- 586 plays
- YouTube
Video introduction of “Mikagura” prayer at “Ise Jingu” in Ise City, Mie Prefecture This is a video produced by "Ise Shrine Official Channel (ISE-JINGU)" called "[Ise Shrine] Shrine Devotional Prayer Okagura ISE-JINGU" (【伊勢神宮】神宮のご祈祷 御神楽 ISE-JINGU). Ise Shrine is a shrine with a long history that has been worshipped in Japan since the time of mythology. The god of the Imperial Grand Shrine (the inner shrine), is Amaterasu Omikami, and the god of Toyokami Grand Shrine (the outer shrine), is Toyouke Omikami. This charming shrine with plenty of nature is located just past Uji Bridge, the entrance to the inner shrine, and is affectionately called "Oise-san" by tourists. Please enjoy the prayer of Ise Shrine, as it's not something you get to see every day. The Prayer "Okagura" at Ise Shrine, Mie Prefecture Photo:Miko with Kagura bells Kagura, dedicated at the Kagura Hall of Ise Shrine, is a ceremony of exorcism in which sacred sake is served before the gods. The ritual prayer, introduced at 0:35 in the video, is one of the most important rituals of Shinto. After the ritual prayer, there is a dance performance (0:53) that shows Yamato-mai, and from 1:08 a long ceremonial dance by the Prince of Lanling. After the Kagura, worshippers pray, as seen at 1:40 in the video Ise Shrine, Mie Prefecture - A Historic Tourist Attraction With Tons of Highlights Photo:Ise Shrine Many tourists visit Ise City, Mie Prefecture to visit Ise Shrine. Don't forget your shuin when you visit! After worship, it's recommended that you purchase a good luck talisman. At Ise Shrine, there are also festivals, such as the Kagura Festival, the Shin-an Festival, and the Kamigyo Festival. We definitely recommend checking these out. On the approach to the outer shrine of Ise Shrine, there's "Houonkan (1F Senokuniya, Syoujirou / 2F Magatama Tei)," "mirepoix," "French cuisine Bon Vivant," "Mitsuhashi Ponju," "Ise Kikuichi," "Akafuku Gekumae Special Shops” and other places where you can enjoy lunch and local gourmet! You can enjoy Japanese sweets such as Akafuku mochi and dumplings, and even eat around. After visiting the geku, go to the naiku where Amaterasu Omikami, the guardian deity of the Japanese people who reigns over the other the eight million gods, is enshrined. "Chōzuya," "Ujibashi," "Isuzu-gawa Mitarashi," "Takimaturinokami," "Goshogu," and "Kazahino minomiya," are full of attractions! There are hotels and inns such as "Toba International Hotel", "Shima Kanko Hotel Bay Suite" and "Ikadaso," so you can enjoy your trip to Ise-Shima even if you're staying overnight. Be sure to enjoy the "profit spot" and the power spot as well. Sightseeing Around Ise Shrine Photo:Okage Yokocho lanterns The area around Ise Jingu is also home to other attractions such as Tagamiya Shrine, Sarutahiko Shrine and Sarume Shrine, which are separate shrines on the grounds. If you have the chance, you should also check out the Imperial Grand Shrine, Ara Matsuri Shrine, Koyasu Shrine, Futami Okitama Shrine, and Meotoiwa in the Ise-Shima area. There are souvenir shops and delicious eateries in Okageyokocho and Oharai town, so be sure to keep your eyes peeled. Summary of Ise Shrine in Mie Prefecture In 2013, Shikinen Sengu was held at Ise Shrine in Mie Prefecture. This is the largest festival at Ise Jingu, where the Great God is relocated to the shrine pavilion, which is rebuilt once every 20 years. In May 2016, key figures from various countries gathered to hold the "G7 Summit," a meeting to discuss global economic and international issues, In Ise City. Ise Shrine is a very popular tourist spot in Japan, and we highly recommend visiting it. If you visit at the right time, you may be able to see the elegant prayers shown in the video, or see the Kagura exorcism. ◆Ise Shrine Introduction of facility outline◆ 【Address】1 Ujikancho, Ise City, Mie 516-0023 【Access】Geku is a 5-minute walk from Ise-shi Station, Naiku is a 30-minute walk from Isuzugawa Station 【Hours】5: 00 - 18: 00 【Closures】None 【Parking】Available 【Telephone No】0596-24-1111 【Entrance fee】Free 【Official Website】Ise Shrine https://www.isejingu.or.jp/en/index.html 【Official Website】Ise City Tourism Association https://ise-kanko.jp/main/english/ 【Tripadvisor】Ise City https://www.tripadvisor.com/Tourism-g303159-Ise_Mie_Prefecture_Tokai_Chubu-Vacations.html -
Video article 11:49
Introducing "Shogi"! Its Rules and How to Play the Popular Traditional Japanese Chess Game! It Seems Simple, but Shogi Is a Battle of Wit and Strategy!
Things to Do- 138 plays
- YouTube
About the Shogi Introductory Video This article will talk about the video "Explaining the Rules of Shogi for New Players" (将棋を全く知らない人向けのルール説明), created by "HAIREY Asoberu Biyoshitsu." There are probably many people who are interested in the traditional Japanese chess game "Shogi" but do not know how to play the game. If you watch this video, you will learn how to move each piece appropriately, as well as learning the terminology, strategies, and tactics of Shogi. What Kind of Game Is Shogi? Photo:Shogi Shogi is a two player strategy board game. It is sometimes called Japanese Shogi to distinguish it from Chess and Changzhi. According to the Japan Shogi Association, there are about 12 million Shogi players worldwide. In recent years, it has become popular globally, as there is an online World Shogi Championship. The origin and the history of Shogi is unknown, but Japan’s oldest Shogi pieces were found in Kofukuji, Nara, Kansai region, and these pieces are from Heian Period (794 to 1185). A Closer Look at the Rules of Shogi Photo:Shogi Captured pieces of Shogi are called Osho, Gyokusho, Hisha, Kakugyo, Kinsho, Ginsho, Keima, Kyosha and Fuhyo. Players follow the rules introduced in the video and advance their pieces up the board within the allotted time limit. From 0:08 in the video, we're given the name of each piece, and the different ways they can move is also explained. Each piece has its own movement. One such move is called "Fuhyo", which only allows movement of one space forward. From 7:28, illegal moves are also explained, and from 10:26, we are given a more in depth look at how each piece moves. Similarly to Chess' "Check" The word "Ote" is said when a piece could take the opponent’s Osho or Gyokusyo. Shogi sounds like a simple game, yet it is very tactical and there are people of all ages who enjoy playing Shogi. What kind of people are professional Shogi players? Photo:Shogi Professional Shogi players were called "Shogi-Sashi" (将棋指し) in the Edo period (From 1603 to 1868). Some famous professional Shogi players include Yoshiharu Habu, ranked 9th dan, Takeshi Fujii, ranked 9th dan, Masayuki Toyoshima meijin, Amahiko Sato, ranked 9th dan, Sota Fujii, ranked 7th dan, Takayuki Yamasaki, ranked 8th dan, Yasumitsu Sato, ranked 9th dan, Kazuki Kimura, ranked 9th dan. There are also professional female players. Professional Shogi players can also earn titles such as Meijin, Ryuo, Oui, Oza, by winning many matches. You can check professional matches, as well as match records for Shogi on NHK's live stream and other such places on the internet. Summary of the Shogi Introductory Video This video gives viewers an easy-to-understand introduction on the rules of Shogi. By installing a Shogi app game such as “Shogi wars,” you can try playing Shogi without needing your own board! While playing these Shogi games, you'll earn ratings and rank up accordingly, which allows players to enjoy heated matches versus opponents in their skill group! If this video made you interested in Shogi, we recommend trying the Shogi app listed above or trying one of the many other applications that are out there! 【Official Website】Japan Shogi Association https://www.shogi.or.jp/ -
Video article 11:59
The Yukata Is an Essential Item of Clothing for Summer Festivals and Hot Spring Trips! Learn the Tips and Tricks of Putting on a Yukata! We’ll Teach You How!
Life & Business- 142 plays
- YouTube
Let's Try on a Traditional Japanese Yukata! This video "Yukata and Obi (帯) belt fitting tutorial by hataori(自分でできる浴衣の着付けと帯結び by hataori)" was created by Official Hataori and shows you in detailed steps how to put on a yukata and obi belt. Yukata are traditional garments that have been worn and loved by Japanese people for centuries. There are several occasions when one can wear a yukata, such as during summer festivals when women dress in gorgeous, colorful yukata or at hot springs or public baths where men tend to wear more plain and simply decorated yukata. However, as they aren't worn very often, there aren't many people who know the correct way to put on a yukata by themselves. This video will teach you in detail how to correctly put on a yukata. Hopefully this video comes in handy the next time you have the opportunity to wear a yukata! The History of Japan's Yukata Photo:Women wearing yukata It is thought that over 1200 years ago, during the Heian Period (794-1185AD), yukata were worn as bathrobes called Yukatabira (湯帷子). Aristocrats at the time would have worn them as they bathed. During the Muromachi Period (1336-1573AD) and Edo Period (1603-1868 AD) lightweight, cotton versions of these bathrobes were worn not during, but after bathing. During the latter half of the Edo Period, it became common for people to wear yukata as more casual clothing such as when taking short trips. Tips on How to Wear a Yukata Source :YouTube screenshot From 0:22 in the video you can see how to put on a yukata. There are many small items that are essential for women when putting on a yukata, such as a Datejime (伊達締), Obiita (帯板), Obi, Obihimo (帯紐), Geta (下駄) or Zori (草履). It helps to have clips or belts to help hold things in place when putting on your yukata and also helps prevent the yukata from falling out of place. One very important item when putting on your yukata is a Koshihimo (腰紐), a cord tied around the waist that helps adjust the length of your yukata. The most elegant way to wear a yukata is to adjust the length so that the yukata is just covering the ankles. Please refer to 0:55 in the video to see how to tie a Koshihimo. When wearing a kimono, an extra layer of clothing called a Hadajuban (肌襦袢) is worn underneath the kimono. However, this is unnecessary when wearing a yukata. Source :YouTube screenshot From 3:00 in the video, you can see how to put on a Munehimo (cord wrapped around the chest area). Once the yukata is in place, it's time to wrap the Obi belt. You can see this from 5:59 in the video. For more detailed information on how to tie an obi belt, please refer to the instructions in the video. We recommended wearing your hair in a refreshing up-do when wearing a yukata. A handheld Japanese fan, such as a Sensu (扇子) or Uchiwa (団扇), also looks great with a yukata. How to Tie an Obi Belt Photo:Kimono belt There are a variety of ways to tie an obi belt. For women who are wearing a colorful yukata in the summer to a special event such as a fireworks display, we recommended tying the obi in a ribbon shape using the Bunko musubi (文庫結び) or Chou musubi (蝶結び). Once you are used to tying an obi belt, you can attempt the more difficult Hana musubi (花結び). The Kakuobi musubi (角帯結び) style of obi is typically worn by men. Yukata Fitting Summary Photo:Women wearing yukata In summer, you will find many stores selling yukata sets and there are also places where you can rent a yukata for the day. If you choose to rent a yukata, there may be someone who can help you get dressed into it, so please take advantage of this opportunity. Taking a walk outside wearing a yukata, especially one you managed to put on yourself, is sure to be a great feeling! Please make sure to use this video the next time you decide to wear a yukata! Just watching the video we're sure you'll learn something new! -
Video article 7:31
How to Cook Rice with a Mess Tin! 6 Tips to Make Tasty, Fluffy Rice Using Solid Fuel!
Things to Do Food & Drink- 424 plays
- YouTube
The Basics of Camp Cooking in Japan: Rice Rice, the staple food of the Japanese people, is also popular when camping. In this article, we'll introduce a video how to cook rice using a mess tin. Learn about mistakes advanced campers have already made so you can avoid making them yourself! Video Introduction This video, titled "[Mess Tins] Tips to Avoid Mistakes When Cooking Rice" (【メスティン】メスティン自動炊飯で失敗しないポイントとは), was uploaded by "Second Lieutenant Nya [Demoted to Rave Reviews]" (ニャア少尉【絶賛降格中】). The video introduces how to cook rice without fail using a mess tin. It's a must-see for outdoor and camping beginners in Japan, as well as for those who have never successfully cooked rice with a mess tin. Check it out! Mess Tins - A Popular Piece of Camping Dishware Photo:Camping gear A mess tin is a piece of cookware used during camping and backpacking. Shaped like a lunch box with a handle, they're made of aluminum for high heat conduction and can be heated with a single burner. They're also compact and easy to store. They can be used for smoking foods, pasta, and even arranged recipes using cooked rice and bread. They're a popular cooking utensil for outdoor enthusiasts with a variety of cooking methods, such as simmering, steaming, baking, etc. The first time you use a mess tin, it's recommended that you file and deburr it, as they can have rough spots on them. Some campers also recommend seasoning to prevent burning and other problems. 6 Tips for Cooking With a Mess Tin Photo:Rice soaked in water The video explains 6 tips to avoid mistakes when using a mess tin for outdoor cooking and camping. Let's take a look! ・Allow Water to Permeate the Rice Thoroughly After washing your rice, you'll want to soak the rice in water for at least 30 minutes during summer and 1 to 2 hours in winter in order to allow the water to penetrate the rice. [Video] 0:48 - Preparing the rice ・Solid Fuel (25g) Next is the solid fuel. Use 25g of solid fuel so that the fire won't go out in the middle of cooking. [Video] 1:24 - Solid fuel ・Next is the water. Be careful with the amount of water so that your rice isn't hard when you're finished cooking. In the video, water is added until the middle of the rivet of the mess tin for 1 cup of rice, but note that the height differs by manufacturer. [Video] 1:54 - Adding water ・Use a Wind Screen Fourth, use a windbreak to keep the heat and temperature consistent. The wind outside can make it difficult for the fire to reach the mess tin, resulting in uneven cooking, so be sure to use a wind screen. [Video] 2:24 - Wind screen ・Place a Weight on Top of the Mess Tin Lid The lid may come off when the pressure inside the mess tin rises. It's recommended that you put a weight on the lid to prevent it from coming off. [Video] 2:41 - Weights ▪ Steaming Remove from heat once steam starts to spill out or there's any bubbling sounds. To prevent the temperature from dropping too low, place the rice in a temperature retaining bag and let it steam for 10 minutes to make it fluffy and delicious. [Video] 3:52 - Steaming Warming Up Canned Goods With a Mess Tin! Source :YouTube screenshot The video shows how you can place a weight on top of the lid to prevent it from opening while the rice is cooking. In the video, canned food that is eaten with rice was placed on top of the lid instead of a weight. When the rice is done cooking, the canned food is also warmed up, so you can kill two birds with one stone! Summary of Mess Tins for the Outdoors & Camping In this article, we introduced a video of how to cook with a mess tin. A mess tin is a cooker that is handy for outdoor cooking, such as when camping, because it allows for easy outdoor cooking due to its versatility. Whether you're cooking with a mess tin for the first time or have used a mess tin before but experienced some failures, be sure to refer to this video to make some delicious rice! -
Video article 16:57
100-Yen Shop Camping! Useful Goods for Solo Camping, and How to Use Them! Check Out This Awesome, Unexpected Equipment!
Things to Do- 163 plays
- YouTube
Handy Goods From Japan's 100-Yen Shops Camping is immensely popular in Japan! With camping's rise in popularity, solo campers looking to explore nature are on the rise. However, it can be a bit pricey to get started camping when you have to buy all of the equipment. This is where 100-yen shops like DAISO, Seria, and Watts come in handy. In this article, we'll introduce some 100-yen items that can be used for solo camping. Video Introduction This video, titled "[100-Yen Camping Gear] 100-Yen Items That kimu23 Would Use When Solo Camping" (【100均キャンプ道具】きむ23のソロキャンプに使えそうな100均アイテム), was uploaded by "CAMP HACK," a channel run by kim23, a popular Japanese YouTuber and avid solo camper. For important items, like tents, sleeping bags, and sierra cups, you can get authentic outdoor gear, but for casual camping gear and useful outdoor goods, 100-yen shops are the place to go! At Japan's 100-yen shops, you can find many lightweight and easy-to-use items. You may find it easier to get started with solo camping casually by first purchasing 100-yen items, and then gradually moving on to more authentic camping gear. Japan's 100-Yen Shops and Camping Equipment Photo:DAISO The three 100-yen stores that carry the stylish camping equipment featured in the video are DAISO, Seria, and Watts. In response to Japan's recent solo camping boom, 100-yen shops now offer full lineups of outdoor-related goods. Also, you can use different items for different purposes, such as kitchenware and gardening tools, by slightly modifying them, or even by making your own camping tools. The best part is that 100-yen goods are easy on the wallet! Precautions When Buying Camping Gear From Japan's 100-Yen Shops Photo:Outdoor goods for sale In the video introduced here, goods from a 100-yen store are used as outdoor items. However, it's important to note that some of the items in the video are not used how they were originally intended to be used. Since this is not how the manufacturer recommends using them, if you use them as camping equipment, you'll be using them at your own risk. Care should also be taken around campfires. Outdoor Equipment From Japan's 100-Yen Shops Shown in the Video So, with that out of the way, let's take a look at the 100-yen camping gear introduced in the video. These 100-yen items, which are not originally intended for outdoor use, are transformed into useful outdoor goods! Check out the video to see how they're used! Source :YouTube screenshot ■5-Piece 500 Yen Burner Boil water and enjoy simple cooking with just 5 items: a stainless-steel plate, a stainless-steel bowl, a paulownia wood cutting board, solid fuel, and a cooker stand from Seria! [Video] 1:00 - ¥500 Burner made with 5 100-yen items ■A tiered accessory container that can be used as a seasoning container. Store salt, pepper, and other powdered seasonings in these containers made to hold small beads, decorative parts, and other items. The small containers can also be connected together, and there's even an 8-tiered type as well, so those who are particular about their spices can use this to keep their camping food nice and tasty! [Video] 3:04 - A seasoning container using an accessory case Source :YouTube screenshot ■Cosmetic carrying containers for liquid condiments Seria's cosmetic refill set can hold three types of liquids. It comes with a clear zip-up case, which is great for preventing leaks. [Video] 4:33 - Cosmetic containers used for liquid condiments ■Bungee cord with clips When camping or outdoors, there are sure to be times when you want to hang something to dry. In such cases, Seria's bungee cord with clips can be used for various purposes. Since both ends can be hooked to something, you can hang various things by hooking the cord to a tarp and then hanging different items with the clips. [Video] 5:27 - Bungee cord with clips ■Flexible band carabiner for hanging a lantern The band can be wrapped around a pole to hang a lantern. [Video] 6:05 - Flexible band with carabiner Source :YouTube screenshot ■A tableware band to hold cups together Even when camping solo, you may want to bring some small dishes with you. In such cases, these tableware band can hold the dishes firmly together when stacked. [Video] 6:30 - Tableware band ■Ultra-light stainless steel chopsticks Lightweight and non-slip stainless steel chopsticks [Video] 7:00 - Stainless steel chopsticks ■Mini tongs that don't tip over when set down Although palm-sized, these tongs are surprisingly convenient even for grabbing heavy items. [Video] 7:18 - Mini BBQ tongs ■Mini crates for LP gas canisters These mini crates are stackable if you have several of them. They're great for neatly storing smaller items when solo camping. [Video] 7:35 - Mini crates ■A mini stool that you can place items on The mini crates above, as well as other items you don't want to set on the ground, can be placed on top of this simple folding chair from Seria. [Video] 8:03 - Mini stool Source :YouTube screenshot ■Stylish garbage bags If you don't like the look of simple trash bags, Seria's temperature retaining paper bags can be used to create a brightly colored trash corner. They're also convenient for separating burnable and non-burnable trash. [Video] 8:20 - Temperature retaining bags as trash bags for solo camping ■A mini pipe-hammer that's more than meets the eye DAISO's mini hammer can also be used to hammer stakes. It may require a little technique, but it's great for when you want to lighten your load as much as possible when solo camping. [Video] 9:32 - Mini stake hammer ■ A carabiner for use in places where stakes can't be used If there are trees or stones in the place where you want to stake a rope and you can't, you can use DAISO's 3-hook carabiner to split the rope into two halves. A small item that does an unexpectedly large job. [Video] 10:03 - 3-hook carabiner ■A wire trash rack used as a firewood rack A trash rack used with a plastic bag becomes a firewood rack, to avoid firewood getting wet from being placed on the ground. It is also lightweight and compact. [Video] 10:54 - Wire firewood rack Source :YouTube screenshot ■An amazing stainless steel towel rack used as a side table A stainless-steel towel rack that can be used as a side table for solo campers. The shape can be used to hang things as well. It can be used for other purposes as well, according to your needs. [Video] 11:21 - Campfire side table ■Sliding wire sink rack Usually used for sinks, but can also be hooked to a fire pit to boil water. [Video] 11:59 - Campfire rack ■Hanging clips for hanging up chopsticks and cups Can be used to hang chopsticks or gloves that to prevent them from falling on the ground [Video] 13:45 - Hanging clips ■900 yen for a convenient rack Assembling Watts' 3-tier Multi Free Rack allows you to organize your smallest goods for easy access. [Video] 14:55 - Multi free rack Summary of 100-Yen Shop Camping in Japan Camping is an outdoor leisure activity that can be enjoyed by one person or many, but it can require a large budget to prepare a full-scale set of camping equipment. For more expensive items, you can go for rentals or look for deals at specialty stores, but for smaller items, 100-yen goods can do the trick, as shown in the video. Solo camping, in particular, often involves day-trip camping and carrying gear alone, so compact 100-yen camping gear can be very useful! It is valuable to have information that introduces items that someone has actually used and found useful. Be sure to take a look at the video, which shows how these 100-yen camping items can be used. -
Video article 12:49
A Solo Camping Guide for Japan - A Checklist of What to Bring With Just a Backpack!
Things to Do Nature- 82 plays
- YouTube
Japan's Solo Camping Boom Due in part to the Corona pandemic, camping has become a popular way to get outside and enjoy nature and the outdoors in Japan. Traditionally, camping was often a family or group activity, but "solo camping" has been on the rise as of late. Solo camping is a great way to get away from the stresses of everyday life and enjoy some time alone in a quiet environment. Having some alone time to get in touch with nature can be relaxing, and it also provides an opportunity for self-reflection. In this article, we'll take a look at some useful gear for solo camping. Solo Camping Gear Photo:Camping gear As we mentioned previously, solo camping refers to "one-person camping," and it has been growing in popularity in Japan in recent years. With Japan's current boom in solo camping, lots of useful and stylish solo camping gear is now available on the market. Video Introduction Source :YouTube screenshot The video we'll be going over today, titled "[Camping Gear] Camping With Just One Backpack! Solo Camping Gear Introduction" (【キャンプ道具】バックパック1つでキャンプが出来る!ソロキャンプギア紹介), was uploaded by "Takibito channel" (焚き人channel). The video introduces compact, convenient, and lightweight camping gear and backpacks. Various gear that can be packed into one backpack is introduced in an easy-to-understand manner. ※Please note that the order in which the gear is introduced is different from the order shown in the video as they've been divided based on their purpose. A Comfortable Tent and Sleeping Area Source :YouTube screenshot First, we'll introduce tents and bedding to bring when solo camping. The tent introduced in the video is the LOCUS GEAR Khafra HB Kit. It can be easily stored in a backpack and is also stylish and waterproof. The tent is secured with Snow Peak Solid Stakes and Boundless Voyage Titanium Peg Solid stakes using an MSR Stake Hammer to pound the stakes into place. As for sleeping gear, a NANGA AuroraLite 600DX sleeping bag and Therm-a-Rest NeoAir XTherm are great options! If you need a pillow, a MARCHWAY Inflatable Camping Pillow is recommended. For a night light, a BRISIE LED Lantern is waterproof, dustproof, and can also be used as a mobile battery. Must-Have Gear for Building a Fire Source :YouTube screenshot Next, we'll introduce gear for building a campfire that can fit in a backpack when solo camping. The first step in building a campfire is to chop kindling. The 38cm Husqvarna hatchet is a high-quality Swedish-made hatchet that is sharp and weighs just 600 grams. After chopping some wood, it's time to get a fire started. To build a fire, a Morakniv Mora Knife, SOTO Slide Gas Torch, and Conifer Cone Butterfly Saw are used. For easy fire starting, the match-shaped SOLSTICKAN FIRELIGHTERS are used as a handy igniter, and their combustion duration of 8 minutes makes it easy to ignite firewood. When the fire is about to be go out, a Bushcraft Fire Blaster (Sx) is used to keep it going. To protect your hands, use Tent-Mark Designs King Tongs and GRIP SWANY G-1 gloves. Solo Camping Gear for Cooking Source :YouTube screenshot The next solo camping gear we'll introduce is what to bring so you can enjoy cooking. This includes cooking utensils, etc. that can fit in a backpack. Camp food is an important part of the camping experience. The STC Picogrill 398 and the Boundless Voyage Titanium Fire Grill make the perfect cooking tables and are highly popular in Japan. The Snow Peak Aluminum Personal Cooker Set is easy to store! The set includes a frying pan and two shallow cookers. WILD-1 Brass Sierra Cups are also useful. After cooking up some delicious food it's time to relax. Relax and unwind with the SOTO Field Hopper ST-630 table and Helinox Tactical Chair, or enjoy a cup of freshly brewed, delicious coffee in a Snow Peak Ti-Single Cup. THE NORTH FACE Venture Jacket is great for any sudden rain that might occur. A Backpack to Hold All Your Solo Camping Gear Source :YouTube screenshot A Seibertron backpack can hold all of the solo camping gear featured in the video! The pockets and side pouches on the backpack can be well utilized to store all of your camping gear. The backpack is also waterproof, has a large storage capacity, and is comfortable to carry. Store all of your solo camping gear compactly in one backpack! See below for all solo camping gear introduced above! ■NANGA AuroraLite 600DX ■38cm Husqvarna hatchet ■Snow Peak Aluminum Personal Cooker Set ■Snow Peak Ti-Single Cup ■THE NORTH FACE Venture Jacket ■LOCUS GEAR Khafra HB Kit ■Therm-a-Rest NeoAir XTherm ■Snow Peak Solid Stakes ■Boundless Voyage Titanium Peg Solid ■MARCHWAY Inflatable Camping Pillow ■STC Picogrill 398 ■Boundless Voyage Titanium Fire Grill ■GRIP SWANY G-1 ■MSR Stake Hammer ■SOTO Field Hopper ST-630 ■Tent-Mark Designs King Tongs ■Morakniv Mora Knife ■SOTO Slide Gas Torch ■Conifer Cone Butterfly Saw ■SOLSTICKAN FIRELIGHTERS ■Bushcraft Fire Blaster (Sx) ■WILD-1 Brass Sierra Cups ■BRISIE LED Lantern ■Helinox Tactical Chair ■Seibertron backpacks Summary of Solo Camping Gear for Camping in Japan In this article we introduced solo camping gear that fits into one backpack. The video shows you how to take it out of the backpack, so you can use it as a reference when packing. Be sure to check it out. If you're planning on camping in Japan for the first time or feel that solo camping might be too difficult, your best bet is to gather information from advanced campers so you can save time when decided what gear to buy. Enjoy Japan's beautiful outdoors with a solo camping adventure! -
Video article 4:11
Yamanashi Minamitsuru-gun "Yamanakako Campsite" Rice Cooker with melted snow water from Mt!Video shows the basic use of a rice cooker for camping and the secret to making excellent camp rice!
Things to Do- 73 plays
- YouTube
Yamanashi Minamitsuru-gun "Yamanakako Campsite" Video introduction of how to cook rice using a rice cooker This video, titled “Cooking Rice with a Mess Kit” (飯ごうでご飯を炊こう), was uploaded by “Yamanakako Village Tourism Division” (山中湖村観光課). The camp ground introduced in the video is Sonei Yamanakako Camping Ground, located at the foot of Mt. Fuji. The video shows how to cook rice in a mess kit using meltwater from Mt. Fuji. When going camping, try bringing a mess kit to make your own camping meals. How to Cook Rice With a Mess Kit Mess kits are aluminum cookware often used by soldiers or when camping to cook food. As you can see in the video, they can also be used to cook rice! A typical mess kit in Japan has an outer lid and an inner lid which can be used to measure rice. First, wash the rice and add an appropriate amount of water to the mess kit. Wash-free rice is useful when you don’t have enough water to wash the rice (or just don’t feel like washing it). The correct way to cook rice is to let it soak up water for about 30 minutes and then put it over the fire. Cook the rice over low to medium heat until it comes to a boil, and then reduce the heat to low. Make sure to pay attention to time and heat level. After cooking the rice, turn the mess kit upside down and let it steam for 10 minutes. This can be seen at 3:11 in the video. Tips to Make the Most of Your Mess Kit While Camping In Japan, basic camping goods can be purchased at 100-yen shops such as Daiso all across the country. A digital scale or measuring cup are useful for measuring rice, water, and other ingredients precisely. Also, be sure to prepare ample food and necessary tools, including tinder and plates. If you want to reduce the aluminum smell of the mess kit, you can cook the rice using the water you used to wash it. There are many different types of cookware that you can use when camping, so be sure to look for what suits your needs best. Summary of Cooking Rice With a Mess Kit If you remember the steps shown in the video, you can enjoy delicious rice when camping. Mess kits are also useful for making arranged recipes, such as jambalaya and oden. You can rent a mess kit at the Sonei Yamanakako Camping Ground shown in the video, so be sure to make a reservation if you want to enjoy a fun camping experience.