-
Article
-
Things to Do
-
Region
-
Season
-
Tag
Articles
-
 Video article 1:31
Sail out From Otaru, Hokkaido on the Scenic Blue Cave Cruise! Witness the Enchanting Cobalt Blue Ocean and Make Great Memories!
Things to Do Travel- 330 plays
- YouTube
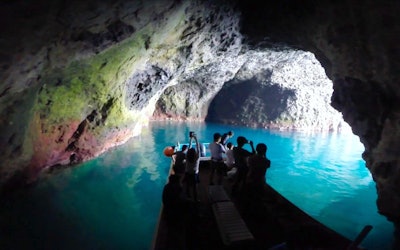
About Hokkaido's Blue Cave Cruise Promotional Video This promotional video, titled "Otaru, Hokkaido - Tsuusen's Original Blue Cave Cruise" (【北海道・小樽】元祖!青の洞窟クルーズbyツウセン), was released by "ACTIVITY JAPAN." It focuses on the Blue Cave Cruise that sails out from the Otaru Canal and goes around the Marine Park. The well-organized cruise tour takes you to the best sightseeing spots by boat, so you can enjoy Hokkaido's vast sea. The video captures the cobalt blue ocean and the marvelous sunset. This article will delve into some of the charms of Otaru, Hokkaido's Blue Cave Cruise. About the Blue Cave Cruise Source :YouTube screenshot Sailing out from the Otaru Canal, the Blue Cave Cruise offers you a great experience to enjoy the vast sea of Hokkaido. Sea birds elegantly flying in the air, the stunning rocks structures... you'll probably even see a dolphin or shark on your way there as well. This coastal area was once called "Shu-ya" in Ainu language, which can be loosely translated as "Kettle Rock". The main attraction of the cruise is the blue cave located on the shore in Niseko-Shakotan-Otaru Kaigan Quasi National Park. When you enter the cave, you'll notice how the water turns turquoise blue. In the video, the boat enters the cave at 0:17. The awesome beauty of the blue pool inside the cave is certainly worth seeing. photo: Otaru's Blue cave entrance Located on the shore of Shakotan Peninsula, the blue cave was formed by strong sea waves. It's known for its apparent luminescent quality, imparted by the light passing through the openings. Its unique geographical formation and the angle of the sunlight flooding in create a series of magical scenes. Other marine activities, such as snorkeling, sea kayaking, boat cruises, and rafting are also offered in the area. When you hear "blue cave," it might be the Blue Grotto in Italy that first comes to mind. Japan, however, features several blue sea caves including the one in Otaru. Some other well known blue caves in Japan are: - Hachinoheana in Iwate Prefecture - Dogashima Sea Cave Skylight in Shizuoka Prefecture - Cape Maeda in Okinawa - San-in Coast National Park in Hyogo Prefecture. Highlights of the Blue Cave Cruise Source :YouTube screenshot The cruise offers you a great opportunity to take in the natural beauty of Hokkaido. You can enjoy a quiet time admiring the beautiful expanse of the sea, and the luxury of having the aromatic sea breeze fill your nose as it brushes your cheeks. If the weather is clear you can catch a gorgeous sunset, as seen in the video from 1:05. Sea birds, such as seagulls, black-tailed gull, and white-tailed sea eagles often fly around the cruise boat and you can enjoy feeding them as well. This is shown in the video at 0:58. Information About Hokkaido's Blue Cave Cruise Photo: Otaru station platform Hokkaido's Blue Cave Cruise is offered for a limited time between late spring and early autumn. Otaru port is 5 minutes by car and 13 minutes on foot from JR Otaru station, and the port has 10 free parking lots. The 80-minute cruise will take you to 10 different viewpoints. You need to make your reservation in advance either by phone or on their official website. As of April 2020, the tour costs 5500 Yen (~$51 USD) for Adults, and 3000 Yen (~$28 USD) for Children and Toddlers. Cold weather protection is offered on the cruise, but we recommend wrapping yourself well just in case. Summary of Hokkaido's Blue Cave Cruise Photo:Otaru, Blue Cave Cruise The video "Otaru, Hokkaido - Tsuusen's Original Blue Cave Cruise" introduces the Blue Cave Cruise in Hokkaido. The video is composed of beautiful images of the stunning turquoise sea and the clear blue pool glowing in a mysterious pitch-black cave. You'll definitely want to check it out after seeing the video! 【Tripadvisor】Blue Caves Hokkaido's Blue Cave Cruise -
 Video article 15:53
Pros and Cons of Burner Pads - Camping and Outdoor Activities With a Single Burner
Things to Do Food & Drink- 148 plays
- YouTube
Single Burners for Camping in Japan Japan is experiencing a camping boom, and many campers opt for the easy-to-use single burners when camping. Let's take a look at a video to see what burner pads are and how, if at all, they can make your cooking experience better when enjoying the outdoors. Video Introduction: Single Burners and Burner Pads This video, titled "Should You Buy a Single Burner and Burner Pad Together?" (シングルバーナーとバーナーパッドは一緒に買うべき?), was uploaded by "HAMA." Different Types of Single Burners Photo:A single burner There are two types of single burners: unified and partitioned. The unified type has the burner and gas canister in one unit, making it compact and convenient for cooking for one person. With the partitioned type, the burner and gas can are separated, and the burner is more stable than the unified type, so it's recommended when using a large pot. In addition, there are two types of gas canisters: CB cans and OD cans. CB cans are often used in household gas stoves, and inexpensive ones can be purchased at 100-yen shops all across Japan. The video uses a unified single burner with easily accessible CB cans. The Pros of Using a Burner Pad With a Single Burner Photo:A burner pad In the video, Hama-san from Okinawa goes over whether or not you should use a burner pad with your single burner. As you probably already know, a single burner is a small gas stove that can start a fire. It's a piece of outdoor equipment that can easily be used to boil water and cook food when camping or enjoying other outdoor activities. However, using a single burner by itself has some disadvantages, such as not distributing heat well, resulting in burnt pots and pans, as well as being unstable when used with larger pans. This is where burner pads come in. The main feature of a burner pad is that it converts the flame into a more evenly distributed source of heat. This makes it possible to cook dishes like curry, which requires heat be increased gradually, without burning the food. [Video] 4:35 - Using a Burner Pad In the video, you can see how gyoza (Japanese dumplings) are cooked. By using the burner pad, the gyoza are evenly browned and look delicious! [Video] 12:45 - Cooking Gyoza Beware of Thermal Radiation When Using Burner Pads Photo:A single burner The burner pad used in the video is a burner pad by Uniflame, made with a stainless-steel frame and a special heat-resistant steel mesh. The burner pad distributes heat and allows the user to adjust the strength of the flame to suit their needs. However, it's recommended that you cook over low heat because the thermal radiation can damage utensils and also heat up the gas can. Thermal radiation can also occur when using larger cookware, such as frying pans. Although not shown in the video, there are heat shielding tables for single burners. Consider checking them out as well! Should You Buy a Burner Pad for Your Single Burner? Summary The burner pad, which more evenly distributes the heat of a single burner, expands the range of cooking recipes you can prepare. Some campers use single burners without a burner pad when boiling water and with a burner pad when cooking. The less burnt-on food, the easier it is to wash your cookware. If you're thinking about purchasing a burner pad, be sure to use this video/article as a reference! -
Video article 3:01
Nozawa Onsen Ski Resort Video Introduction! Fun Courses for Kids, Day-Care, and All Sorts of Facilities! Enjoy Hot Springs and More at This Winter Wonderland in Nagano Prefecture With Your Family
Things to Do Sports Travel- 67 plays
- YouTube
Nozawa Onsen Ski Resort in Japan's Shinshu Region: Video Introduction This video, titled "2020–21 Nozawa Onsen Ski Resort Promotion Video" (2020-21 野沢温泉スキー場プロモーションビデオ), was uploaded by "nozawaonsen." Blanketed in a veil of silvery white snow, Nozawa Onsen Ski Resort has something for the whole family, with a variety of courses, ranging from beginner to expert level. In addition to skiing and sledding, facilities include a kids' park and even a day-care center, so visitors with small children can enjoy the slopes too. Once you've had your fun on the powder, at Nozawa Onsen Ski Resort you can soothe your tired body in the thermal springs, or enjoy some delicious cuisine. Before we go any further, check out Nozawa Onsen Ski Resort's gorgeous snow-covered scenery and people enjoying winter activities in the video. Nozawa Onsen Ski Resort’s Distinctive Features, and Course Difficulty Photo:Nozawa Onsen Ski Resort, Nagano, Japan Nozawa Onsen Ski Resort is located in northern Nagano prefecture in Japan's Koshin'etsu region, and its slopes — which cover an area the size of 63 Tokyo Domes — set it apart from all other ski resorts. Twinkling prettily, trees decorated with icicles dot the landscape, which, with its 100% natural snow, boasts some of the best powder in Honshu (the main island of the Japanese archipelago) and there are plenty of gorgeous views to be seen as well. The vast slopes play host to a total of 36 runs, divided in a 40/30/30 ratio between beginner, intermediate, and expert difficulties respectively. The resort is popular amongst skiers and snowboarders of all levels, from novices to seasoned experts. What’s more is, there's the Nagasaka Gondola, a large gondola which can ferry 10 people from the Nagasaka area to the Yamabiko area in one go. These gondolas are the first in Japan to have an all-glass structure, which boasts excellent ventilation properties, and allows riders to take in the natural scenery as they travel from one point to the next. Plenty of Courses for Beginners and Families! Photo:Nozawa Onsen Ski Resort, Nagano, Japan Thanks to its abundance of runs and areas aimed at beginners and children, Nozawa Onsen Ski Resort is popular among visitors with no skiing experience and families with small children. There's even a rental shop, so there's no need to worry if you don't have your own equipment. The Uenotaira Course (上ノ平ゲレンデ, uenotaira gerende) and Paradise Course (パラダイスゲレンデ, paradaisu gerende) are recommended for beginners or kids who aren't yet familiar with skis or snowboards. These slopes are both gentle and wide, making them the perfect choice for those who want to enjoy the snow without worrying about having an accident. Furthermore, thanks to lower temperatures than those at the foot of the mountain, the quality of the snow is great. The lift adjacent to the slopes has a handrail and can take up to four people, meaning you can ride as a group; a boon for those with young children who may struggle with the lifts. Once you've had your fill of skiing about at the summit, you can leave the Paradise Course behind you and head for the Rinkan Course (林間コース, rinkan kosu). This course allows skiers to enjoy some spectacular views as they descend the mountain along a beautiful wooded trail. If you aren't confident in your skiing abilities, you can take the gondola to the bottom, so be sure to keep this in mind if you're new to skiing or snowboarding. The area at the foot of the mountain is also recommended for beginners and kids. There are wide and gentle slopes here too, ideal for kids who are experiencing skiing or snowboarding for the first time. Ziplines, Indoor Playgrounds and More! Check Out the Exciting Activities at Nozawa Onsen Ski Resort Photo:Zip Sky Ride at Nozawa Onsen Ski Resort, Nagano, Japan "Zip Sky Ride" is one of the most popular facilities at Nozawa Onsen Ski Resort. This zipline, comprising of a seated harness mounted on a wire rope using a pulley is located above the Hikage Course, and is 652 meters with a total altitude difference of 122 meters. The zipline can reach speeds of up to 70 km/h! This aerial activity lets visitors soar above the slopes like a bird. The ride is accessible to everyone elementary school age and up, so consider flying over the mountains with your kids! In addition, the Kids' Park and Nasky Room are great for those with kids who haven't started elementary school yet. The Kids' Park offers sledding, tubing, and more, and the Nasky Room (ナスキールーム) has educational toys, making these places great for both relaxing and playing. There's a day-care as well! "Yumin," has qualified childcare professionals present, meaning you can have peace of mind knowing your kids are in good hands while you enjoy skiing, snowboarding, and other winter activities on the slopes. How to Get the Best Deals at Nozawa Onsen Ski Resort! Photo:Friends chatting with smartphones Buying one of the special package tickets from Nozawa Onsen Ski Resort's home page will allow you to save a little money. Priced at ¥6,500 for adults and ¥4,300 for kids, the special package tickets include a gondola ticket, which would usually sell for ¥6,000, or ¥3,600 per child, as well as ¥1,000 worth of lunch tickets. Furthermore, a package that includes a 1-day lift ticket, a ¥1,000 lunch ticket, and a Nozawa Onsen Sparena bath ticket is also available for ¥7,000 for adults and ¥4,600 for children. These perks are also available to those visiting one a day trip, so save yourself some money while enjoying Nozawa Onsen Ski Resort. Additionally, there are a variety of seasonal value passes available to skiers, including a spring skiing service pass, and family-oriented passes, such as the spring break family pack campaign, etc. Enjoy a trip to Nozawa Onsen Ski Resort next spring with your little ones and make some unforgettable memories! Check out Nozawa Onsen Ski Resort's homepage for more details. Nozawa Onsen Ski Resort Roundup: A Ski Resort Recommended for Families and Kids The beautiful slopes covered in powdery snow offer tons of photogenic views that would look great on Instagram. There are a variety of courses tailored for both children and adults, and the views are fantastic. The area surrounding Nozawa Onsen Ski Resort has a wide range of hotels, inns, and ryokan (traditional Japanese style inns) as well. A shuttle bus runs between the spa town and the ski resort, so guests can unwind with a dip in the hot springs and some delicious food after a fun-filled day of skiing. We implore you to head to Nagano Prefecture in Japan's Shinshu region and enjoy the beautiful surroundings and memorable winter activities! 【Official Website】Nozawa Onsen Ski Resort 【TripAdvisor】Nozawa Onsen Ski Resort -
Video article 4:56
Let’s Spin Some Traditional-Style Tops! Learn How to Wrap It, Spin It, and Even Some Cool Tricks!
Things to Do- 1.96K plays
- YouTube
Explaining how to spin a top The video “How to Spin the Top(【改訂版】コマのまわし方(ヒモの巻き方)【 How to spin the top 】)” was created by “Seiai Kindergarten - Fussa, Tokyo” and it explains how to wrap a string and how to spin a top. The video is for kids, so the basics of how to play with the top is easy to understand. This article introduces how to wind a top up and spin it. Be sure to follow along with the video! Traditional Japanese Tops Photo:Old-fashioned top Traditional Japanese tops are a toy played with by attaching a spindle to a circular piece of wood and using a string to spin it. The tip of the stem is thin, maintaining the balance in the center while the top spins. There are tops all around the world and each country has their own version with unique characteristics. For example, there are gasing in Malaysia that adults use and make bets with, diabolos in China that are known for their acrobatics, and spinning tops, used in performances, in Japan. The top has a very long history and it is said that they originally started from the spinning of snail shells. The oldest top in the world, was found in Egypt, and said to have been used around 2000 to 1400 B.C. It is believed that “finger twirling,” tops twisted using one's fingers, were the first kinds of tops invented. In fact, the oldest top is a simple hand-spun top made of carved wood. The whip top is still created as a Japanese folkcraft and wooden toy in Japan. How to Wind up and Spin a Top Source :YouTube screenshot As you can see in the video from 0:03, hold the top in your left hand and the string in your right. The string will have a knot at the end. Put the string on the left side of the stem and pull the knot towards your body on the right side of the stem. From there, place the long end of the string over the knot that you just pulled to the right side of the stem. It's difficult to explain, but you can see this at 0:18 in the video. Then, turn the top to the side while keeping the string tight, and hook the string on the stem on the bottom of the top. After wrapping the string tightly twice on the bottom stem, gradually wrap the rest of the string to cover the bottom of the top. When wrapping the string, it's easier to move the top to wrap it, as opposed to wrapping it using the hand holding the string. When you've finished wrapping it, you'll know you did it correctly by the nice pattern on the bottom of the top. How to Spin and Throw the Top Source :YouTube screenshot After winding the top up, it's finally time to let it rip! As shown in the video, hold the top in your left hand and dangle a bit string. Hold the dangled string between your right ring and pinky fingers, and make a fist around the string. Make a finger gun with your hand and hold the top with your thumb and index finger. After that, face the direction where you want to throw the top, open your legs slightly wider than your shoulder, lower your body and throw that sucker! It is better to throw it as horizontally as possible. Be careful not to throw it straight down as it won't spin and you might break your top with the force. You can watch how to throw it starting from 2:45 in the video. You can see man in the video doing tricks, such as placing the spinning top on the palm of his hand, and rope-walking, from 4:14. Summary of Japan's Traditional Tops Photo:Whip Top The video “How to Spin the Top,” created by “Seiai Kindergarten - Fussa, Tokyo,” introduces how to spin a top, a toy often used during New Years in Japan. The video explains how to wrap the top string as well, so it's great for beginners. It can also be enjoyed by advanced top users since there are difficult tricks in the video. -
Video article 2:57
Asakusa Hanayashiki, Japan's Oldest Amusement Park, Has an Awesome Retro Showa-Era Atmosphere! Experience a Nostalgic Japan at the Popular Amusement Park in the Heart of Taito City, Tokyo!
Things to Do- 231 plays
- YouTube
Asakusa Hanayashiki - A Popular Retro Amusement Park! This video, titled "Asakusa Hanayashiki – Local Information Video Site|Machi Log" (浅草花やしき - 地域情報動画サイト 街ログ), was uploaded by "machilogmovie." The amusement park "Asakusa Hanayashiki" in Asakusa, Taito, introduced in the video, is the oldest amusement park in Japan. The park is located next to the west side of Sensoji Temple, the symbol of Asakusa, so you can enjoy thrilling rides and other attractions in the heart of the city. Asakusa Hanayashiki is a very popular amusement park for both children and adults, where you can enjoy sightseeing and attractions in the Asakusa area. In this video, Yuka Hasegawa of the Hanayashiki Actors shows us the charm of Asakusa Hanayashiki. The History of Asakusa Hanayashiki Photo:Asakusa・Hanayashiki Asakusa Hanayashiki opened more than 170 years ago in 1853. Surprisingly, this is around the same time as when the Black Ships (1843) came to Japan in the Edo period (1603 to 1868). At first it was a botanical garden, but it gradually expanded in scale and added a zoo, the Asakusa Flower Theater, and other attractions, making it a very popular amusement park that attracted many visitors and was very crowded at its peak. During the Pacific War, the park was forced to temporarily close its doors, sending all of the animals in the park to Sendai. In 1947, it reopened as an amusement park. After the reopening, the park reopened with its current style of ride attractions, including Japan's oldest roller coaster, which can be seen at 0:59 in the video, and Bee Tower, the symbolic tower of Asakusa Hanayashiki, which can be seen at 0:19 in the video. For the longest time, the park did not charge an admission fee, but with the 1985 revision of the Entertainment Establishments Law, they began charging an admission fee. Rides at Asakusa Hanayashiki Source :YouTube screenshot The jet coaster, said to be Japan's oldest roller coaster, is one of Asakusa Hanayashiki's signature thrill rides. The other rides other than the roller coaster used to be more of a heartwarming experience, but today Asakusa Hanayashiki has become an amusement park with a full range of thrilling rides that can be enjoyed by adults and children alike. Below are the list of rides. Roller Coaster (0:59) Bee Tower (0:19) Disk’O (1:17) Space Shot (1:26) Sky Ship (1:34) Carousel (2:10) Ferris Wheel Haunted House BBQ Garden Seasonal Events: More than 20 seasonal events are held throughout the year, such as "The Young Ace Detective" and "Lumiyashiki," a countdown illumination event that is great for taking pictures. Summary of Asakusa Hanayashiki Photo:Asakusa・Hanayashiki-dori Asakusa Hanayashiki is recommended as a date spot for couples, and is also a great place for parents and children. Asakusa Hanayashiki is a compact amusement park, so after enjoying the park, you can go shopping or hang out in the tourist area of Asakusa. It's only a 10-minute walk from Toei Subway or Tokyo Metro Asakusa Station, and a 2-minute walk from Tsukuba Express Asakusa Station, so it's really easy to get to! For more information on admission fees and opening hours, please visit the official website of Asakusa Hanayashiki. Discounts are available for children, seniors and those with disabilities. There is no parking lot at the park, so please use the nearby coin-operated parking lot if you are coming by car. Enjoy a retro atmosphere in the middle of Tokyo! ◆Information◆ 【Address】2-28-1 Asakusa, Taito, Tokyo 111-0032 【Access】10 minute walk from Toei and Tokyo Metro Asakusa Station and 2 minute walk from Tsukuba Express Asakusa Station 【Admission fee】1,000 yen for adult and 500 yen for child 【Hours】10 am to 6 pm (varies by season and weather) 【Closures】None 【Parking】None 【Telephone No】03-3842-8780 【Tripadvisor】Hanayashiki https://www.tripadvisor.com/Attraction_Review-g14134311-d614123-Reviews-Hanayashiki-Asakusa_Taito_Tokyo_Tokyo_Prefecture_Kanto.html -
Video article 16:21
Ayatori AKA Japanese Cat's Cradle! Learn How to Play the Exciting String Game!
Things to Do- 2.09K plays
- YouTube
Ayatori! This video was created by "Ayatori Dekita!" Fun Lessons From Baaba!" The title of the video is "[Ayatori Shapes] Cradle, Rice Field, Diamond, a Japanese Hand Drum, a Ship, and a Rope Bridge. Slightly Difficult Techniques of Ayatori for Adults [Audio Commentary] String Figures / Baaba's Ayatori" (あやとりできた! ばぁばが楽しく教えるよ」が制作した『【あやとり連続技】ゆりかご・田んぼ・川・ダイヤモンド・つづみ・船・つり橋 ちょっと難しい変身あやとり 大人向け【音声解説あり】String figures / ばぁばのあやとり). The video explains advanced level Ayatori for adults, in a slow, easy-to-understand format. Be sure to check it out! What is Ayatori? Photo:Ayatori Ayatori is a game where you make different shapes with a string looped around your fingers. It's basically the same as cat's cradle, but the shapes/names are different due to cultural differences. Ayatori is also called "Itodori" and "Chidori," in different regions of Japan. It's a very popular game played by children all over the world. It is said to have a great effect on children's intellectual development because of the use of hands and fingers and using one's imagination to think of shapes and understand how to manipulate the string. Ayatori can be played with multiple players by taking turns and transforming the string into different shapes, or it can be played solo, as shown in the video. There are also people who do magic tricks that involve ayatori. The origin and the history of ayatori is unknown, but there is a theory that it started around the Heian period (794-1185) in Japan. Unfortunately there is no proof to back this theory. Basic Techniques and How to Play Ayatori Source :YouTube screenshot This video gives an easy to understand commentary on how to make different shapes for solo play ayatori. The video starts with a single string sitting in a loop on a table. From there, Baaba teaches viewers how to hold the string, and then how to make a cradle (3:04), a rice field (5:21), a river (6:09), a diamond (9:47), a Japanese hand drum (12:46), a ship (13:20), and finally a rope bridge (14:03). This video also gives tips on how to hold the string on your fingers and how to remove it from your fingers. There are a lot of cool techniques you can learn by watching it. Some other techniques, not shown in the video, include "rubber," broom, ladders, turtles, bridges, stars, and even Tokyo tower! Rubber and broom are relatively easy to make, so these are perfect for beginners. Overview of Ayatori Photo:A parent and child playing Ayatori Ayatori is a fun game that can be enjoyed with just a single piece of string! Be sure to watch the video to learn about some cool shapes that you can practice. It's also great for kids, so if you have some little one's of your own, be sure to try it together! -
Video article 2:48
Indoor Skydiving in Japan! The Popular Attraction From Germany and Russia Has Arrived in Koshigaya, Saitama! Introducing Flystation in Koshigaya Lake Town!
Things to Do- 629 plays
- YouTube
Indoor skydiving at “Flystation” The video introduces FlyStation in Koshigaya Lake Town. The video is titled “FlyStation Instructor Demonstration(FlyStationインストラクターデモンストレーション)”, and it was created by “infinitegazelle.” FlyStation offers the indoor attraction of skydiving. As you can see in the video at 1:24, you will float up high even though it is an indoor attraction. You can see how thrilling this attraction is from the video so definitely take a look! This article will talk about the thrilling indoor skydiving attraction "FlyStation". What is FlyStation? Photo:Skydiving Skydiving is a fun activity where you fall from the high in the sky and enjoy floating in the air. As you can see in the video, FlyStation enables you to enjoy skydiving in a completely indoor environment. With a strong winds up to 360 km/h from the bottom of the wind tunnel, you are able to float in the air. This is next-generation entertainment, and it has become very popular in the United States and Europe. And now, this popular attraction has finally arrived in Japan. In the wind tunnel with 19.8 meter height, this is excitement like you've never experienced before. All of the necessary equipment is included in the flight price. There is no need to prepare beforehand. FlyStation, pre-flight school is available to learn how to fly and professional instructors support one-on-one indoor flight. 4 year olds and older are eligible for indoor skydiving. Please note that the weight limit is less than 120 kg (264.5 lbs). With experienced instructors and operators to control the wind, this attraction completely safe. In this video, you can check out the different techniques such as floating up in the air, going upside down at 1:38, and moving every direction in the air. Where Is FlyStation and How Can I Access It? Photo:Koshigaya Lake Town FlyStation is located in Koshigaya Lake Town in Koshigaya, Saitama. It has easy access, being only a 12 minute walk from “Koshigaya Lake Town station” on Musashino line. There is only one location currently, but more locations in Yokohama, Osaka and Chiba will be opened soon. There are also different indoor skydiving locations in Nagoya and Fukuoka. Pricing for FlyStation Source :YouTube screenshot The length of 1 flight at FlyStation is 1 minute long. The flight ticket costs 4,500 yen (~$41 USD) for an adult and 4,200 yen (~$38 USD) for a child on weekdays, 5,000 yen (~$45.50 USD) for an adult and 4,700 yen (~$43 USD) for a child on weekends. A 200 yen (~$2 USD) discount will be applied when you visit on your birthday. The price is a bit high, but considering how much it costs to actually skydive for a minute, FlyStation is a lot cheaper than actual skydiving. It's also great for people who are worried about the dangers of skydiving, as it's totally safe. Summary of FlyStation Photo:Skydiving “FlyStation Instructor Demonstration” is a video by “infinitegazelle” demonstrating indoor skydiving at Koshigaya Lake Town. It has slowly been getting more attentions as it allows you to skydive indoors, and enjoy floating in the air. FlyStation will be the next tourist spot in Saitama. Come visit FlyStation and experience the excitement! We recommend you book in advance if you are visiting during a holiday week, summer vacation or on weekends. ◆Outline of FlyStation◆ 【Address】6-19-3 Koshigaya Lake Town, Saitama 【Access】12 minutes walk from the south exit of “Koshigaya Lake Town station” on JR Musashino line. 【Opening Hours】10:00~19:00 【Parking】Free parking available 【Phone Number】048-940-5010 【Official Website】Flystation/ Experience flying in the air with your kids https://flystation.jp/?gclid=Cj0KCQiA-bjyBRCcARIsAFboWg2KpdOHjHoCjiLdOKiCfUXTWBsCkclR82R-ht7Jg3FPwfnOnC-5BsoaAhxREALw_wcB 【Official Website】AEON Lake Town https://www.aeon-laketown.jp/ -
Video article 3:13
110% Fun at Hirakata Park! Winter Illuminations, Summer Swimming Pools, and More! Discover All of the Seasonal Events and Attractions at This Amusement Park in Osaka!
Things to Do Travel Nature- 98 plays
- YouTube
Hirakata Park, Osaka: Video introduction This video, titled "[Hirakata Park Official Video Clip] Fun Hirakata Park for Children and Adults All Year Round" (【ひらかたパーク公式】 子どもから大人まで一年中楽しいひらパー), was uploaded by "hirakatapark." The video is a brief three-minute intro to Hirakata Park in Osaka. It shows seasonal spots and attractions popular on social media as well, such as cherry blossoms, roses, and illuminations. Check out the video to see everything there is to do at Hirakata Park. Hirakata Park: An Introduction to the Oldest Amusement Park in Japan Photo:Hirakata Park, an amusement park in Hirakata, Osaka Hirakata Park is an amusement park located in Hirakata, Osaka. The park is approximately 40 acres, allowing guests to enjoy many attractions and plenty of facilities all year round, including swimming pools in the summer and an ice-skating rink in the winter. Unique events are held in every season, and people of all ages, from small children to adults, can enjoy their time here. Opened in 1910, the park has been open for more than 100 years: it has a longer history than any amusement parks in Japan and one of the representative theme parks in the Kansai area. Although Hanayashiki in Asukusa, Tokyo technically has a longer history, it was destroyed once in WWII, making Hirakata Park the oldest amusement park in Japan without interruption. Junichi Okada, a member of V6, a popular Japanese idol group, has been appointed as the poster child of Hirakata Park. The Japanese movie Hard Days, featuring Junichi Okada, commemorates the 10th anniversary since his appointment as such. More Than 40 Attractions at Hirakata Park! Photo:The Ferris wheel at Hirakata Park, Hirakata, Osaka Hirakata Park features a wide range of rides that both children and adults can enjoy, including thrill rides. It has many attractions that small children and their parents can enjoy together, such as the classic teacup-shaped Strawberry Cafe, Magical Jumping, and Dolphin Paradise. It also has attractions that adults can enjoy. Red Falcon, with a top speed of 70 km/h, is one ride that will satisfy even the most die-hard thrill seekers. ELF is a unique wooden roller coaster that is popular for its classic wooden roller coaster feel. People of any age taller than 3 ft 7 in tall can ride it. Those looking for an even more thrilling experience can try METEO, which drops from a height of around 165 feet! It also has indoor attractions and covered rides, so you can enjoy the park even on rainy days. Its one-day pass, Free Pass as they call, may be a good deal to ride various attractions. A "free pass" that includes admission to Hirakata Park and unlimited access to attractions costs 4,800 yen for adults, 4,000 yen for elementary school students, and 2,800 yen for children from 2 years old to preschool age. Purchase online or with Lawson Ticket for a discount. For details, please check the official website. Enjoy a Hot Summer Day at the Pools at Hirakata Park Photo:A child playing in a pool The Boon is its swimming pool where both children and adults can enjoy a huge lazy river pool and kids pool. The swimming pools are especially fun for children on their summer vacation who are full of energy. Kiddie Slider, Crying Tube, and Canyon Ride are fast and powerful tube slides. You can bring in a dome-shaped pop-up tent of 2m x 2m or less to the poolside, but it will be crowded during summer vacation, so you'll need to get a spot early in the morning. [Video] 0:46 - Nagisa Pool and the Lazy River Pool In the summer, you can leave the pool area in your swimsuit and ride other attractions as well. Please check the official website for pool fees. Autumn and Winter Events at Hirakata Park: Halloween, Illuminations, and More! Photo:An illumination at Hirakata Park, Hirakata, Osaka During autumn, Hirakata Park is dyed in Halloween colors with pumpkins and ghosts displayed throughout the park. Autumn roses are also in full bloom during this season, so be sure to stop by the Rose Garden. In the winter, Hirakata Park is home to an ice-skating rink called Winter Carnival. It has three areas, including the main rink, sub rink, and baby rink. you can choose the rink you want to skate at according to your age and ice-skating skills. Another winter event is the Amusement Park of Lights, an illumination event that transforms Hirakata Park into a magical world. Different illuminations and music are played in each area, and you can also enjoy night attractions. Be sure to take a photo in front of the Christmas tree to commemorate your trip to the park! [Video] 2:28 - Illuminations at Hirakata Park Other Things to Do at Hirakata Park – Petting Zoos, Athletic Parks, Barbecues & More! Photo:A prairie dog at Wonder Garden, Hirakata Park Hirakata Park has two animal areas. The outdoor Wonder Garden is a great place to stop by while having fun at the amusement park. At the indoor Wakuwaku Zoo, you can feed cute animals. You can feed popular red pandas for a limited time on certain days as well, so be sure to check the schedule in advance. [Video] 1:35 - Wonder Garden Active elementary school children can also enjoy the educational adventure "Athletic 'try-it,'" which has two courses, normal and challenging. Preschool children can also take part in the adventure, so long as they are accompanied by an adult! The self-service barbecue areas can be reserved online, making it easy to prepare and clean up. Consider trying it with your family during spring break or summer vacation. How to Get to Hirakata Park There are several ways to get to Hirakata Park depending on where you're coming from, but below we'll introduce how to get to Hirakata Park from Osaka Station and from Kyoto Station. Hirakata Park From Osaka Station (Total time: ~40 minutes) To get to Hirakata Pak from Osaka Station, first, take the Osaka Loop Line to Kyobashi Station (~7 mins). From Kyobashi Station, take the Keihan Main Line to Hirakata-Koen Station (~19 mins). From Hirakata-Koen Station it's an approximately 10-minute walk. Hirakata Park From Kyoto Station (Total time: ~45 minutes) To get to Hirakata Park from Kyoto Station, take the Kintetsu- Kyoto Line to Kintetsu Tambabashi Station (~11 mins), and then from Tambabashi Station, take the Keihan Main Line to Hirakata-Koen Station (~20 mins), and then walk to Hirakata Park (~10 mins). Summary of Hirakata Park Photo:The rose garden at Hirakata Park, Hirakata, Osaka At Hirakata Park, where many seasonal events are held, you can feel the spirit of the season from the flowers that decorate the park. If you ride the Red Falcon when the cherry blossoms are in bloom, you can ride through a row of cherry trees. The 300 cherry trees planted in the park are also well worth seeing. [Video] 0:10 - Red Falcon Riding Through Cherry Blossoms The park has 4,000 roses of 600 different varieties in its rose garden, which is beautiful from any angle. In the spring and autumn, visitors are delighted by the colorfully blooming roses. [Video] 0:28 - The Beautiful Rose Garden Hirakata Park is a theme park loved by people in the Kansai region, where everyone from children to adults can enjoy themselves. If you're visit Osaka on vacation, be sure to stop by Hirakata Park. Children on their spring or summer vacation are sure to have a blast! ◆Hirakata Park◆ 【Address】1-1 Hirakata Koenmachi, Hirakata, Osaka 【Hours】10:00 am -5:00 pm 【Admission Fee/Tickets】Adults (junior high school students and older): $11.15 USD, Children (Ages 2 through elementary school): $6.27 USD. Prices correct as of 6/27/2023. ※Please not that prices are subject to change, so please check the official website for up to date information. 【Nearest Station】Hirakata Park Station, Keihan Railway 【Official Website】Hirakata Park 【TripAdvisor】Hirakata Park -
Video article 7:47
CB or OD? Gas Canisters for Camping in Japan: Which Gas Canister Is Right for You?
Things to Do- 286 plays
- YouTube
Camping and Gas Canisters in Japan Japan is experiencing an unprecedented camping boom. Its popularity is increasing year after year. There are two types of gas cans used for camping in Japan: "OD cans," short for "OutDoor Cans," and "CB cans" (Cassette Bombe Cans), which are used in at home. In Japan, "CB cans" are inexpensive and easily obtainable, but in some cases, "OD cans" are better for camping. In this article, we'll take a look at the different gas canisters used for camping in Japan. Video Introduction Source :YouTube screenshot This video, titled "[Gas] the Difference Between CB Cans and OD Cans. Which Is Better for Camping and How to Use Them Properly" (【ガス】CB缶とOD缶の違いについて キャンプでは結局どっちがいいのか?使い分けのポイントについて解説), was uploaded by "Sports Authority" (スポーツオーソリティ). Japan's Different Types of Gas Canisters In this video, a specialist in outdoor equipment explains Japan's gas canisters in detail. Gas canisters are necessary for using gas burners, cassette stoves, and lighting lanterns when camping and enjoying other outdoor activities in Japan. However, because there are different types, you might be confused about which one is best for you. If you choose the wrong canister when venturing outdoors, you may not be able to start a fire. This time, we'll introduce Japan's gas canisters so that anyone, from beginners to experienced campers, can experience camping in Japan with ease. Learn the differences and be prepared for camping! The Difference Between CB and OD Gas Canisters Photo:An OD can gas canister CB cans are vertical cassette cylinders used not only for camping but also for gas stoves in many homes in Japan. They are generally inexpensive and can be purchased at convenience stores and 100-yen stores, making them easy to obtain and use. The two main components are butane and isobutane. There are also CB cans that contain propane gas, but these are far less common. OD cans, on the other hand, are round, stout, and are made with containers that can withstand pressure. Available at specialty stores and home centers across Japan, they are more expensive than CB cans and contain 30 to 35% propane gas. The canisters themselves are also thicker and feature a strong, stable output that is resistant to cold. The Components of Gas Canisters and Their Boiling Points Photo:A gas stove Butane, isobutane, and propane have different boiling points. The boiling point of butane is around 0°C, isobutane is around -10°C, and propane is around -40°C. This means that propane gas is the most resistant to cold. [Video] 3:00 - Boiling point of liquid gases As the liquid gas vaporizes, it takes heat from its surroundings, so the gas canister gets colder as it is used. Therefore, even outside of extremely cold weather, it's possible that a gas can will become cold and unusable while in use. Even in the spring and fall, depending on the time of day and location, the outside temperature can drop below 10℃. In such cases, it's a good idea to have an OD can that can withstand the cold. When camping in Japan, you'll probably make fewer mistakes if you purchase not only inexpensive CB cans but also OD cans with stronger output just in case. How to Properly Dispose of Gas Canisters in Japan Photo:Disposing of gas canisters When disposing of gas canisters in Japan it's important to empty the contents of the containers before discarding them. Hold the can and shake it to see if it makes any noise. If the OD can has a cap that can be used to vent the gas, use it to make a hole in the can, or if not, use specialized items available at stores to vent the gas. That being said, some municipalities in Japan recommend not opening holes in gas canisters, so be sure to dispose of them correctly according to guidelines prescribed by the local government. Summary of Gas Canisters for Camping in Japan Most people tend to focus on the inexpensive CB cans, but hopefully this has helped you understand the differences and merits between CB and OD cans. The expert in the video listens to customer questions and feedback as well, so you know they're looking out for the best interests of the customer. If you're particular about how you want your food cooked when camping then output is especially important. Be sure to do your research when deciding which gas canisters to buy. -
Video article 3:36
Camping in Japan - How to Clean Up After a Campfire! Key Points for Campfire Cooking in Japan!
Things to Do- 66 plays
- YouTube
Only You Can Prevent Wildfires Japan is currently experiencing an outdoor boom. As an island nation surrounded by the sea, Japan is also blessed with abundant nature. Because of this, it's possible to travel from the heart of Tokyo to a campground surrounded by nature in just a couple hours, and new styles of camping, such as solo camping, are on the rise. Camping is a lot of fun, but it's important to remember to clean up after your campfire to prevent wildfires and other accidents. In this article, we'll take a look at how to clean up a campfire. Video Introduction: Cleaning Up After a Campfire Photo:A campfire This video, titled "How to Clean Up After a Campfire at a Campground" (キャンプ場での焚き火の後片付け方), was uploaded by "Hiro, Camping" (ヒロ、焚き火). Campfires are used for a variety of purposes, including cooking and warmth. Some people simply like relaxing and getting lost in the flames of a campfire. That being said, cleaning up after a campfire is a necessary part of a safe and enjoyable camping trip in Japan. If you fail to clean up after a campfire, it can cause wildfires and other problems for many people. It's important to extinguish fires properly to protect our rich natural environment. Some Campgrounds Allow Open Flame Cooking, Others Don't Some campgrounds allow campfire cooking, while others do not. Be sure to check if the campground you're using allows open flame cooking. If open flame cooking is not allowed, you'll need your own campfire pit, fire sheet, etc. How to Clean Up Charcoal and Ashes After a Campfire Source :YouTube screenshot First, any coals and wood should be burnt down as much as possible. The extinguished coals and ashes can then be placed on a 60-micron aluminum foil. After that, clean up the surrounding area, picking up anything that has dropped under the fire pit. Restore the area to its original state as best as possible. [Video] 0:08 - Picking Up Ashes Water can then be poured over the collected charcoal and ashes. From there, you can wrap the remains in the aluminum foil compactly, removing as much air as possible. Then, wrap that in another sheet of foil and finally, place it in a plastic bag. If ashes from your campfire are scattered nearby, be sure to pick them up as well. Leaving ashes behind is a known cause of environmental pollution. The ashes, as well as the remaining charcoal will not decompose and be replaced by soil, so please do not bury them in the ground. After gathering the remaining ashes, pour water over them. Check the temperature of the ground around you just to be sure as well. Reducing the risk of fire as much as possible will not only protect you, but also other campers and the environment. Dispose of garbage from any meals you made while camping, as well as ashes and charcoal from campfires, in areas designated by the campground. Camp Fire Cleanup Summary Photo:Campfire remains When building a campfire at camp, clean up after the fire properly. Don't leave any ashes or coals behind with the mistaken belief that they will decompose. Failure to ensure that you clean up after a campfire could lead to a wildfire or other major problems. Keep in mind that even the slightest amount of carelessness can lead to a major accident. Everyone has their own way of enjoying camping and other outdoor activities, but remember that you're in a public place and should observe rules and manners. If you go to a campground that prohibits open flame cooking, don't forget to prepare a fire pit and other outdoor equipment. Please make sure to keep the cleanup of bonfires in mind with the video introduced here, and by all means, enjoy the rich nature of Japan while camping! -
Video article 5:37
Beigoma - The Traditional Japanese Spinning Top Loved by Children and Adults Alike! Become a Beigoma Master With the Help of This Video!
Things to Do- 1.15K plays
- YouTube
Beigoma - Traditional Japanese Tops! This video, titled "[Beigoma- 1. Tie it 2. Wind it 3. Hold it 4. Let it rip! - Tokyo Beigoma]" (「ベーゴマの、1.ヒモの作り方、2.ヒモの巻き方、3.持ち方、4.投げ入れ方 | 東京ベーゴマ」), is created by "Tokyo Beigoma" (東京ベーゴマ). The video is an introduction to Beigoma for beginners. This video clearly explains how to play with Beigoma and also teaches basic techniques for spinning Beigoma that are often difficult for beginners. After watching the video, you'll be on your way to becoming a Beigoma master in no time! If you're a total beginner, don't worry, this video has you covered! Traditional Japanese Beigoma Photo:Beigoma showdown Koma are ancient Japanese toys said to have originated in Heian period (794-1185) Kyoto when people played by spinning shells with string. Beigoma is a kind of Koma (Japanese spinning top) made of cast metal. It was a popular toy among kids from the Taisho period (1912-1926) to Japan's economic boom. To play Beigoma, you make a playing board by stretching a thick fabric sheet partially over a bucket or a barrel, and players spin their Beigoma onto the surface and have them bang against one another. Although Beigoma is an old toy, there have been many more people playing with Beigoma, Menko (an old Japanese card game), and other old-fashioned toys, due to a revived interest in old‐fashioned goods. Also, there are "new" Beigoma based toys such as Beyblade (ベイブレード) and Beigoma Spin Heat (ベイゴマスピンヒート), which are very popular among kids and sold at toy stores and online. Beigoma competitions are also becoming popular. The smartphone app "Beigoma Stadium" (ベイゴマスタジアム) is popular among adults as well. There are various types of Beigoma. Pecha (ペチャ) is the thinnest Beigoma and is harder to control but quite strong. Pe-oh (ぺ王) is the most difficult to control but is the most powerful. Chu-daka (中高) is short but easy to spin. Maruroku (丸六) is the best for beginners. Kakuroku (角六) is easy to spin and is also quite strong. Taka-oh (高王) is about 1.5 times the size of Maruroku, and Bay (バイ) is easy to spin and lasts a long time. Beigoma players also modify their Beigoma and make their own original versions. How to Play Beigoma Source :YouTube screenshot Now we'll introduce how to play Beigoma. First, make a string to wrap around the Beigoma (video 0:07). Tie the string and make a few knots. Next up is the winding process. There are several ways to wind the string, such as Onnamaki (女巻き), Otokomaki (男巻き), and Jujimaki (十字巻き). In this video, we'll learn Onnamaki. (~2:14). First, make sure the tip of the Beigoma sits between the knots on the string. From here, press and hold the end of the string onto the Beigoma with your thumb, and wind the string around the beigoma while keeping the pointed tip of the Beigoma between the knots. Next, wrap the string counterclockwise around knots while holding the string tightly with your fingers to prevent it from unraveling. Wrap it slowly in a circle, and your done! Next we'll learn how to hold the Beigoma. Hold it with your thumb and index finger, and wrap the rest of the string around your pinky and grab ahold of it. (~3:34) Source :YouTube screenshot Finally, let your Beigoma rip! (~4:11) Make sure not to throw it at an angle when launching it onto the playing board. Place your right foot close to the board, making sure to launch the Beigoma on the board, and as soon as you launch it, pull the string tightly. Summary of Traditional Japanese Beigoma Photo:Beigoma Did you enjoy learning about Beigoma? The video gives simple instructions on how to play with Beigoma, so even if you've never done it before, don't be shy! You'll be able to throw some awesome Beigoma in no time! If you're interested in traditional Japanese toys, be sure to check out the video! -
Video article 6:10
How to Make a Chopstick Rubber Band Gun: An Easy to Follow Tutorial Video for the Handmade Toy. All You Need Is Rubber Bands and Chopsticks to Create a Powerful, High-Quality Toy!
Things to Do- 1.55K plays
- YouTube
Chopstick Rubber Band Guns! This video is titled "Easy★How to Make Chopsticks Rubber Guns★Handmade Toy" (簡単★ 割り箸ゴム鉄砲の作り方 ★手作りおもちゃ). The chopstick rubber band gun is a popular toy among Japanese children. It uses chopsticks, which is a very familiar item for Japanese people, to create a gun shape by tying them together with rubber bands. They're not too difficult to make, so try to follow along and make your own as we explain the process. Making a Chopstick Rubber Band Gun Source :YouTube screenshot First, prepare 3 wooden chopsticks, a few rubber bands and a pair of scissors. If the chopsticks are still stuck together, break them apart so we can begin making the rubber band gun. As you can see at 0:37 in the video, we'll be using the chopsticks and rubber bands to assemble it. The grip of the gun is made by cutting the chopsticks into pieces with scissors. This is shown at 2:11 in the video. The firing mechanism of the chopstick rubber band gun is simple, and you can make the rubber band fly far by hooking one to the finished gun and shooting. When you finish making one, use a laundry clip as a scope to aim at your target. You can see the rubber band gun being shot at 5:45 in the video. Making a Strong Chopstick Rubber Band Gun Photo:Chopstick Rubber Band Gun You can make cool handmade guns other than the one in the video, such as a laundry clip pistol, a multi-fire pistol, dual handguns, and a gatling gun. There are even crazy strong guns like machine guns, sniper rifles, and semi-automatic gun. Use the internet to search how to make the more advanced rubber band guns and try making one with your friends! These days, there are classes and workshops for chopstick rubber band guns. We recommend giving one a try! Rubber Band Gun Competitions The Japan Rubber Band Gun Shooting Association was established in November 2000. It is an organization that aims to popularize rubber band guns, including the chopsticks rubber band gun variation. The Japan Rubber Gun Shooting Association has established three rules: Matchbox, Fly Shoot, and Coin Pendulum, as official rubber band gun competitions, and there are also events and competitions held. Summary of Rubber Band Chopsticks Source :YouTube screenshot In this article we talked about how to create chopstick rubber band guns. The chopsticks rubber band gun is a handmade toy that can also be enjoyed by adults. We recommend making one during your summer vacation! Check out the video to see how to make chopstick rubber band guns and try to create a powerful device! 【Official Website】Japan Rubber Band Gun Shooting Association http://www007.upp.so-net.ne.jp/jrbgsa/syagekitop.html -
Video article 1:04
Become a Ninja in Kabukicho! Shinjuku’s “Ninja Trick House” in Tokyo; Located on the Busiest Shopping District in the East!
Things to Do Travel- 77 plays
- YouTube
Tokyo's “Ninja Trick House” The video “Ninja Trick House, Shinjuku(手裏剣道場 新宿 忍者からくり屋敷)” was created by “Ninja Trick House in Tokyo”. The Ninja Trick house, where you can throw shuriken and experience becoming a ninja, is located in Kabukicho. You can release stress by listening to the shuriken fly through the air and strike their targets. The facility can be enjoyed by children and adults alike. This article is going to introduce you to Tokyo's Ninja Trick House. What is Tokyo's “Ninja Trick House” Source :YouTube screenshot “Ninja Trick House in Tokyo: Experience the Mystical World of the NINJA” is owned by Legacy Co., Ltd. It is a place where you can experience shuriken throwing and learn ninja sword techniques. You can take your children along or even go as a date. You can enjoy experiences such as touching and drawing replicas of Japanese swords, wooden swords and a ninja swords. It is not something you can experience in many other places. You can check some of that footage out from 0:20 in the video. Searching for trick walls and mechanisms of the ninja house is fun as well. Give it a try if you're curious. Source :YouTube screenshot As you can see from 0:12, the entrance to the Ninja Trick House has red torii gates leading up to its entrance. It feels like you're stepping into another world. During the ninja experience, the first thing they do is show a video that explains ninja. After the video, some ninja enter the room, explain the weapons and tools, and the ninja training begins! You can practice shuriken throwing and swordsmanship at the training range. It is an indoor attraction with a guide, so you can participate without worry. The main attraction, shuriken throwing, is shown from 0:49 in the video. The facility has a Japanese tatami style room that helps make the experience feel authentic! Find out what type of ninja you are, and what school of ninja you belong to as well! Information about Tokyo's Ninja Trick House Photo:Shinjuku Station East Exit at Dusk The Ninja Trick House is about an 8 minute walk from JR Shinjuku station east exit, and a 5 minute walk from Seibu Shinjuku line, Shinjuku Station. As of April, 2020, The admission fee is 1,500 JPY (~$14.00 USD) per person and free for children under 3 years old. The experience itself lasts about 30 to 45 minutes. There is restricted entry when crowded, so we recommend booking ahead of time. The Ninja Trick House has a great reputation, and is very popular among visitors to Japan. The Ninja Trick House also received first prize in TOKYO100; a project by Trip Advisor and the Tokyo Metropolitan Bureau of Transportation. Tokyo's top 100 attractions are shown in the rankings, and there are sites that give coupons as well, so be sure to check it out if you are interested. The world famous "Ninja" Photo:Ninja Ninja existed during the Muromachi period (1336 to 1573) and Edo period (1603 to 1868) in Japan. Their specialty was in intelligence, infiltration tactics, subversion, conspiracy and assassination. Ninja are known all over the world thanks to manga, anime, movies and games. One of the first things that comes to mind for many people when they hear "Japan", is actually ninja. In Japan, you can experience ninja at the VR Ninja Dojo in Kanda, Tokyo, Edo Wonderland Nikko Edomura in Tochigi, the Samurai Museum in Shinjuku and Izakaya Ninja Yashiki in Asakusa. Summary Source :YouTube screenshot The video “Ninja Trick House, Shinjuku”, created by “Ninja Trick House in Tokyo” introduces a facility where you can experience ninja in Shinjuku's Kabukicho. We highly recommend visiting here, as there is no other place where you can experience throwing shuriken and swordsmanship at such a level of authenticity. ◆NINJA TRICK HOUSE: Experience the Mystical World of the NINJA◆ 【Address】 Daiichi Wako Building 4F, 2-28-13 Kabukicho, Shinjuku, Tokyo. 【Access】 8 minute walk from JR Shinjuku east exit. 5 minute walk from Seibu Shinjuku station. 【Entrance fee】1,500 yen. Free for under 3 years old. (April 2020) 【Closures】Every Tuesday and Wednesday 【Parking】None 【Telephone No】 03-6457-3337 【Official Website】Ninja Trick House in Tokyo https://ninja-trick-house.com/en/ 【Tripadvisor】Ninja Trick House In Tokyo Ninja Trick House, Tokyo -
Video article 2:08
The Exciting Roller Coasters and Ferris Wheel at Tokyo Dome City! Enjoy Sightseeing at an Urban Leisure Land Complex in Bunkyo City, at the Heart of Tokyo!
Things to Do- 127 plays
- YouTube
About Tokyo Dome City Introduction Video This video is "[4K] Tokyo Dome City" (東京ドームシティ), released by "uri pin." This video introduces Tokyo Dome City, with Tokyo Dome City Attractions as the main focus. Tokyo Dome City was renamed in 2000 from "BIG EGG CITY." Tokyo Dome City is an urban complex leisure land that includes Tokyo Dome, attractions, bathing facilities, fitness facilities, shops and restaurants. In this article, we will introduce the attractions of Tokyo Dome City and information about its facilities. First, let's check out the video to see what facilities Tokyo Dome City has to offer! "Tokyo Dome City Attractions" Source :YouTube screenshot Tokyo Dome City Attractions is an amusement park that everyone from children to adults can enjoy. Admission is free, but there is a fee for riding or entering the attractions. You can also buy tickets for an unlimited number of rides for one day, tickets to ride five attractions, and the special "Get 10" ticket, which allows you to combine your points to use the facilities of your choice. Hours of operation vary by day and season, so be sure to check the official website before your visit. The first thing you see when you enter Tokyo Dome City Attractions is the Big O, the world's first center-less Ferris wheel (without a central pillar) and the Thunder Dolphin, the world's first roller coaster with a maximum inclination of 80 degrees, both of which can be seen at a href="#section-article-content" target="_blank" class="textlink">0:06 in the video. At 0:18 in the video, the thrilling Skyflower is introduced. Another popular ride is Wonder Drop, which starts at 1:53 in the video. The ride takes you on a leisurely ride through the water, and then you dive into the water from a height of 13 meters. For young children, you can enjoy attractions such as "Hero Show" and "Magical Mist," shown at 1:06. At Magical Mist, mist spouts from the ground, making it perfect for the hot summer season. There are also many other rides and haunted houses available to keep kids and adults entertained all day long. The Facilities of Tokyo Dome City Source :YouTube screenshot In addition to the amusement park, Tokyo Dome City also has baseball games, concerts and other events, as well as the indoor kids' facility ASOBono!, the GO-FUN food court, the fitness and bathing facility LaQua, cafe & restaurant "MEETS PORT," TOKYO DOME CITY HALL , Korakuen Hall, a bowling alley, the exhibition hall, Prism Hall, and more! There is also a jump shop, a limited edition Doraemon shop, and other shops lining the street, so you can enjoy window shopping for souvenirs to commemorate your visit to Tokyo. During the winter season, Tokyo Dome City is illuminated with a spectacular display of lights. Tokyo Dome City is located in Koraku, Bunkyo-ku, Tokyo, and is conveniently accessible from Suidobashi Station on the JR line, Suidobashi Station on the Toei Subway Mita Line, and Korakuen Station on the Tokyo Metro Marunouchi and Nanboku lines. There is also a parking lot so you can visit by car. Summary of Tokyo Dome City Source :YouTube screenshot Tokyo Dome City has attractions for everyone to enjoy. Be sure to check out the video; you're sure to find something that catches your eye! There's also "Look, Play, Relax," and Tokyo Dome City Hotel, so you can enjoy an overnight stay. Whether you're with your family or going as a couple, there's plenty to do in Tokyo Dome City to keep you entertained all day long. ◆Tokyo Dome City Facility Overview◆ 【Address】1-3-61 Koraku, Bunkyo-ku, Tokyo, 112-0004 【Access】Right outside JR Suidobashi Station, Toei Mita Line Suidobashi Station, Tokyo Metro Marunouchi Line, Namboku Line Korakuen Station 【Admission fee】Varies by facility. 【Hours】 Varies depending on the facility. 【Closures】Closures vary by facility 【Parking】Available 【Telephone】03-5800-9999 【Official Website】Tokyo Dome City https://www.tokyo-dome.co.jp/tourists/ 【Tripadvisor】 Tokyo Dome City https://www.tripadvisor.com/Attraction_Review-g1066442-d324261-Reviews-Tokyo_Dome_City-Bunkyo_Tokyo_Tokyo_Prefecture_Kanto.html -
Video article 4:08
A New Sensory Experience at the Odaiba Art Museum’s "Mori Building Digital Art Museum." Experience Another World in This Fantastic, Colorful Space!
Things to Do Travel- 94 plays
- YouTube
Team Lab Borderless' Mori Building Digital Art Museum This is the video of the "Mori Building Digital Art Museum [4K60p](森ビルデジタルアートミュージアム MORI Building Digital Art Museum [4K60p])" produced by "Japan Explorers." It introduces the Mori Building Digital Art Museum, a sightseeing spot in Odaiba, Koto ward, Tokyo, in Japan's Kanto region. The Mori Building Digital Art Museum is a new sensory facility where art is drawn in a three-dimensional space. In the video, you can see contemporary art works wrapped in colorful light throughout the whole story. Enjoy the fantastic scenery of new age art. Check Out the Works of the Odaiba Art Museum and Digital Art Museum! Source :YouTube screenshot At the popular Mori Building Digital Art Museum in Odaiba, you begin by taking a look at a work called "Borderless World." After that, a popular work called "Lamp Forest" is introduced at 1:39 in the video. Numerous lamps change colors one after another, creating an otherworldly landscape. On the third floor of the Mori Building Digital Art Museum there is a tea house called "EN TEA HOUSE Genka-tei." In the multi-jumping area on the 4th floor there is the "Motion Forest" area where you can enjoy the world of the artwork using your whole body. It's a fun and physical area to visit, so it's best to wear easy-to-move-in clothing. This can be seen from 3:14 in the video. Take a look at the "learn! Future Amusement Park" area, which is an educational project. Pay Attention to the Magnificent Scale of Odaiba's Art Museum and Digital Art Museum! Source :YouTube screenshot Epson TeamLab Borderless art uses 520 computers and 470 projectors. With a scale of 10,000 square meters, you can enjoy a complex and three-dimensional world like you've never experienced before. At the Mori Building Digital Art Museum, about 60 works, each of magnificent scale, are exhibited. Apart from the introduction, there are also seasonal projects and more. This keeps art lovers coming back for more, as there's always something new and exciting happening here. Odaiba Art Museum, Mori Building Digital Art Museum Introductory Video Summary Source :YouTube screenshot The videos introduced here condensed the appeal of the Mori Building Digital Art Museum, where you can experience different worlds in light up atmospheres. If you are interested in watching this video, please visit the digital art museum and art museum in the Odaiba area when traveling to Japan or sightseeing in Tokyo. Tours can often be crowded, so it's best to visit during the day on weekdays. ◆ Mori Building Digital Art Museum ・ Team Lab Borderless ◆ 【Address】The second floor of Odaiba Palette Town 1-3-8 Aomi, Koto-ku, Tokyo 【Access】 Rinkai Line Tokyo Teleport Station 5 minutes by walk from Exit A / New Transit Yurikamome 3 minutes by walk from Aomi Station North Exit 【Admission fee】Adult 3,200 yen, Child 1,000 yen (* as of November 2019) 【Hours】Weekdays 10: 00-19: 00, Saturdays, Sundays, and holidays 10: 00-21: 00 【Closures】Every 2nd and 4th Tuesday of the month 【Parking】Affiliated parking available 【Telephone No】03-6368-4292 【Official Website】Mori Building Digital Art Museum-teamLab Borderless https://borderless.teamlab.art/ 【Tripadvisor】Mori Building Digital Art Museum: TeamLab Borderless, Tickets and Travel https://www.tripadvisor.com/AttractionProductReview-g298184-d15126254-MORI_Building_DIGITAL_ART_MUSEUM_teamLab_Borderless_Ticket_and_Transfer-Tokyo_Toky.html -
Video article 7:31
How to Cook Rice with a Mess Tin! 6 Tips to Make Tasty, Fluffy Rice Using Solid Fuel!
Things to Do Food & Drink- 379 plays
- YouTube
The Basics of Camp Cooking in Japan: Rice Rice, the staple food of the Japanese people, is also popular when camping. In this article, we'll introduce a video how to cook rice using a mess tin. Learn about mistakes advanced campers have already made so you can avoid making them yourself! Video Introduction This video, titled "[Mess Tins] Tips to Avoid Mistakes When Cooking Rice" (【メスティン】メスティン自動炊飯で失敗しないポイントとは), was uploaded by "Second Lieutenant Nya [Demoted to Rave Reviews]" (ニャア少尉【絶賛降格中】). The video introduces how to cook rice without fail using a mess tin. It's a must-see for outdoor and camping beginners in Japan, as well as for those who have never successfully cooked rice with a mess tin. Check it out! Mess Tins - A Popular Piece of Camping Dishware Photo:Camping gear A mess tin is a piece of cookware used during camping and backpacking. Shaped like a lunch box with a handle, they're made of aluminum for high heat conduction and can be heated with a single burner. They're also compact and easy to store. They can be used for smoking foods, pasta, and even arranged recipes using cooked rice and bread. They're a popular cooking utensil for outdoor enthusiasts with a variety of cooking methods, such as simmering, steaming, baking, etc. The first time you use a mess tin, it's recommended that you file and deburr it, as they can have rough spots on them. Some campers also recommend seasoning to prevent burning and other problems. 6 Tips for Cooking With a Mess Tin Photo:Rice soaked in water The video explains 6 tips to avoid mistakes when using a mess tin for outdoor cooking and camping. Let's take a look! ・Allow Water to Permeate the Rice Thoroughly After washing your rice, you'll want to soak the rice in water for at least 30 minutes during summer and 1 to 2 hours in winter in order to allow the water to penetrate the rice. [Video] 0:48 - Preparing the rice ・Solid Fuel (25g) Next is the solid fuel. Use 25g of solid fuel so that the fire won't go out in the middle of cooking. [Video] 1:24 - Solid fuel ・Next is the water. Be careful with the amount of water so that your rice isn't hard when you're finished cooking. In the video, water is added until the middle of the rivet of the mess tin for 1 cup of rice, but note that the height differs by manufacturer. [Video] 1:54 - Adding water ・Use a Wind Screen Fourth, use a windbreak to keep the heat and temperature consistent. The wind outside can make it difficult for the fire to reach the mess tin, resulting in uneven cooking, so be sure to use a wind screen. [Video] 2:24 - Wind screen ・Place a Weight on Top of the Mess Tin Lid The lid may come off when the pressure inside the mess tin rises. It's recommended that you put a weight on the lid to prevent it from coming off. [Video] 2:41 - Weights ▪ Steaming Remove from heat once steam starts to spill out or there's any bubbling sounds. To prevent the temperature from dropping too low, place the rice in a temperature retaining bag and let it steam for 10 minutes to make it fluffy and delicious. [Video] 3:52 - Steaming Warming Up Canned Goods With a Mess Tin! Source :YouTube screenshot The video shows how you can place a weight on top of the lid to prevent it from opening while the rice is cooking. In the video, canned food that is eaten with rice was placed on top of the lid instead of a weight. When the rice is done cooking, the canned food is also warmed up, so you can kill two birds with one stone! Summary of Mess Tins for the Outdoors & Camping In this article, we introduced a video of how to cook with a mess tin. A mess tin is a cooker that is handy for outdoor cooking, such as when camping, because it allows for easy outdoor cooking due to its versatility. Whether you're cooking with a mess tin for the first time or have used a mess tin before but experienced some failures, be sure to refer to this video to make some delicious rice! -
Video article 2:38
How to Use a Chimney Starter! Easy-To-Use Oga Charcoal That Holds Fire but Is Difficult to Light!
Things to Do- 381 plays
- YouTube
For Campers Who Have Difficulty Lighting a Campfire Making a fire gets easier the more you do it, but it can be difficult for novice campers. Campfires and barbecues are two of the best parts about camping and the outdoors. In this article, we'll introduce how to use a chimney starter so that those new to the outdoors and those who are finding it difficult to start a fire, can do so with ease. Video Introduction This video, titled "The Easiest Way to Start a Campfire|How to Light Charcoal Without Fail Even for Beginners" (1番簡単な火おこしのやり方|初心者でも絶対に失敗しない炭に火をつける方法), was uploaded by "Izu no Nushi Tsuri" (伊豆のぬし釣り). If you're like most campers you've probably struggled to light a fire at some point when camping or enjoying the outdoors. With the help of this video, you can learn how to easily light a campfire using a chimney starter. What is a Chimney Starter? Source :YouTube screenshot Chimney starters are also called charcoal starters. They're an excellent tool for easily starting a fire using the chimney effect (stack effect). In the video, a Uniflame Charcoal Starter is used. The video shows how easy it is to start a fire, even if you're new to using a chimney starter. This video shows how to start a fire without failure using a chimney starter. Using Oga Charcoal - Long Lasting But Hard to Start Photo:Oga Charcoal Although oga charcoal burns long and can be used for 2 to 3 hours, it can be difficult to light. In this video they use said oga charcoal. If you can master how to use it, you can start building fires efficiently. How to Use a Chimney Starter Source :YouTube screenshot So, without further ado, let's take a look at how to use a chimney starter. ・Stand the chimney starter up vertically and place the coals inside in an upright position. By placing the coals upright, they will burn more efficiently due to the rising air currents. [Video] 0:06 - Placing charcoal in the chimney starter ・Place the igniter under the chimney starter and light it. Underneath the chimney starter, there's a space for the igniter. After lighting the igniter, place the chimney starter on top of the igniter so that the flames rise into it. Then just let it sit for about 20 minutes. It's incredibly easy. [Video] 0:55 - Lighting the igniter The fire spreads from the igniter to the charcoal placed on top. Even a novice outdoorsman can light oga charcoal with a chimney starter. The idea behind the chimney starter is to use the air flow and the rising air currents to stimulate combustion. If you use the chimney starter to light a fire when you arrive at your campsite, you can start the BBQ (barbecue) when you've finished setting up your tent and other equipment. Use Air Flow to Efficiently Start a Fire Photo:A campfire When it comes to camping, outdoor cooking is what it's all about. Family campers and solo campers alike can enjoy cooking a variety of different foods. Some experienced campers make their own chimney starters using the chimney effect. However, beginners should start with a commercially available chimney starter. A chimney starter can start a fire in a short time and can be conveniently packed. The stainless-steel design also makes it rust-resistant. Summary of How to Use a Chimney Starter In this article, we introduced how to light charcoal using a chimney starter. You may have been surprised at how much easier this method can be. If you're struggling to build a campfire or not feeling confident about your fire making skills, it might be a good idea to have a chimney starter so you can enjoy your time camping in the outdoors while relaxing around a fire and eating delicious barbecue instead of worrying about getting your fire started. For some people, building a fire is one of the best parts of being outdoors, but if you prefer to prioritize mealtime over the time spent on starting a fire, consider picking up a chimney starter. -
Video article 7:07
The Bon Odori Izakaya, Where You Can Enjoy the Bon Odori Dance All-Year-Round: A Must-Visit Izakaya in Shinjuku, Tokyo!
Things to Do Food & Drink Travel- 37 plays
- YouTube
The Bon Odori Izakaya: A Taste of Japanese Culture This video, “Bon Odori Izakaya - 盆踊り居酒屋”, was created by “TokyoStreetView - Japan The Beautiful”. This is a 4K video introducing a restaurant where you can experience Japan’s traditional dance. Bon odori is a well-loved traditional dance which has existed in Japan for centuries. Every year, during the Obon season, people in all areas of Japan gather to enjoy doing this traditional dance together. In Tokyo’s Shinjuku area, there is an intriguing place aimed at tourists where bon odori can be enjoyed year-round. Isn’t it strange to imagine enjoying bon odori, normally associated with the stages of summer festivals, in an izakaya of all places? The video introduces the spectacle in 7 minutes. You'll definitely get a sense of the festive atmosphere through this video. What Is Bon Odori? Photo:Image of Bon Odori During the Obon period, which is celebrated in August in Japan (July for places such as Tokyo), there are various events held to pay respects and offerings to ancestors. Bon odori is a type of dance where residents dressed in yukata surround a large stage and dance together. In the middle of the stage is a smaller stage where they perform the festival's music and play Japanese drums, providing the accompaniment to the dance. The exact moves of the dance differ according to each area of Japan, and it is said that there are over 1,000 types of bon odori choreographies throughout Japan. Visit a Summer Festival and Enjoy Bon-Odori! Photo:Siblings at a Japanese Summer Festival Bon odori is commonly held as a part of the summer festivals in Japan. Lanterns are lit in temples and shrines, food stalls are set up, and there is a lively, bustling atmosphere with many visitors. Summer festivals, which can even be said to be Japan’s summer tradition, are definitely a recommended event for visitors who wish to experience Japanese culture. There are many festivals where tourists are heartily welcomed to participate in the dance, so don’t hesitate to give it a try! A Look at the Bon Odori Izakaya! Source :YouTube screenshot Although Bon Odori is a piece of Japanese culture that can only be experienced during the Obon period, at the bon odori izakaya in Shinjuku, you can enjoy bon odori any time of the year. This exciting place is the Shinjuku Sanchoku Yokocho (新宿産直横丁) in Shinjuku’s Kabuki-cho (歌舞伎町) area. The Bon Odori Izakaya is a popular entertainment establishment where you can become immersed in dancing the bon odori. On top of that, the Edo-like atmosphere allows you to experience a piece of Japan’s history. From0:22 in the video is the Tokyo Ondo (東京音頭), and from 1:09 is the Tanko Bushi (炭坑節), traditional dances well-known to the Japanese. Even just watching your video, doesn’t your body start to move to the beat? Summary of the Bon Odori Izakaya Source :YouTube screenshot From 5:46 in the video, visitors are shown thoroughly enjoying dancing the bon odori in the izakaya. We highly recommend the Bon Odori Izakaya for visitors with an interest in Japanese culture, as well as those who just want to have a fun time. Be sure to check out the Bon Odori Izakaya shown in the video if you haven't yet! If this article/video have made you feel like you want to experience the culture of Bon Odori, or if you want to dance while enjoying drinks and food, be sure to visit the Bon Odori Izakaya in Shinjuku, Tokyo! ◆Shinjuku Sanchoku Yokocho◆ 【Address】Tokyo, Shinjuku, Kabukicho 1-27-5 APM Building 6th Floor (東京都新宿区歌舞伎町 1-27-5 APM ビル6階, Tokyo-to Shinjuku-ku Kabukicho 1-27-5 APM biru rokkai) 【Access】Two minute walk from the Seibu Shinjuku Station off the Seibu Shinjuku Line (西武新宿線「西武新宿駅」, Seibu shinjuku sen seibu shinjuku eki) 【Hours】Mon-Thur 11:00~24:00, Fri・Sat 11:00~4:00 the next day, Sun・Public Holidays 11:00~24:00 【Closures】None 【Telephone Number】03-5285-9288 【Things to Note】As opening hours are irregular, be sure to confirm the opening days and hours of the izakaya before visiting. 【Official Website】Bon Odori Izakaya|Experiential Entertainment Izakaya BonOdori IZAKAYA|Tokyo Shinjuku https://bon-odori.net/izakaya/ja/ -
Video article 10:31
How to Clean and Dry a Tent After Camping in the Rain! Useful Tips and Appliances for Camping in Japan!
Things to Do- 76 plays
- YouTube
Enjoy Camping Even During Japan's Rainy Season Japan has four distinct seasons, each of which has its own variety of natural beauty to enjoy, such as cherry blossoms and autumn leaves. However, after spring comes the rainy season, otherwise known in Japanese as "tsuyu." Camping is experiencing a big boom in Japan right now, and so, in this article, we'll introduce how to clean up when it rains during a camping trip. Video Introduction: How to Clean Up After Camping in the Rain and Useful Appliances Photo:Camping in the rain This video, titled "How to Clean Up After Camping in the Rain and Useful Appliances" (雨キャンプ後のテント片付けと、便利な物を紹介), was uploaded by "HIRO channel," a channel focused on introducing various camping-related videos. Have any of you ever had the experience of being rained out during a camping trip? Tents are already a pain to pack up and clean, but this is especially true if it rains when camping. Mud and dirt get stuck to your tent and other equipment making it a hassle to clean. Perhaps you don't even want to try camping in the rain because of how difficult it may seem. Well, this video will show you how to easily clean up your tent and tarps after camping in the rain, as well as some useful tips to make cleaning your camping gear easier. Be sure to check out this quick 10-minute video to learn how to easily clean up and maintain your tents and other equipment. What to Do When It Rains While Camping Photo:A campground In Japan where it's said to rain on average about once every three days, it's not uncommon that the weather turns to rain on the day you're going camping. Thus, although not mentioned in the video, we'll first introduce a few measures to take when camping in the rain. First, when camping in the rain, be careful where you set your tent up. Avoid camping near rivers and set up your tent on gravel or other areas with good drainage. Next, when setting up your tent, hang the tarp first, then the tent. This creates a space to keep out the rain and makes the process go more smoothly. If it's raining when you're packing up to leave, we recommend putting the tarp away last. In addition, to combat the rain, tents and tarps should be coated with a water repellent to keep rainwater off them, which will make your job easier when it comes time to take them down. Finally, place a sheet under the tent to combat the rain. This will prevent water and dirt from getting into your tent and make cleanup easier. Knowing the above measures will help you safely enjoy a camping trip even in the rain. Pack It in a Dry Bag and Head Home Source :YouTube screenshot Cleaning up a tent after camping in the rain can be very difficult. It can be especially difficult to take home a tent that is covered in dirt or sopping wet. That being said, if your tent or tarp is large and you have a lot of stuff, pack it wet in dry bag, such as the "Coleman 110L Dry Bag." The large capacity makes it very convenient, especially when compared to carrying several smaller garbage bags made of thicker material. Rinse With Water After You Get Home When you arrive home, first wash your tent or tarp with water. The dirt will be even harder to remove once it dries, so it's important to wash it before the dirt has a chance to dry. After washing off the dirt, hang the tent outside in a covered area, such as under the eaves of your roof or on a balcony, or inside in a bathroom. Dry in the Sun or With Convenient Appliances Source :YouTube screenshot Once water is no longer dripping from the tent/tarp, allow it to dry. Make sure to dry it thoroughly, as, if not properly dried, mold can start to grow. As for drying, if the weather is good, dry it in the sun. If it's difficult to dry in the sun due to rain, a clothes dryer or futon dryer can be used. If you put a washed tent or other items in a drying bag, a tent will dry in about 4 hours. If you place a sheet or mat on or under the bag, you can kill two birds with one stone by drying them together. Even if not directly wet from the rain, sleeping bags and other items may be damp as well, so we recommend that you dry them in a bag made for drying bedding. This is a really handy trick for cleaning up after a rainy camping trip. And That's How You Handle Camping in the Rain As shown in the video, the first thing to do when you finished camping during a rainy camping trip is to quickly bring back the we gear and dry them thoroughly after rinsing them with water. In addition, if you make use of some convenient household appliances, cleaning up after a rainy camping trip will be a breeze. If you've had a bad experience camping in the rain and felt discouraged from going camping because of the cleanup, consider trying these methods to help make your camping trip one to remember! "HIRO channel" uploads a variety of videos. You can enjoy various camping videos, including introductions of camping gear, camping videos showing different areas, camping cooking videos, and more. Be sure to check them out! -
Video article 7:39
Scuba Diving and Other Things to Do on Okinawa's Miyako Island! Enjoy Beautiful, Maze-Like Sea Caves, Mystical Underwater Worlds, and Sandy Beaches!
Things to Do Living Things Travel- 62 plays
- YouTube
Popular Scuba Diving Spots in the Sea of Miyako Island (Miyakojima): Video Introduction This video, titled "The Unbelievably Beautiful Diving in Miyako Island" (宮古島のダイビングがありえないほど綺麗な件), was uploaded by Ldive, a scuba diving specialty store located in the Nagoya area of Aichi prefecture. In the video, you can explore maze-like caves that will make you feel like an explorer and the fantastical blue light illuminates them. The video captures what it feels like to go scuba diving, with encounters with sea creatures, the sound of divers breathing, and the changing colors of the sea as light filters down. Be sure to enjoy the video as you read on. Miyako Island, a Great Place for Scuba Diving in Okinawa, Japan Photo:A diver Miyako Island, located approximately 300km southwest of the main island of Okinawa, between the Pacific Ocean and the East China Sea, is a popular destination for scuba diving. The island is surrounded by several smaller islands, including Irabu Island, Tarama Island, and Shimoji Island. It has a subtropical maritime climate that is warm, hot, and humid throughout the four seasons. Most of the strata are Ryukyu limestone from uplifted coral reefs, formed by overlapping blocks of sandstone and mud slabs. The entire island has an almost flat, low plateau-like landscape. The area around Hirara Port, a 15-minute drive from the airport, has accommodations, restaurants, and dive stores, making it a convenient spot for sightseeing on the island. A rental car is recommended for sightseeing. However, sightseeing cabs and local buses are also available to take you to popular sightseeing spots. Miyako Island and Ishigaki Island are the most popular remote islands in Okinawa. However, if you want to take your time to enjoy the water, we recommend Miyako Island, with its many attractive scuba diving sites. The West Coast of Shimoji Island: A Popular Spot for Scuba Diving Photo:Cave diving on Miyako Island One of the characteristics of Miyako Island's diving spots is the abundance of caves. Some caves are so narrow that only one person can pass through and there are also places where it is pitch black without an underwater light. The darkness of the caves is what makes the blue light that filters through the openings even more incredible. The blue light and the bubbles exhaled by the divers create a fantastic scene. Be sure to check it out in the video. [Video] 3:00 - A Narrow Cave [Video] 3:50 - A Diver and the Mystical Blue Light In the video, you can also see various encounters with sea creatures and other moments that can only be experienced while scuba diving. The Palace of the Demon King is a popular spot among divers, with its structure resembling a labyrinth with three rooms connected by corridors. The light that filters through the opening and into the corridor 25 meters deep makes it seem like an underwater palace. [Video] 4:40 - Encounters with Marine Life [Video] 6:42 - Encounters with Marine Life [Video] 7:26 - Encounters with Marine Life Toriike Pond, a Natural Monument Known as the 'Dragon's Eye' Photo:Toriike Pond, Miyako, Island Toriike Pond, often called 'The Dragon's Eye" is a National Place of Scenic Beauty and a Natural Monument. The two ponds are connected via an underground cave, with the pond on the west side being connected to the ocean. There is also a nearby mini-grotto, which is said to have incredibly beautiful water. In addition to these, there are other popular diving spots such as "Antonio Gaudi" with artistic overlapping arches that change depending on the angle from which they are viewed, is also located nearby. "Nakanoshima Hall" has a fantastic view of blue light pouring straight down through a series of vertical caverns to a depth of approximately 25 meters. Another popular dive site is "Marine Lake," where you can see a long cave and a view of strong sunlight that shines into the cave like a laser beam. Irabu Bridge and the Scuba Diving Sites of Irabu Island That Await You Photo:Irabu Island, Okinawa Irabu Bridge, which connects the main island of Miyakojima and Irabu Island, offers beautiful scenery surrounded by the blue seas and skies. Beyond that, Irabu Island is also dotted with popular diving sites. Blue Cave, is a mysterious cave glowing with blue light located on the north side of Irabu Island, where you can see colorful coral and schools of tropical fish. Near Blue Cave, there is also Cross Hole, which is said to be the most beautiful place on Irabu Island. "Shiratori Kindergarten," uniquely named because of the large number of juvenile fish there, and "Snake Hole," where fog is generated due to waves and manta rays often pass by in early spring, are also popular dive sites with many attractions. Scuba Diving Tours to Popular Points on Miyako Island Photo:A woman diving There are various types of diving tours available, including tours that include free rental of equipment such as underwater cameras, underwater lights, and dive computers, tours that include round-trip airfare, lodging, and diving, tours that include rental cars, tours that include box lunches made from local ingredients, and tours that include free photos as a gift. There are two types of scuba diving: experience diving, in which beginners can participate, and fun diving, in which only licensed divers (C-card holders) can participate. The experience diving course for beginners includes basic training, such as how to breathe, how to remove pressure in ears, how to handle equipment, and hand signs (hand signals), and you can also enjoy a walk underwater with a guide or instructor. The popular diving license acquisition course includes a plan that allows you to stay at a hotel with a diving store attached to it, and is recommended for those who want to acquire a license in a short period of time (2 to 3 days). Miyako Blue: The Beautiful Waters of Miyako Island Photo:Coral reefs at Yabiji, Miyako Island Miyako Island has many breathtaking spots where you can enjoy its beautiful waters which have been dubbed "Miyako Blue." ●Yabiji Yabiji is Japan's largest coral reef group, consisting of over 100 large and small coral reefs. Known as the Great Barrier Reef of Japan, it's a popular spot where you can see vibrant coral, tropical fish, and sea turtles in the emerald green sea. ●Yonaha Maehama Beach Yonaha Maehama Beach is a 7km long stretch of white sandy beach and is said to be the most beautiful sea in the East. The sea is a gradient of emerald green to deep blue, and is especially beautiful at sunset. ●Cape Higashi-Hennazaki Located at the easternmost point of Miyako Island, sits the approximately 2km beautiful cape of Higashi-Hennazaki. It offers a panoramic view of the Pacific Ocean to the south and the East China Sea to the north, and it has been designated as a Place of Scenic Beauty. Other popular spots include the Sunayama Beach, known for its fine powdery snow-like sand and rock arches formed via erosion from waves, as well as Irabu Island's Triangulation Point, where you can enjoy a beautiful view of Miyako Blue from a 70-meter cliff. Traditional Crafts, Delicious Food, and One-Of-A-Kind Souvenirs on Miyako Island Photo:Miyako Soba (Soki Soba), Okinawa Miyako Island is known for its unique cuisine and traditional crafts that are popular as souvenirs. Miyako Island's gourmet foods include Miyako soba, which is Okinawa soba that originated on Miyako Island, Miyako beef, which must be raised on the island for at least 15 months, Miyako adzuki a traditional vegetable, and Doug's Burger," made with yellow fin tuna from Miyako Island and Japanese black beef from Tarama Island. Other popular products include ripe mangoes with a perfect balance of sugar, acidity, and flavor, chunky sweet and sour island bananas, and additive-free pure brown sugar made from nutrient-rich sugarcane. The Miyakojima City Traditional Crafts Center sells various items and hosts tours where visitors can experience traditional Miyako Island crafts, such as Miyako Jofu, a traditional textile which is woven with threads made from fibers of the ramie plant, Miyako-ori, a hand-woven fabric made using cotton for the warp and spun ramie fibers for the weft, and Miyako-asaori, in which hemp is used both for the warp and weft. Other Things to Do on Miyako Island (Miyakojima) Besides the beaches and scuba diving, there are a variety of other things you can do on Miyako Island. It's recommended that you stay for at least two days to see everything the island has to offer. Here are a few places we recommend checking out when visiting the island. Miyako Shrine Miyako Shrine, built in 1590, is the southernmost shrine in Japan (as a shrine under the comprehensive administration of the Jinja Honcho or Association of Shinto Shrines). The shrine has a unique architecture and color that can't be found in other shrines in Japan, and is great for taking photos and exploring the history and culture of Miyako Island. Hours: Open 24 hours Admission Fee: Free Seasah Story Shisa are mythical lion-dogs found in Okinawan mythology. Seasah Story is a shop that specializes in shisa statues. There are all sorts of unique shisa that can be seen and purchased inside the store. It's a great place to go for souvenirs! Hours: 10:00 am - 7:00 pm Taragawa Brewery Taragawa Brewery has been brewing awamori, a strong alcoholic beverage unique to Okinawa, for more than 70 years. The brewery also has a unique method for storing awamori in a 60-meter-longcave located 5 meters underground. You can take a tour of the brewery and even purchase your own awamori at the end. Hours (Tours): 11:00 am, 1:30 pm, 3:00 pm. Each tour is 45 minutes to an hour long. Admission Fee: Free How to Get To Miyako Island (Miyakojima) Despite being technically a part of Okinawa, Miyako Island is located quite a ways south of Okinawa. Because of this, the only way to get to the island is via plane. From Tokyo, you can take a 3-hour flight from either Haneda Airport or Narita Airport. From Naha, Okinawa, you can take a 50-minute flight to directly to Miyako Airport. From Osaka, it's a 2 hour and 15 minute flight from Kansai International Airport. Summary of Miyako Island, a Place Dotted With Popular Scuba Diving Spots The maze of caves and the underwater world with blue light pouring in from the surface, makes diving on Miyakojima a one-of-a-kind experience. The fantastic caves will make you feel like an explorer as you encounter all sorts of fascinating marine life. We hope that watching the video and reading this article has you interested in a trip to Miyakojima! 【Trip Advisor】Miyako Island (Miyakojima) https://www.tripadvisor.com/Tourism-g680765-Miyakojima_Okinawa_Prefecture-Vacations.html -
Video article 11:10
An Exciting Shark Diving Experience Just 2 Hours From Tokyo! Discover the Beautiful Underwater World of Ito, Chiba!
Things to Do Living Things Travel- 51 plays
- YouTube
Feel the Excitement of Shark Diving in Ito, Chiba via Video! This video, titled "Tateyama Ito Diving" (館山 伊戸ダイビング), was uploaded by "munecyan." It introduces diving in Ito, Chiba. If you're interested in diving but aren't very familiar with it, be sure to check out the diving you can do in Ito, Chiba in the video! Are There Sharks in Tokyo and Chiba? There are a variety of different sharks in both Tokyo and Chiba. Some sharks you can find in Tokyo are houndsharks, sawsharks, angelsharks, etc. Additionally, in Chiba there are shortfin mako sharks, salmon sharks, thresher sharks, and many more varieties. Going on the shark diving tour in Ito is the best way to see sharks near Tokyo, but there are also other diving spots in Japan where you can go shark diving. Ito, Chiba Prefecture – A Popular Diving Spot Close to Tokyo! Ito, Chiba, in the Kanto region, is known as the southernmost diving spot in Japan's Kanto region. Divers from all over the world gather here to enjoy the diving spots of the Boso Peninsula. Ito is also known as a shark diving spot. You can see schools of sharks from up close. In addition to sharks, Ito is also a fascinating diving spot where you can see sunfish, nudibranchs, and a variety of other marine creatures up close. The Various Marine Life You Can See in Ito, Chiba Photo:Banded houndsharks and red stingrays One of the greatest attractions of diving is to be able to see sea creatures swimming in the sea up close. As mentioned above, in Ito and the Tateyama area, you can see beautiful coral reefs as well as various types of creatures up close. You can enjoy the marine world of Ito through an unforgettable diving experience. [Video] 4:55 - Coral Reef [Marine Life in Ito, Chiba] Here are some of the sea creatures you may encounter in the sea of Ito. ・Short barbeled velvetchins ・Longtooth groupers ・Banded houndsharks ・Goniobranchus tinctorius (sea slug) ・Red stingrays ・Dorid nudibranchs (sea slug) ・Striped boarfish ・Asian sheepshead wrasse ・Spotted white sea slugs ・Sun fish Tateyama Shark Scramble – The Main Attraction in Ito, Chiba! Photo:A group of banded hounsharks Tateyama Shark Scramble is attracting a lot of attention in the Tateyama/Ito area. Tateyama Shark Scramble refers to the phenomenon when more than 100 sharks can be seen swimming in a whirlpool in the ocean. It's also known as the "Shark Tornado." Ito was originally called Shark City because of the large number of sharks that inhabit the area. However, serious damage was caused by the large number of sharks. The problem was that the sharks ate the fish caught by fisherman, who were left with insufficient catches. The local fishing cooperative wanted to somehow solve this problem, so they consulted a man named Mr. Shiota, who provides diving services in Ito. As a result, a shark guiding operation was launched in 2009 which successfully kept sharks away from captured fish. As a result of these efforts, Okimaene, a dive point in Ito, Chiba, is now attracting attention from all over the world as a spot where you can swim with sharks. Underwater Bird Watching in Ito, Chiba? Photo:A Japanese cormorant Underwater bird watching might sound like a fever dream, but it's actually something that can be enjoyed in the Tateyama and Ito areas in winter. During the winter you can see Japanese cormorants diving into the ocean. This bird is native to Japan, Korea, and other parts of East Asia. Its body is 84-92 cm in length and it's generally greenish-black with a yellow beak. In addition to the cormorants that originally inhabit the Tateyama/Ito area, some cormorants come to Ito from other areas for the winter. In winter, the water temperature drops and the cormorants cannot catch fish in the shallows, so they dive into the water to catch fish. You can watch them catch fish underwater when diving. Another attraction of diving in Tateyama and Ito is that you can experience underwater bird watching of sea cormorants only in winter. When Is the Best Season to Go Diving in Ito, Chiba? Photo:Diving Diving is possible throughout the year in the Tateyama/Ito area in Chiba, and from late August to early September, the water is warm enough to dive in a wetsuit. Shark schools can be seen throughout the year, but some species and scenes can only be seen at certain times of the year. ・January to March: Underwater bird watching The water is crystal clear and the cormorants can be seen diving up to 20 meters below the surface. ・June-August: You can view the courtship ritual of the longtooth grouper from up close. ・Autumn - Winter: You can see powerful scenes of large fish attacking their prey. How to Get to Ito, Chiba Since it's only a two-hour bus ride from Tokyo, visitors can enjoy diving on a day trip. There are also restaurants in the area, with the seafood restaurant "Gyoko Shokudo Daibo" being particularly popular for its delicious seafood and hamayaki (a style of cooking where the entire fish is skewered and cooked whole over a grill). While the Tateyama/Ito area is popular for diving, it's also a great place for sightseeing and fishing, as there are many fishing ports, restaurants, guest houses, and hotels, some of which have open-air baths with a view of the sea. Summary of Diving in Ito, Chiba The Tateyama/Ito area is a popular diving spot for beginners and experienced divers alike, and has attracted attention from around the world. The shark diving is especially exciting! You can see sharks swimming around from up close in the video. Located just 2 hours from Tokyo, Ito, Chiba is a great spot for a day trip. Why not try diving in the Tateyama/Ito area, where you can see schools of sharks and sea cucumbers being captured in the ocean? It's an experience you can't have anywhere else in Japan! [TripAdvisor] Ito, Chiba -
Video article 3:31
The Kagoshima Amami Islands - The Mecca of Scuba Diving! Discover the Bright Blue Waters and Rich Nature Unique to Japan! If You Like Experience-Based Activities, You're in for a Treat!
Things to Do Travel- 60 plays
- YouTube
Scuba Diving in the Bright Blue Waters of the Amami Islands, a Look at the Scuba Diving Mecca of Japan This video, titled "Tokunoshima, Amami Islands Scuba Diving in 3 Minutes" (奄美群島 徳之島 ダイビング動画3分), was uploaded by "kamuivision." It introduces scuba diving around Tokunoshima in Japan's Amami Islands. This article will introduce scuba diving in the Amami Islands alongside the video. The video will introduce actual underwater footage of the Amami Islands, including various footage of the marine life found in the area. From schools of fish and jawfish to whales and cuttlefish the Amami Islands are full of marine life, so be sure to check out the video as you read on! Scuba Diving in the Amami Islands! Explore the Geography and Charm of the Fascinating Tourist Destination! Photo:Cape Kanami Observation Deck, Tokunoshima, Amami Islands In 2019, before the Corona pandemic, scuba diving was becoming more and more attractive in Japan, mainly due to the 2019 Marine Diving Fair, a massively successful event that took place in Tokyo. The city of Amami, located in the Amami Islands just halfway between Kagoshima and Okinawa, is classified as a remote island and is part of Amami Oshima. Scuba diving is the backbone of the city's tourism industry and is incredibly popular, especially among those traveling to the Amami Islands from outside of Japan. The main cities of Kagoshima's Amami Islands include Tokunoshima, Isen, and Amagi. Amagi, one of the hubs in the Amami Islands, is a relatively large town with hotels, an airport, stores, and other tourist facilities, making it easily accessible to large numbers of travelers. It's a small town with a population of around 6,000, but it closely resembles a resort area and is supported by tourists visiting on tours. It has a subtropical climate, which is a rarity in Japan, and is relatively warm all year round due to its karst topography. The island is home to many rare flora and fauna, including the habu, a variety of venomous pit viper, and is rich in natural heritage. Photo:A coral table at Amami Oshima During summer, the best season to experience scuba diving in the blue waters, the area is very popular. In addition to scuba diving, you can also dive from the islands' dive sites and even enjoy snorkeling experiences as well. As shown in the video, the Amami Islands are a unique and wonderful place where you can see sea turtles, stingrays, manta rays, coral reefs, and other marine life in the beautiful, clear blue waters. In the video, you can see sea turtles at 0:57, stingrays at 1:57, manta rays at 2:25, and whales of remarkable size at 2:41. All of the fish swim gracefully and magnificently in the ocean, delighting the viewer, and visitors to the islands, with their beauty. Learn More About the Nature of the Amami Islands! Photo:Innojofuta on Tokunoshima The Amami Islands are extremely attractive for their various natural heritages. The nature has been carefully preserved via the "Happa Green Product." On Tokunoshima, the heart of the Amami Islands, there is a place where you can watch a bullfight called "Tokunoshima Nakusami Kan" (Tokunoshima Bullfighting Hall). Looking out to the sea, visitors will be overwhelmed by the natural heritages, such as Boma Heart (母間ハート), a heart-shaped hole in a rock, Innojofuta (犬の門蓋), with its sloping stone walls that form arches, and the Mushiroze (ムシロ瀬), a beautiful granite coastline, and other natural heritages found in nature. Unbuki Underground Seawater Cave, a natural sea inside the land, is another attraction for those feeling adventurous to explore. Tomori Beach in the northern part of Amami Oshima is also unique. The coral cluster "Daibutsu Sango" (大仏サンゴ) is the largest leaf coral cluster in Japan and is said to be an underwater miracle. If you go to the southern part of Amami Oshima, you'll find a jungle-like virgin mangrove forest. A canoe ride through the primeval forest makes you feel like you're in a theme park and is an experience you'll never forget. Summary of the Fascinating Nature of the Amami Islands, a Place of Scuba Diving and Endless Adventure! As you can see in the video, there are many notable natural features and fascinating spots in the Amami Islands. Scuba diving is a recommended activity where you can feel the beauty of the Amami Islands through your own skin. Be sure to check out the video to get a better idea of what you can expect to experience when scuba diving! Consider a visit to the Amami Islands, a tropical location in Kagoshima! 【TripAdvisor】Amami Oshima https://www.tripadvisor.com/Tourism-g14769233-Amami_Oshima_Kagoshima_Prefecture_Kyushu-Vacations.html -
Video article 3:25
A Thousand-Year-Old Coral Megalith in Tokushima Prefecture: One of the Largest Coral Reefs in the World, This 9-Meter-Tall Coral Reef Is the Result of a Series of Miracles and Its Beautiful Appearance Has Captivated Many Divers!
Things to Do- 38 plays
- YouTube
The Millennium Coral of Mugi, Tokushima via Video This video, titled "Mugi Diving: A Thousand-Year-Old Coral" (牟岐ダイビング 千年珊瑚), was uploaded by "Shimizu Akinori" (清水明徳). It introduces, as its name suggests, a thousand-year-old coral reef near Oshima Island in Tokushima. What you see in the video is the Millennium Coral, a coral reef in the inner bay of Oshima Island in Mugi, Tokushima. Oshima Island off the coast of Mugi, Tokushima is one of the most beautiful spots in Japan where many people visit for diving and snorkeling. The huge coral reef shown from the beginning of the video is called "Sennen Sango" (lit. "Thousand-Year Coral" or "Millennium Coral"). The Millennium Coral is a tree-shaped coral reef formed by the growth of porites lutea, a type of stony coral. Registered as a "Miraculous Heritage," the coral reef is estimated to have been growing for as long as 1,000 years. At 0:08 in the video, you can see a person actually diving underwater and swimming next to it, giving you a good idea of just how large it actually is. The sheer size of it is enough to amaze you. The Millennium Coral of Oshima Island in Mugi, Tokushima: A Coral Reef Formed by a Combination of Favorable Conditions Source :YouTube screenshot The Millennium Coral is the result of a combination of favorable conditions in nature. The warm currents of the Kuroshio Current come in from the coast, the island is not environmentally destructive, and it is located in an inner bay, which protects it from rough seas. The Millennium Coral is located at a depth of 23 meters. It measures approximately 9 meters tall and 30 meters round, and is also known as the "Underwater Christmas Tree" because of its shape. It is one of the largest and longest living coral reefs not only in Japan, but also in the world. Starfish – The Natural Enemy of the Millennium Coral Photo:Crown-of-thorns starfish In recent years, crown-of-thorns starfish have increased in number, eating away at the Millennium Coral. The town of Mugi has been working to protect the coral, and in 2015, December 7 was designated as Millennium Coral Day. At 1:10 in the video, you can see beautiful fish swimming around the Millennium Coral. The Millennium Coral is a symbol of Mugi, Tokushima. In addition to being a tourist attraction, the Millennium Coral also plays a role in purifying the ocean by absorbing carbon dioxide and producing oxygen, making it an indispensable part of the marine environment. Summary of the Millennium Coral of Oshima Island in Mugi, Tokushima There are many ways to get to Mugi, Tokushima, where the Millennium Coral is located: by air, by sea, or by express bus. From Tokushima City, it takes 1 hour and 20 minutes to reach by train via JR lines, and approximately 1 hour and 40 minutes to reach by car. There are also tours to the remote islands where visitors can enjoy a variety of experiences and delicious food. If you're a diver, be sure to visit the Millennium Coral in Mugi, Tokushima if you have the chance! We hope this video has given you an idea of just how beautiful the Millennium Coral is. Hopefully we can continue to protect this beautiful coral for years to come. -
Video article 6:05
Three Essential Rope Knots for Camping and the Outdoors! Two Half-Hitches, Taut-Line Hitch, and the Bowline Knot; Easy Knots for Beginner Campers and Outdoor Enthusiasts!
Things to Do- 90 plays
- YouTube
Must-Know Knots for Campers Japan's camping boom has led to an increase in the number of people who have just started camping or are looking to get into camping. In this article, we'll introduce three useful knots for beginner campers, so anyone new to camping can familiarize them with knots, which are essential for setting up tents and tarps and a variety of other tasks. Video Introduction This video, titled "[Super Convenient] 3 Useful Rope Knots for Camping [Two Half-Hitches, Taut-Line Hitch, Bowline Knot]" (【超便利】キャンプで役立つロープの結び方3選【ツーハーフヒッチ・自在結び・もやい結び】), was uploaded by "MotoCamp" (MotoCamp【モトキャンプ】). Useful Knots for Camping and Other Outdoor Activities and How to Tie Them Photo:A knot Knots are incredibly useful for camping and outdoor activities. They can be used to secure tents to stakes or even hang a tarp. Furthermore, ropes are also very useful for hanging small camping equipment and drying dishes. However, if you just have a rope and don't actually learn how to tie knots, the rope is nothing more than a piece of rope. Therefore, learning how to tie knots is an important component of a comfortable camping trip or outdoor experience. Unfortunately, learning how to tie knots can be a bit challenging for beginners. Therefore, in this article, we'll introduce three practical knots that even beginners can learn. They're useful for camping and outdoor activities, so take this opportunity to learn them! How to Tie a Two-Half Hitch Source :YouTube screenshot The first knot we'll learn is the "Two-Half Hitch." [Video] 0:20 - Two Half Hitch This knot has three features: ・It's easy to tie ・It's relatively tight ・Useful for setting up tarps Now, let's take a look at how to tie it. Be sure to follow along with the video to see an actual demonstration of how each knot is tied. 1. Take the short end of the rope and pass it under the long end and then pull the short end through the loop it creates. 2. Do the exact same thing directly below the first loop and then pull the short end of the rope upwards towards to first knot to tighten it. 3. Pull the long end of the rope tight and you're done! The rope will now be securely fastened to the post. It's easy to untie this knot, so be sure to try it a few times to make sure you've got the hang of it. How to Tie a Taut-Line Hitch Source :YouTube screenshot The second knot we'll talk about is the "Taut-Line Hitch." [Video] 1:24 - Taut-Line Hitch The features of this knot are as follows: ・The length of the rope can be easily adjusted. ・Convenient for securing stakes when setting up a tent. Now let's take a look at how you tie a Taut-Line Hitch. 1. Once again, take the short end of the rope and pass it under the long end and then pull the short end through the loop it creates. 2. Again, just like the Two-Half Hitch, do the same thing below the first knot, except this time create some distance between the first and second knots. 3. Then, pass the shorter rope through the loop created between the two knots once more. 4. Tie another knot below the second knot. Finally, tighten the rope and you're done. The rope doesn't wiggle when pulled, but the length can be adjusted by holding above the knot and pulling. How to Tie a Bowline Knot Source :YouTube screenshot The final knot we'll go over is the "Bowline Knot." [Video] 3:59 - Bowline Knot The perks of this knot are: ・It's tight ・Convenient for securing ropes It takes some practice, but it is one of the most important and basic knots, and is essential for enjoying outdoor activities and camping. With that out of the way, let's learn how to tie a Bowline Knot. 1. Make a loop with the longer rope. 2. Below that loop, pinch the rope together and pass it through the loop you just made from the top. 3. Pass the end of the shorter rope through the loop sticking out of the other loop from underneath. 4. Pull the short long end away from the short end to form a knot. This secures the knot and completes the Bowline Knot, which will not budge in the slightest. This knot is also called the "King of Knots." Because of its strength, this knot is frequently used not only for camping and outdoor activities, but also for mountain climbing, loading trucks, and even on construction sites. If you're employed in a field that uses knots, the Bowline Knot can be incredibly useful. Summary of Essential Knots for Beginner-Level Outdoor Enthusiasts Photo:Guy lines There are many more knots than this. If you're serious about camping, mountain climbing, or any other outdoor activities, learning how to tie knots is important. If you can learn how to tie knots, you'll be able to set up tarps, tents, and hammocks using trees and rocks even in places where the ground is too hard for stakes. Knots can also be used to secure yourself to something in the event of a natural disaster, or to carry an injured or sick person to safety. Finally, here are a few more important knots you can look up. ・The Figure-Eight Knot: A knot that won't come undone even if it's caught on something. ・The Clove Hitch: A knot that acts as a stopper when your rope is not long enough. ・The Butterfly Knot (Butterfly Loop): Convenient and practical for hanging something or for drying clothes. ・The Trucker's Hitch: which can be more strongly secured by tying a double knot. All of these knots are useful for camping and outdoor activities. If you try to learn too many at once, it may be difficult to remember how to tie them. We recommend by starting with the three knots shown in the video so that you can use them immediately in camping and outdoor situations. They may come in handy in unexpected situations!