-
Article
-
Channel
-
Region
-
Season
-
Tag
Articles
-
 Video article 1:00
Glamping and Motorsports at Mobility Resort Motegi in Tochigi Prefecture! Enjoy an Adventurous Time Surrounded by Nature at the Former Twin Ring Motegi!
Things to Do Travel Nature- 26 plays
- YouTube
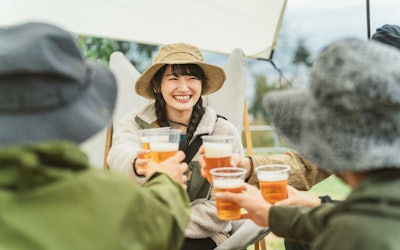
Mobility Resort Motegi Camping Village: Video Introduction This video, titled "[Mobility Resort Motegi] Starry Sky Forest Camping Village|Lotus Tents Promo Video" (【モビリティリゾートもてぎ】森と星空のキャンプヴィレッジ ロータステントPV), was created by Mobility Resort Motegi (モビリティリゾートもてぎ). Mobility Resort Motegi is located in Motegi, Tochigi, in Japan's Kanto region. It has a camping field called Starry Sky Forest Camping Village Mobility Resort Motegi next to a popular circuit where some of the world's top races are held. What is Mobility Resort Motegi? Photo:Hello Woods, Mobility Resort Motegi Mobility Resort Motegi, formerly known as Twin Ring Motegi, is a theme park in Motegi, Tochigi where visitors can enjoy motor sports and the great outdoors. Mobility Resort Motegi, owned by Honda Mobilityland, changed its name in 2022 to coincide with the merger of Suzuka Circuitland Co., Ltd. And Twin Ring Motegi Co., Ltd. Mobility Resort Motegi is a family-friendly theme park. In the park area, you can enjoy an adventure course and rides and explore nature in a forest. At Hello Woods, you can go for a ride on ziplines. There's also the Starry Sky Forest Camping Village where you can enjoy glamping (a fancy type of camping where gear is provided for you), BBQ, and relaxing hotels. If you're a fan of motorsports, the Honda Collection Hall, with approximately 300 Honda automobiles and motorcycles on display, is a must-see attraction. [Video] 0:13 - The Camping Area Surrounded by Nature Located Near the Circuit Camping, Glamping, and Log Cabins! Outdoor Activities at Starry Sky Forest Camping Village Photo:Camping There are three ways to spend time with family and friends at Starry Sky Forest Camping Village at Mobility Resort Motegi: ・Camping Pitch a tent and enjoy the outdoors with a relaxing fire. ・Glamping A fancy camping experience for those looking to enjoy the outdoors without the hassle of setting up and taking down tents. ・Log cabins Enjoy the outdoors in any season thanks to the log cabins that even come with air conditioning. [video] 0:36 - Glamping in Lotus Tents Things to Do at Mobility Resort Motegi: Athletic Activities and More! Photo:An aerial view of Mobility Resort Motegi Here, we'll introduce some popular activities at Mobility resort Motegi. ・Mega zipline: Wing Enjoy a view of nature and the nearby race track from the sky with this 1,837 foot-long-zipline at Hello Woods. ・Forest Obstacle Course: DOKIDOKI A huge, tree-climbing athletic facility that resembles an acorn tree. This popular activity features 39 difficulty levels, allowing everyone from elementary school students to adults to enjoy the challenge. ・Forest Labyrinth: ITADAKI A three-dimensional maze themed on the ecosystem of the park's forests, where visitors collect stamps from 14 locations on their way to the top. The huge animals and plants are really impressive. ・Forest Family Walk: TEKUTEKU Visitors can enjoy a game-like stroll through the Hello Woods' forest, while taking pictures, learning, and relaxing. ・Attractions Featuring Cars and Motorcycles There are more than 10 attractions for people of all ages and experience levels. Visitors can drive a car with a driving school motif, as well as motorcycles, off-road vehicles, and even race cars. In addition, there are many other original activities available only for a limited period of time to enjoy nature and activities limited to guests only. Please check the official website for more information! Glamping at Mobility Resort Motegi: Rates, Meal Fees, Etc. Photo:A t-bone steak Various glamping plans are available at Mobility Resort Motegi, including those that can be enjoyed in both rotary tents and bell tents, and which offer a full range facilities. Plans include a half-board plan that includes a T-bone steak BBQ dinner and breakfast using fresh, local ingredients, a plan that includes a pass to the park, and an overnight plan that allows guests to bring their own food and cooking equipment and enjoy their stay how they please. We also recommend checking out their original accommodation plans, such as the Birthday Plan. The price per "room" starts from 25,800 yen (~$182 USD) for an overnight stay in the lotus tents with no meals included. How to Get to Mobility Resort Motegi (Motegi Circuit) There are several ways to get to Mobility Resort Motegi, and here we'll list a few of them. Mobility Resort Motegi From Tokyo Station (Shinkansen) To get to Mobility Resort Motegi from Tokyo Station, take the shinkansen to Utsunomiya Station (50 mins) and then from Utsunomiya Station, take a bus (90 mins) or taxi (60 mins) to Mobility Resort Motegi. Mobility Resort Motegi From Tokyo Station (Local Train) From Tokyo Station, take the Limited Express train to Mito (80 mins) and then take a bus to Mobility Resort Motegi (90 mins). Mobility Resort Motegi From Haneda Airport and Narita Airport If you're wondering how to get to Mobility Resort Motegi from Haneda or Narita Airport, the easiest way is to first make your way to Tokyo Station and then use one of the two routes above. Summary of Mobility Resort Motegi Surrounded by a natural forest, Mobility Resort Motegi is the perfect place to get away from your hectic daily life. Mobility Resort Motegi also has great reviews, with many people saying that they were able to enjoy themselves all day without getting bored and wanting to visit again. Glamping is also a great option for those with small children. If you're visiting the race track to enjoy some motorsports, consider staying at the nearby camping/glamping area and enjoying a night under the stars with some BBQ! 【Official Website】Mobility Resort Motegi 【TripAdvisor】Mobility Resort Motegi -
 Video article 9:30
10 Camping Manners to Be Careful of When Camping in Japan! Time, Sound, Shared Spaces, Etc. Avoid Trouble When Camping!
Things to Do Nature- 17 plays
- YouTube
Are Camping Manners Universal? Photo:A family enjoying camping Japan is often praised in foreign media and news for its manners. It shows Japanese people's unique attentiveness to others. Today, camping is becoming popular all across Japan due to the novel coronavirus. But are camping manners in Japan and camping manners in other parts of the world the same? Let's take a look at some camping manners to be careful of when camping in Japan. Video Introduction: Basic Camping Manners for Beginners Photo:A campground's cooking area This video, titled "10 Camping Manners Camping Beginners Should Know" (キャンプ初心者の方が知っておきたいキャンプマナー10選), was uploaded by "Taro Camp" (たろーキャンプ). It features camping gear and shows what camping is like in Japan. In Japan, many people are getting into nature and outdoor activities! Camping gear and items for beginner-level campers are now available as well, making it easier to start enjoy camping. However, although camping is done in nature, campgrounds are still public places and there are rules and manners to follow. Below, we'll introduce an easy-to-understand explanation of rules regarding time and use of public spaces when camping in Japan. Whether you're a beginner or an experienced camper, be sure to check out this article to avoid any misunderstandings and learn proper etiquette for camping in Japan. Rules and Manners Regarding Time Photo:A campground ・Be Quiet Late at Night It's good manners to be quiet after 10:00 p.m. Many campgrounds are often quiet, and even normal conversation can echo into other campsites. Thus, it's important to be careful about the volume of your voice and music, especially at night. Furthermore, some campgrounds have their own set times for lights-out hours, etc. Be sure to follow the etiquette of the campground you're using. ・Lights-Out Means Lights-Out As we just mentioned, lights-out hours are often set by the campground. In campgrounds where there are no streetlights or residential lights, lanterns and other lights can be intrusive. If you still want to stay awake when the lights go out, consider using a smaller light inside your tent. ・Check-in and Check-Out Hours Of particular importance are check-out times. Check-out times vary from campground to campground, but most campgrounds in Japan set their check-out time to be 10:00 a.m. It's important to respect check-out times for the sake of other campers using the campground. Use of Common Space and Garbage Photo:Campground manners ・Keeping Shared Spaces Clean Cooking areas, toilets, and shower rooms are shared spaces. It's a fact that some people pour leftover food, such as vegetable scraps and leftovers, into cooking areas. However, if the sinks become clogged, it causes problems not only for other campers but also for the campground. Furthermore, when using shower rooms and other facilities, keep in mind that other campers want to use them as well. Shared spaces are used by other campers, and it's imperative that they be used properly as to keep them clean. [Video] 2:37 - Manners in Shared Spaces ・Proper Clean-Up of Garbage Beginner-level campers should be especially cautious of this. Leave your campsite cleaner than it was when you got there. Clean up when you've finished using a site. It's very important for each and every one of us to be aware of this so that we can enjoy the refreshing air of the outdoors and camp in a pleasant environment. Be sure to take care of any charcoal and garbage you've used. Furthermore, be careful to properly separate garbage. Things like plastic bottles and food scraps should not be disposed of together. Please note that some campgrounds require campers to take their garbage home with them. Greetings and Respect for Other Campers Photo:Lake Tanuki Camp Ground ・Be Considerate of Other Campers A good campsite means being considerate of other campers at the campground. It is more enjoyable to camp in a pleasant atmosphere of mutual respect rather than hostility. Of course, don't forget to greet the campers next to you! Especially if there are small children, pets, or animals, it is a good idea to greet any fellow campers. ・Set Up Your Camp at a Reasonable Distance From Other Campers If other people have already set up their tents, keep a certain distance from them. As a rule of thumb, set up your tent at least 3 meters away from other campers. Of course, it is possible to be closer than this, depending on how crowded the site is, but you should keep this 3-meter rule in mind when camping in Japan. ・Be Mindful of Other People's Scenery If your campsite is a scenic campground, make sure that you're not obstructing other people's views. Remember that other campers go camping to enjoy the scenery too. ・Keep Music at a Volume That Does Not Disturb Others When camping, it's normal to want to listen to music, but try to play it at a volume that does not disturb other campers. There are various types of campers, some who want to enjoy the sounds of nature or listen to their music while enjoying nature. It's proper camp etiquette to enjoy music at a volume that does not disturb those around you. Nature Goes Hand in Hand With Camping ・Preserve the Natural Environment Avoid breaking tree branches, digging up plants, etc. Enjoying nature is what makes camping camping. If we destroy it then the next people to camp in the area won't be able to enjoy it. Also, if you want to use tree branches as kindling, be sure to check with the campground before doing so. Also, we recommend that you check with the campground beforehand if you plan to make an open fire directly on the ground, as many campgrounds prohibit this. Precautions to Avoid Trouble When Camping in Japan! Photo:A woman enjoying solo camping It's important to follow the rules carefully to avoid getting into trouble at the campground. Things such as leaving trash behind or playing loud music can cause a lot of trouble not only for other campers, but for the campground as well. Also, if you're planning on bringing a pet, keep it on a leash! Not everyone is comfortable with animals. Violations of manners and rules can lead to quarrels and other problems that, if serious enough, can end up with the police getting involved. If this happens, your camping experience and the camping experience of others will be ruined. To avoid trouble, be sure to respect camp etiquette! Summary of Camping Manners in Japan A campsite is a place to enjoy nature in a space shared with others. Some people want to go to bed early to feel the refreshing morning air of the great outdoors, and others just want to enjoy a fun time with everyone. Everyone has their own way of enjoying themselves, which is exactly why it's important to be mindful of others. Even experienced campers have been warned by other campers that they are too noisy. Because it's a quieter environment than the city, you may need to be more careful than usual. Please be sure to follow the rules set by the campground as well as the camping manners we listed above so that all campers can have a pleasant time when camping. The video shows examples of poorly used cooking areas and a fire pit that wasn't properly cleaned after being used. Be sure to check it out whether you're a beginner or an experienced camper! -
Video article 23:15
Choose the Right Cooler When Camping in Japan! Comparing Usages, Size, and Cooling Ability! AO, Daiwa, and Coleman
Things to Do- 22 plays
- YouTube
Coolers, a Necessity for Summer Camping in Japan Summer in Japan is characterized by strong sunlight, high temperatures, and excessive humidity. Compared to spring and fall, which are quite pleasant, it's important to be careful of heat stroke and food poisoning during summer. Therefore, we'd like to introduce a video on coolers, a necessity for enjoying outdoor activities and camping during summer in Japan. Video Comparing Coolers This video, titled "My Recommended Coolers [Comparing 4 Types] (For Camping BBQ Outdoor Use) Coleman, Logos, Daiwa, and AO, Four Popular Brands" (おすすめクーラーボックス【4種比較】(キャンプ BBQ アウトドア用)コールマン・ロゴス・ダイワ・AOクーラー人気ブランドを一挙に紹介します!), was uploaded by "solo camp & camp cooking in Japan TANA channe." What Should You Look for When Buying a Cooler? Material? Cooling Ability? Style? Photo:A cooling bag Outdoor activities, such as BBQ and camping, are very popular in Japan as of late. Many people are in the process of planning outdoor leisure activities for the hot summer ahead. You might be one of them and are even considering buying a cooler. What are the most important things to consider when purchasing a cooler? Size, cooling ability, whether it's hard or soft, design... these are all important factors to think about. You should first decide on what it is that you want your cooler to accomplish. In this article, Tana, a solo camper in Japan, compares the usages, features, and storage capacity of four different coolers for campers having trouble choosing the right cooler. In addition, the cooling ability of three coolers of different sizes, designs, and materials are evaluated based on hourly temperatures and ice retention. This article is especially for those looking for a cooler for camping, festivals, picnics, etc., but aren't sure which one is best. We think this will help you choose the one that's right for you! AO Coolers 12L Canvas Soft Cooler Source :YouTube screenshot The first cooler on the list is the AO Coolers 12L Canvas Soft Cooler. As its name suggests it's a soft cooler. At first glance, the bag is so well designed that it doesn't look like a cooler. The outdoor pattern is quite stylish. The bag, which looks like a bucket, can be made into a square shape by buckling the clips on the sides. In this shape, it is almost as large as the DAIWA Cool Line 800 8L Cooler introduced next. The capacity is 11.35 L, and it can hold 12 350 ml cans plus 2.2 kg of ice. The video shows how different sized bottles fit in the cooler. [Video] 0:26 - Features of the AO Cooler DAIWA Cool Line 800 8L Cooler Source :YouTube screenshot The DAIWA Cool Line 800 8L Cooler comes from a fishing equipment manufacturer. Check it out if you're looking for a compact cooler for solo camping, fishing, or other outdoor leisure activities. It comes with a carrying strap and can be carried over the shoulder. The compartment is large enough to just barely hold a 1.5-liter bottle. It's a great cooler if you're only planning on bringing a few items. [Video] 6:10 - Daiwa Cooler Features LOGOS Hyper Subzero Cooler M 12L Source :YouTube screenshot The LOGOS Hyper Subzero Cooler M 12L is another soft cooler. This cooler has a cool silver design and can hold a 2L plastic bottle horizontally. The long sides are made of a hard material, so it can't be broken down into a smaller size, but it is designed to be thinner. It can be used for a variety of activities, including camping and festivals, making it quite attractive. Because of its stylish appearance, this product is also recommended for those who are particular about the appearance of their camping equipment. [Video] 8:04 - Features of the LOGOS Cooler Coleman Extreme Ice Cooler 25L Source :YouTube screenshot The Coleman Extreme Ice Cooler 25L is the largest cooler shown in the video, but it's a soft cooler and can be folded. It's a bit large for a solo camping cooler. Tana, the solo camper in the video, utilizes it to hold other items as well. The metal fittings on the side are plastic, so you need to be a little careful when carrying heavy items inside it. [Video] 9:06 - Features of the Coleman Cooler Comparing Cooling Ability - AO, Daiwa, and Coleman The cooling ability of coolers is important when camping in the summer. But do size and shape determine a cooler's cooling ability? Check out the video for a comparison of the cooling ability of different coolers from AO, Daiwa, and Coleman. The indoor temperature is 26.6 degrees Celsius, and one bag of ice is put in each cooler to test the temperature and ice retention over time. ・After approx. 1 hour Coleman: 14.5°C, 20% of ice melted AO: 9.4°C, 10% of ice melted Daiwa: 13.6°C, 15% of ice melted At this point, we can say that the ice retention is AO > Daiwa > Coleman. ・After approx. 4 hrs. Coleman: 13.5°C, 40% of ice melted AO: 14.9°C, 20% of ice melted Daiwa: 15.7°C, 30% of ice melted At this point, the ice retention is still the same - AO > Daiwa > Coleman. ・After approx. 6 hours Coleman: 13.5°C, 80% of ice melted AO: 14.1°C, 70% of ice melted Daiwa: 15.4°C, 70% of ice melted At this point, AO and Daiwa are about equal. ・After approx. 8 hours Coleman: 19.3°C, 90% of ice melted AO: 14.2°C, 80% of ice melted Daiwa: 13.9°C, 80% of ice melted After more than 8 hours, the Daiwa cooler maintained the coolest temperatures. [Video] 10:16 - Comparing three different coolers [Video] 17:11 - Results after 4 hours [Video] 22:09 - Results after 8 hours The Coleman is the largest of these coolers, so it's not possible to make a blanket judgment, but as an example, this test may be useful for those considering replacing or buying a new cooler in the future. Tips for Keeping Your Cooler Cool Photo:A cooler Here are some tips for keeping your cooler cool that aren't related to the characteristics of the cooler. ・Make sure that the items to be placed in the cooler are cooled in advance. If possible, cool the inside of the cooler box as well. ・Place refrigerants on the top and bottom of the cooler. ・Use a combination of large and small ice cubes. ・Don't drain the water after the ice has melted. ・Minimize opening and closing of the cooler. ・Avoid hot ground and place in a cool place out of direct sunlight, such as in the shade. Find the Cooler That Works Best for You and Enjoy Your Time Camping! Coolers are useful outdoor equipment for storing food for camping and BBQs and drinks for picnics. In summer, use coolers to prevent heat stroke and food poisoning, but be careful when handling drinks and food. There are many beautiful campgrounds in Japan. To enjoy the summer outdoors to the fullest, choose a cooler that suits your individual style and that will keep your food and other items cold. -
Video article 10:02
[Summer Camping] 12 Camping Essentials to Beat the Heat and Protect Against Insects! Safety Precautions for Japan's Hot Summers and Cool Campgrounds!
Things to Do- 21 plays
- YouTube
Japan's Hot and Humid Summers Summer in Japan is hot and humid. When camping in Japan, it's essential to take measures against both the heat and insects. In this article, we'll introduce some recommended items to protect against the heat and keep insects away so you can enjoy an exciting summer camping trip in Japan. Video Introduction Photo:Women being bitten by bugs This video, titled "12 Recommended Items to Protect Against Heat and Insects When Summer Camping" (夏キャンプの暑さ対策・虫除け対策に買って良かったおすすめアイテム12選をご紹介), was uploaded by "Camp Lab" (キャンプ研究所). When camping in summer, preventing insect bites and heat stroke is crucial to enjoying a safe camping trip. There are many dangerous insects in Japan, and it's important to take all possible precautions. In addition, many people succumb to heat stroke and other health problems in Japan's hot and humid summers. If you take proper measures to protect yourself from insects and heat, you can avoid dangerous situations, so be sure to keep reading so you can be prepared. 6 Tips to Keep Bugs Away When Summer Camping in Japan The first item introduces is the "Fuji Nishiki Power Forest Incense," an insect repellant item that forestry professionals also recommend. As this is professional-grade, the thickness and size are quite different from those for general use. You can see how they're used in the video. [Video] 0:57 - 1. Fuji Nishiki Power Forest Incense Mosquito Repellent Source :YouTube screenshot The next item is bug spray. We recommend a skin-friendly, DEET-free insect repellent that is safe for children to use. The video recommends commercial insect repellent sprays, as homemade sprays made with ingredients such as peppermint don't last as long. [Video] 2:04 - 2. Insect Repellent DEET has long been used in insect repellents in Japan, but more and more parents are avoiding it when it comes to their children because of its side effects that can cause skin problems. It's also important to avoid exposing skin to insect bites as much as possible when summer camping. Leggings and pants that cover the skin are especially important to protect against bites. [Video] 2:58 - 3. Leggings Next, the "Yabu Mosquito Barrier" is a type of spray that is sprayed on the grass around your tent to create a barrier effect. [Video] 3:29 - 4. Yabu Mosquito Barrier Source :YouTube screenshot In addition, insect repelling LED lanterns are a recommended nighttime insect repellant. [Video] 4:11- 5. Insect repelling LED lantern Taking advantage of the nature of insects to be attracted to ultraviolet rays, placing a lantern with built-in UV a slight distance from your camp prevents insects from being attracted to your campsite. Poison Remover is a useful first aid item for treating venomous insect stings. The syringe-like container allows pinpoint suction of the sting. [Video] 5:06 - 6. Poison Remover 6 Heat Protection Essentials for Summer Camping in Japan Photo:A portable fan The following items are recommended for protection against the heat when summer camping. Portable fans have clips and can be attached to car handles or tables and can also be used as stand-alone fans. [Video] 6:03 - 1. Portable electric fan Quick-drying, antibacterial, deodorizing, super-cheap sports shirts. Sports shirts are great for summer camping as you'll likely be hot and sweat throughout the day. [Video] 7:00 - 2. Sports shirts Cooling spray is a spray for clothing. It's an excellent product that allows you to feel a cool sensation just by spraying it on your clothes. [Video] 7:23 - 3. Cooling spray Gatsby Facial Paper with strong menthol is an item that gives you a cool and refreshing feeling just by wiping your skin with it, and it's cost-effective, too! [Video] 7:39 - 4. Gatsby Facial Paper Cooling towels are wetted and used as is. If you don't have a cooling towel, you can use a regular towel. [Video] 8:15 - 5. Cooling towel A cooling face gaiter is an amazingly useful product that makes you feel cooler just by putting it on your face. [Video] 8:40 - 6. Cooling face gaiter Summary of Summer Camping in Japan Photo:A woman enjoying solo camping This article introduced useful goods recommended for summer camping to protect against heat and insects. Japan's rainy season can feel hotter than you might think, so make sure you have the right heat protection gear, and be careful of heat stroke. Also, by taking all possible measures against insects, you'll be able to prevent unexpected accidents. We hope the information in this article will be of use during your next summer camping trip. If you want to camp in an area that's as cool as possible in the summer, it's important to choose the right campground. For the most part, campgrounds at higher elevations tend to be cooler. Also, here are some campgrounds that are considered relatively cool even in Japan's hot summers. ・Ontake Natural Recreational Forest Kurumijima Campground (Gifu) ・Togakushi Campground (Nagano) ・MUJI Minami-Norikura Camping Ground (Gifu) ・MUJI Campground Campania Tsumagoi (Gunma) ・Kyukamura Tsumagoi Kazawa Camping Ground (Gunma) That being said, with summer temperatures getting hotter and hotter each year, even at cooler campgrounds, you musn't let your guard down. Be prepared for the heat and insects, and enjoy your summer camping experience. -
Video article 29:15
How to Set Up a Tarp - A Definitive Guide for Solo Campers! Works for Square, Rectangle, and Hexagon Tarps Too!
Things to Do- 17 plays
- YouTube
Tarps - An Essential Piece of Camping Gear In Japan, the Corona pandemic has made it difficult for many people to gather in places with large groups of people. As such, camping has been growing in popularity as a leisure activity that can be enjoyed by families, and an increasing number of people have started camping. Tents are important when camping, but another piece of equipment that's incredibly important is the tarp. In this article, we've chosen a video in which an advanced camper introduces how to set up a tarp. Video Introduction Photo:A tarp This video, titled "The Definitive Guide to Setting Up a Tarp - All the Techniques and Tips for a Perfect Setup! After This, You've Got No Excuses!" (【決定版】完璧なタープを張るテクニックとコツを余すことなく大紹介!これで張れない訳がない!), was uploaded by "" (チキューギ.). It's a detailed guide on how to set up a tarp. This channel has published various videos on tarp setup in addition to this video, but this video is a culmination of all them. The video shows how to set up a tarp without fail, even as a solo camper! If you're planning on setting a tarp up for camping any other outdoor activities, be sure to check out this video before you do it! General Information About Tarps Photo:A tarp A tarp is a large sheet of waterproof or water-resistant material without a floor that protects against the sun and rain when outdoors. The material they're made of varies, but it's generally a heavy polycotton or a light polyester. There are many different types of tarps: ・Hexagon tarps - Hexagonal tarps with two poles ・Square tarps and rectangular tarps for large groups or families ・Wing tarps - Which are almost square in shape ・One-touch tarps - Freestanding and easy to set up ・Screen tarps with mesh panels and many more. Tarp sizes range from approximately 2m to over 6m, with the type and size adjusted to the number of people and situations in which they will be used. How to Set Up a Hexagon Tarp With 2 Poles Photo:A woman hammering stakes The video explains how to set up a 2-pole hexagon tarp. However, the method can also be used for a basic 2-pole tarp, rectangle tarps, or even square tarps, so be sure to check it out. First, fold the tarp in half, place it down with the sun facing you, and drive a marker stake into the ground where the tarp's eyelet is. Place the poles in a straight line from the folded line of the fabric and place a marker stake at the end of the pole. [Video] 1:43 - Laying the tarp down [Video] 3:03 - Positioning the poles [Video] 3:32 - Marker stake Next, lay the pole down so that it is perpendicular to the marker stake you just put down. Drive another stake into the ground 2/3 of the way up the pole, at an angle such that they create a 30-degree angle between the ground and the stake, and a 90-degree angle between the stake and the guy lines. By doing this, not only is the angle determined, but also the distance the poles are from the stakes, making the tarp more wind resistant. Thread the top of the pole through the eyelet of the tarp, followed by your guy lines. Connect the guy lines to the stakes while leaving some slack, then set the poles up and tighten the guy lines. After that, tie the sub ropes in the four remaining eyelets, making sure they're tight. The video also shows how to tie sub ropes, including how to tie the Eskimo Bowline, the Bowline, the Slip Knot, and the Cow Hitch using sub ropes at four different locations. [Video] 15:37 - Tying knots for your sub-ropes Tips for Avoiding a Saggy Tarp Here's a tip for when your tarp is a bit loose after setting it up. Move the base of the poles towards the center of the tarp slightly. This creates more tension on the guy lines. Pulling the guy lines tight will remove wrinkles and creating a nice, clean-looking shelter. [Video] 22:15 - Tips for more tension Choosing the Right Camping Gear Photo:Steel stakes for securing a tent when camping Polyester can be used without the methods shown here, but polycotton and cotton tarps are heavy and can be easily affected by wind and other factors if the angle and position of the tarp isn't correct. Also, because tarps can be heavy, it's important to choose the one that's right for you when purchasing any equipment. Having said that, ropes should be 5mm or longer, and sturdy stakes, preferably 3cm or thicker, are also recommended. Safe in the Rain and Wind! Summary of How to Set Up a Tarp The video explains how to put up a tarp in an easy-to-understand manner with a variety of tips and tricks. It's a great video that can help even beginners put up a tarp beautifully and without failure. If you can put up a tarp properly, you can enjoy peace of mind even when it rains or there are strong winds. If you're a beginner who is just learning to put up a tarp, or you've managed to do it before but aren't quite confident in your skills, be sure to check out this video, as it's packed with tips from an advanced camper. -
Video article 11:55
Compact Cookware and Dishes for Family Camping! Recommended Cutlery, Cookers, and More!
Things to Do Life & Business- 27 plays
- YouTube
Introducing Dinnerware and Cutlery for Families Who Love to Camp While leisure and other activities are limited due to the Corona pandemic, camping, which can be enjoyed outdoors, has become very popular in Japan. Here we'll introduce camping accessories that family campers have found useful. Check out these compact items and how to neatly store them. Video Introduction This video, titled "Introducing Family Camping Dishes, Cutlery, and Cookers!" (Introduce items such as family camp dishes, cutlery and cooker!) was uploaded by "Pahta / Camp." It introduces recommended dinnerware, cutlery, cookers, and other camping items for family camping that can fit in a Seattle Sports Frost Pak Soft Cooler! The video introduces cutlery and dinnerware sets for a family of four, including two children and two adults, neatly stored in a soft cooler. This video is recommended for beginners as it explains the appeal of each camping item, what to look for, design features, and materials. The way they're stored is also very helpful. Be sure to check it out in the video! Storing Camping Dinnerware and Cutlery Neatly and Compactly Source :YouTube screenshot The video begins with the opening of a SEATTLE SPORTS Frost Pack 25QT, which stores dinnerware and cutlery, and which is useful for camping with a family. The Seattle Sports Frostpack 25QT is an American-born brand synonymous with soft coolers. When camping solo, you can also take your family's portion of dinnerware and cutlery out of the bag and go camping with less weight. Now, let's take a look at the items introduced in the video. Basic Camping Rice Cooker and Kettle Source :YouTube screenshot Introduced first are bottles for making tea and water, a rice cooker for cooking rice, and a kettle for boiling water. Rice is a staple food in Japan and it's great for cooking when camping as well. Snow Peak, the cookware, can also be used to make soup and rice, and the lid can be used as a frying pan. ・1 liter Nalgene bottle: Used to store water ・UNIFLAME Rice Cooker Mini DX: Used to cook rice ・Trangia Kettle 0.9L (aluminum): Used to boil water ・Snow Peak Trek 1400 (aluminum): Cooking utensils Titanium Dinnerware and Cutlery Photo:Outdoor dinnerware Titanium is a suitable material for dinnerware because of its high heat resistance. If the heat from hot soup or other food is transferred directly to your dinnerware, it can cause burns when eating. In this respect, titanium dinnerware stays relatively cool, allowing you to eat without worrying about being burned by your cutlery. [Video] 2:53 - Introduction of cutlery Cups, cutlery, and other items featured in the video. The first titanium sierra cup that PAHTA (the youtuber) bought is a product that they recommend. It's a simple design, but the handle is designed so that it naturally hooks onto the middle finger when held, making it easy to hold and spill-resistant. ・Snow Peak Titanium Sierra Cup: Used for cooking and as dinnerware ・Snow Peak - Trek Titanium Bowl (discontinued) ・Snow Peak - Trek Titanium Plate (discontinued) ・Coleman - Cooking Tool Box 2: Holds mugs and cutlery ・Snow Peak - Stacking Mug Snow Peak H300: Mugs ・Snow Peak - Titanium Cutlery FS (discontinued): Forks and spoons ・OPINEL - Opinel No. 7 Round Tipped Stainless Steel Knife ・Windmill - Windmill JP Turbo Lighter ・A rice scoop and chop sticks ・MSR ALPINE DX Cutting Board: A small cutting board with stylish colors Titanium dinnerware and cutlery is popular partly because it is lightweight when carried to cleaning stations at camp. Another important feature that makes them popular is that they can be neatly stacked for easy storage. Useful Camping Gear for Drying Dishes Source :YouTube screenshot After eating at camp, it's necessary to clean up afterwards. Here we'll introduce some useful goods for cleaning up. ・Coleman Hanging Dry Net 2: A net for drying dishes outdoors ・Sponge and detergent for cleaning dinnerware ・HOLD & FOLD baby bottle stand (discontinued): used as a portable drying rack Featured in the video is a HOLD&FOLD baby bottle drying rack. After washing dishes, you'll want to dry them, but there are surprisingly few compact dish drying racks. The product shown in the video is a reused baby bottle holder but is compact and convenient. Summary For beginners who are thinking about getting camping equipment, videos and information from advanced campers who have actually used the equipment and are comfortable recommending it are a useful resource. It's important to choose camping equipment that is light, simple, and easy to use, and that can be stored neatly. As shown in the video, storing a family's worth of dinnerware, cutlery, and cookers in sets will decrease the chance that you forget something. Be sure to reference this video for camping information. -
Video article 8:40
A Beginner's Guide to Building a Campfire! Useful Camping Equipment and Tips for Beginner Campers!
Things to Do- 15 plays
- YouTube
Campfires - A Fun Way to Enjoy Camping at Night Camping at night is all about enjoying the campfire. With Japan's camping boom, more and more camping beginners are getting into camping, but some of them don't know how to build a fire. In this article, we'll go over how to build a campfire in detail. Video Introduction This video, titled "How to Build a Campfire: Starting a Fire and Cleanup (Beginner Guide)" (【キャンプ初心者でも大丈夫】火起こしから後片付けまで”焚き火のやり方”詳しく教えます!), was uploaded by "IYASHI NEKO." The video explains how to build a campfire in a simple and easy-to-understand way so that even beginners can enjoy the outdoors when camping. This video is a must-see for anyone new to the outdoors or camping. Master How to Build a Campfire Photo:A firepit The video is divided into three parts (preparation, practice, and precautions) to introduce bonfires. The Preparation section introduces the equipment needed for camping and outdoor activities. The Practical section focuses on how to build a fire, and the precautions section introduces cleanup and other important points to keep in mind when building a campfire. Preparation for Camping and Outdoor Fires Photo:Firewood The equipment for building a fire is as follows. ・A fire pit ・Firewood ・Firelighter ・Tongs ・Heat-resistant gloves ・A multi-purpose lighter (A candle lighter is used in the video) ・Fireproof sheet When using kindling, coniferous trees with high oil content, such as cedar and pine, and broadleaf trees such as oak and sawtooth oak with long burn times are often used, and each has its own pros and cons. ■Coniferous trees (cedar and pine) Pros: Good for kindling because of its flammability Cons: Burns out quickly ■Broadleaf trees (oak, sawtooth oak) Pros: Long burn time, so you can enjoy your campfire for longer Cons: Poor flammability When you get used to building a fire, we recommend using them together, but coniferous wood may be easier to start with for beginners. Also, firewood can be purchased at many hardware stores in Japan, but thicker wood can't be used as kindling. Because of this, be sure to chop the wood with a hatchet so that you can use it as kindling when building a fire. [Video] 0:44 - Fire building equipment Practicing How to Build Camping and Outdoor Fires Source :YouTube screenshot In the practical section of the video, you can see how a fire is actually lit. First, set up the fire pit. When building a fire, it's important to stoke the fire. Place natural igniters, such as pine cones, at the bottom of the fire pit. Place kindling or twigs on top of the igniter. This is an important point to remember! Oxygen is necessary for combustion, so to allow oxygen to reach the flame, be sure not to smother the fire, and make sure there are ample paths for air to reach the fire. [Video] 2:42 - Starting a fire Things to Be Careful of When Building Camping and Outdoor Fires Photo:A campfire The precautions section introduces common knowledge about camping and outdoor activities that beginners may not be aware of. First, to prevent tents and tarps from burning due to fire sparks, be careful to set up the fire a comfortable distance from tents or tarps. Also, if your campsite is on grass, pine needles, etc., be sure to lay down a fireproof sheet under your fire pit. Rules vary from campground to campground, so be sure to check the rules of the campground you're staying at before building a fire. If the campground has an ash dump, be sure to dispose of the ashes after enjoying your fire, or if not, then follow the rules established by the campground. Make sure your campfire is completely extinguished when you're finished with it. Campfires can take hours to fully extinguish. Be sure to account for this when considering your departure time and allow plenty of time for your fire to extinguish. Don't over-stoke your fire. Putting in too much wood at once is dangerous as your fire can quickly get out of control. Also, by building large fires you'll run out of wood quickly. Enjoy a nice slow-burning fire. [Video] 4:52 - Precautions Summary of How to Build a Campfire If you spend all your time building a fire and cleaning it up afterwards, you'll miss out on a lot of enjoyable camping time. Be sure to master the basics of building a campfire. There are many other ways to build a campfire besides the method described here. Find what style works best for you so you can enjoy a nice, relaxing camping trip with a warm nighttime fire. -
Video article 11:38
How to Comfortably Sleep in a Sleeping Bag! Mats, Cots, and Other Useful Camping Gear!
Things to Do- 19 plays
- YouTube
Sleeping Comfortably When Camping Japan is in the midst of a camping boom, but one of the most common mistakes made by beginner campers is that they lose sleep because they can't control the temperature of their sleeping environment and end up being colder than they thought they would be. In this video an advanced camper explains the key points for getting a good night's sleep when camping. Video Introduction: Choosing a Sleeping Bag and Mat for a Good Night's Sleep When Camping Photo:A man buying a sleeping bag This video, titled "Getting Started Camping - Recommended Sleeping Bags and Mats for Beginners|Girl's Camping, Solo Camping, and Family Camping" (キャンプの始め方 初心者さんにおすすめの寝袋・マットは? 寝袋・マットの選び方編 編 女子キャンプ、ソロキャンプ、ファミリーキャンプの始め方 キャンプ初心者さん向け), was uploaded by "Camp Lab" (キャンプ研究所). Have you ever gone camping and had trouble sleeping because it was colder than you thought it would be? In this article, we'll cover how to choose a sleeping bag and mat, as well as items that will help you get a good night's sleep when camping. Japan has four distinct seasons with each season requiring different temperature adjustments when camping. If you're planning on going camping in the future or are having trouble sleeping when camping, be sure to keep reading! Regular Sleeping Bags vs. Mummy Sleeping Bags Photo:A sleeping bag There are two main types of sleeping bags, rectangular sleeping bags and mummy sleeping bags. Let's take a look at how these sleeping bags differ. Rectangular sleeping bags are characterized by their spacious interior. Another key point is that they can be connected to sleeping bags of the same maker and model. This type of sleeping bag is recommended for families sleeping with small children. For those seeking a more spacious feel, rectangular sleeping bags are great, but measures should be taken to preventthe sleeping bag from getting cold due to their spaciousness. [Video] 0:44 - Rectangular Sleeping Bags Compared to rectangular sleeping bags, mummy sleeping bags are snugger to the body. Although they may feel narrower than rectangular sleeping bags, the advantage is that they are warmer as there's less space between the body and the bag. [Video] 1:16 - Mummy Sleeping Bags Sleeping Bag Material – Down or Synthetic? Photo:Down Sleeping bags differ in comfort and characteristics depending on the material they are made of. The two main materials used in sleeping bags are down and synthetic fibers (such as polyester). Let's take a look at the pros and cons of each. ・Down Sleeping Bags The pros of down sleeping bags is that they are lightweight and can be stored compactly. One of the main cons of down sleeping bags however, is that they are often expensive. [Video] 1:45 - Pros and cons of sleeping bags - Materials ・Synthetic sleeping bags are generally more affordable than sleeping bags made of down. On the other hand, they are bulky and not easily stored. Each sleeping bag has a comfort temperature labeled on it. Many people incorrectly interpret this comfort temperature though, so please be careful. For example, if a sleeping bag states "comfort temperature 10°C," it means that you can sleep comfortably if you wear clothes that can withstand a temperature of 10°C. Be careful not to catch a cold by mistakenly getting into a sleeping bag with light clothing. When selecting a sleeping bag, it's important to check the comfort temperature, as it varies according to the amount of cotton used. [Video] 2:19 - Sleeping Bag Comfort Temperatures Using a Mat for Sleeping When Camping If you sleep only in a sleeping bag without a mat, you may absorb the geothermal energy from the ground and become hotter or colder, which can cause you to wake up in the middle of the night. Therefore, it's important to prepare a mat for your sleeping area to avoid being affected by the geothermal energy. [Video] 3:18 - Camping Mats Staying Warm When Camping: Air Mattresses, Inflatable Mats, and Closed-Cell Camping Mats Photo:A man blowing up a camping mat There are three main types of mats for avoiding the effects of geothermal energy. Let's take a look at the characteristics of each. ・Air Mattresses Air mattresses are cushioned and comfortable to sleep on because of the air inside. However, it should be noted that over time, the air in the mat is affected by geothermal energy which is then transferred to the body. When using an air mattress, use a hot carpet or cool mattress to manage the temperature over time. [Video] 4:06 - Air Mattresses Keep in mind that air mattresses can also be punctured. They may even puncture when being inflating or worse, when sleeping. Take this into consideration when deciding whether or not to purchase an air mattress. [Video] 5:15 - Points to keep in mind about air mattresses The biggest advantage of inflatable mats is that they are made of urethane and are very comfortable to sleep on. However, like air mats, there is a possibility that they are punctured, and they are also susceptible to geothermal energy. The time and effort required to inflate and deflate the may can also be considered a disadvantage. [Video] 5:41 - Inflatable Mats ・Closed Cell Camping Pads Closed cell camping pads are easier to set up than air mattresses or inflatable mats. If you're looking to save time when setting up and taking down your tent, consider looking into closed cell pads. There are also types with excellent insulation properties and types that can be used on snow. However, they are generally not as comfortable as air mattresses and other types of mats, so be sure to consider this when purchasing a camping mat. [Video] 6:32 - Closed Cell Camping Pads Useful Camping Gear to Help You Sleep Better - Cots, Sleeping Bag Liners, Hot Water Bottles, Fans, and More! Photo:A cot The video introduces several items that can help you get a good night's sleep when camping. Combine them with sleeping bags and mats to achieve a comfortable sleeping environment. ・Cots Cots are essentially foldable beds. Cots are separated from the ground so they are less susceptible to the effects of geothermal energy. [Video] 7:47 - Characteristics of a Cot ・Sleeping Bag Liner Sleeping bag liners are like sleeping bags made of a single piece of thin fabric. By putting it in a sleeping bag, you can increase your resistance to the cold. If you already have a sleeping bag, it's a good idea to buy an extra sleeping bag liner as a countermeasure against the cold. It is also a great way to save money compared to purchasing a new sleeping bag. [Video] 8:07 - Characteristics of Sleeping Bag Liners ・Hot Water Bottles Hot water bottles are great for warming the lower body. For those who are shorter, the inside of a sleeping bag tends to be colder due to larger air pockets. This is great for people who often get cold feet when sleeping. [Video] 8:37 - Hot Water Bottles for Camping ・Disposable Hand Warmers Disposable hand warmers can be put inside a sleeping bag in cold areas to protect against the cold. This item can be used in place of a hot water bottle. [Video] 9:16 - Disposable Hand Warmers Besides these items, hot carpets and electric blankets can make sleeping even more comfortable during the colder months. Furthermore, wood and oil stoves are also effective at protecting against the cold. We also recommend each camper have their own fan, as it's an essential item to bring camping in the summer to protect against the heat when the hot weather is making it difficult to sleep. Choose a Sleeping Bag and Mat That's Right for You and Enjoy a Good Night's Sleep When Camping! Getting a good night's sleep is crucial to having an enjoyable camping trip. If you don't get enough sleep, you'll have less energy for camping activities the next day and you might be tired when driving home. Prepare sleeping bags and mats according to the season to ensure a comfortable night's sleep! -
Video article 35:26
8 Different Fire Tongs Recommended by a Professional Camper! Snow Peak, TEOGONIA, Captain Stag, and More!
Things to Do- 15 plays
- YouTube
Choosing the Right Fire Tongs for Camping in Japan Fire tongs are an indispensable piece of equipment for camping if you're planning on building a fire. More and more people are starting to enjoy both solo and family camping in Japan. In this article, we'll introduce a video goes over the different features and comfort of fire tongs. Video Introduction: 8 Different Fire Tongs for Camping and Outdoor Activities in Japan This video, titled "Campfire BBQ [Comparing 8 Different Fire Tongs]" (キャンプ焚火BBQ【火ばさみ8種類比較), was uploaded by "solo camp & camp cooking in Japan TANA channe." Fire Tongs: Features and Ease of Use Photo:Fire tongs If you're just getting started with camping or other outdoor activities, or you're finding your current fire tongs difficult to use or in need of replacement, this video is for you! The video introduces the characteristics of each pair of fire tongs, how comfortable they are to use, and how well they can actually handle charcoal and other materials. Hopefully it helps you find a new pair of fire tongs. 1. Snow Peak Source :YouTube screenshot Snow Peak's fire tongs are 40.5 cm long, approximately 4 cm wide, made of stainless steel, and weigh approximately 200g. They open in a V-shape and can be stored compactly simply by putting a rubber band on the tips to hold it shut. The grip is made of beech wood, making it easy to hold, and the jagged tip makes the fire tongs suitable for campfires and barbecues. They also look stylish. Reviews state that the tongs are reliable even when used with heavy firewood, and that they don't warp easily and are easy to use. Although some strength is required when picking things up, the large opening makes it easy to grab large coals and other items. [Video] 1:55 - Snow Peak's Fire Tongs [Video] 8:36 - Picking Up and Moving Charcoal 2. TEOGONIA Fireplace Tongs Source :YouTube screenshot TEOGONIA's fire tongs are 42 cm long and weigh 390g. The body is made of steel and the grip is made of high-quality rosewood. The tip of the tongs opens wide for a firm grip. However, it may be difficult for some people, such as those with smaller hands or women, to open them wide. It may be better to actually try them out in a store before purchasing them. [Video] 10:00 - TEOGONIA Fire Tongs 3. KONYO Daigoro Source :YouTube screenshot The Daigoro Charcoal Tongs are 28.5 cm long and are suitable for use on smaller charcoal beds. Many reviewers say that they are non-slip and rust-resistant, and most importantly, they are inexpensive. However, some people seem to feel that they are less sturdy than others, or that they become distorted and do not grip well. [Video] 16:10 - Daigoro Charcoal Tongs 4. ONOE (尾上製作所の火ばさみ) Source :YouTube screenshot The ONOE fire tongs are relatively reasonably priced fire tongs. The video shows how the flat shape allows you to grab charcoal and kettles without difficulty. This product can also be used for picking up trash. [Video] 18:46 - ONOE Fire Tongs 5. Captain Stag Wide BBQ Tongs (キャプテンスタッグ BBQ ワイド 炭バサミ) Source :YouTube screenshot The Captain Stag Wide BBQ Tongs also open wide in a V-shape, and require a rubber band or some other binding to store them easily. This is a larger type with an overall length of about 47 cm. They are made of stainless steel and feature a wider width at the tip. The wide tip allows for a firm grip on large pieces of firewood or charcoal. Made of stainless steel, it is resistant to rust and can be used not only for camping but also for picking up trash, such as empty cans and twigs. [Video] 20:52 - Captain Stag Wide BBQ Tongs 6. Captain Stag Dutch Oven Tongs Source :YouTube screenshot The Captain Stag Dutch Oven Tongs feature a Dutch oven lifter at the tip. The overall length is about 49 cm and the tongs themselves are rather large. The grip is made of natural wood. With a load capacity of 5 kg, this product can be used as both fire tongs and a lid lifter, making it useful for those who use Dutch ovens when camping. Compared to Snow Peak, they require less strength to clamp down on something. Some say they're easy to use because the handle is made of wood, while others say it is difficult to use because of the unique tip. This is a product that has a niche use and should be purchased for specific uses. [Video] 23:39 - Captain Stag Dutch Oven Tongs 7. Vieaura Fireplace Tongs Source :YouTube screenshot The Vieaura Fireplace Tongs are 38.5 cm long, and weigh only 15g. They are lightweight, and are suitable for use in a wide range of applications. The long handle is also a good choice for those who are concerned about getting burned. Because the tongs are light and slim, some say the tongs aren't strong enough, and some people with smaller hands may find the tongs difficult to open wide. On the other hand, there are also reviews that say the tongs are easy to use and grip charcoal firmly, so this is another pair of tongs we recommend trying at a store before purchasing. [Video] 27:27 - Vieaura Fireplace Tongs 8. Captain Stag Large Charcoal Tongs Source :YouTube screenshot The Captain Stag Large Charcoal Tongs have a total length of 45 cm and include a stopper for easy storage. The jagged tip makes them easy to grasp objects with, and the grip is vinyl-coated to prevent slipping. Reviews include comments that say the rubber grip is easy to use, while others say the tongs aren't durable and the clip for storing the fire tongs comes off easily. [Video] 30:58 - Captain Stag Large Charcoal Tongs Summary of Fire Tongs for Camping in Japan Fire tongs come in a wide variety of types and at varying prices. Your choice will come down to your camping/outdoor preferences, how you plan to use the tongs, and who will be using them. You can purchase fire tongs online, but if you're interested in a product after watching the video, consider trying it out in a store to get an idea of what the product is like before buying it. Don't forget to check the length as well, as you also want to be careful about safety when dealing with fire. By choosing the perfect camping equipment for you, you can enjoy a more comfortable outdoor experience. -
Video article 15:53
Pros and Cons of Burner Pads - Camping and Outdoor Activities With a Single Burner
Things to Do Food & Drink- 130 plays
- YouTube
Single Burners for Camping in Japan Japan is experiencing a camping boom, and many campers opt for the easy-to-use single burners when camping. Let's take a look at a video to see what burner pads are and how, if at all, they can make your cooking experience better when enjoying the outdoors. Video Introduction: Single Burners and Burner Pads This video, titled "Should You Buy a Single Burner and Burner Pad Together?" (シングルバーナーとバーナーパッドは一緒に買うべき?), was uploaded by "HAMA." Different Types of Single Burners Photo:A single burner There are two types of single burners: unified and partitioned. The unified type has the burner and gas canister in one unit, making it compact and convenient for cooking for one person. With the partitioned type, the burner and gas can are separated, and the burner is more stable than the unified type, so it's recommended when using a large pot. In addition, there are two types of gas canisters: CB cans and OD cans. CB cans are often used in household gas stoves, and inexpensive ones can be purchased at 100-yen shops all across Japan. The video uses a unified single burner with easily accessible CB cans. The Pros of Using a Burner Pad With a Single Burner Photo:A burner pad In the video, Hama-san from Okinawa goes over whether or not you should use a burner pad with your single burner. As you probably already know, a single burner is a small gas stove that can start a fire. It's a piece of outdoor equipment that can easily be used to boil water and cook food when camping or enjoying other outdoor activities. However, using a single burner by itself has some disadvantages, such as not distributing heat well, resulting in burnt pots and pans, as well as being unstable when used with larger pans. This is where burner pads come in. The main feature of a burner pad is that it converts the flame into a more evenly distributed source of heat. This makes it possible to cook dishes like curry, which requires heat be increased gradually, without burning the food. [Video] 4:35 - Using a Burner Pad In the video, you can see how gyoza (Japanese dumplings) are cooked. By using the burner pad, the gyoza are evenly browned and look delicious! [Video] 12:45 - Cooking Gyoza Beware of Thermal Radiation When Using Burner Pads Photo:A single burner The burner pad used in the video is a burner pad by Uniflame, made with a stainless-steel frame and a special heat-resistant steel mesh. The burner pad distributes heat and allows the user to adjust the strength of the flame to suit their needs. However, it's recommended that you cook over low heat because the thermal radiation can damage utensils and also heat up the gas can. Thermal radiation can also occur when using larger cookware, such as frying pans. Although not shown in the video, there are heat shielding tables for single burners. Consider checking them out as well! Should You Buy a Burner Pad for Your Single Burner? Summary The burner pad, which more evenly distributes the heat of a single burner, expands the range of cooking recipes you can prepare. Some campers use single burners without a burner pad when boiling water and with a burner pad when cooking. The less burnt-on food, the easier it is to wash your cookware. If you're thinking about purchasing a burner pad, be sure to use this video/article as a reference! -
Video article 2:38
How to Use a Chimney Starter! Easy-To-Use Oga Charcoal That Holds Fire but Is Difficult to Light!
Things to Do- 364 plays
- YouTube
For Campers Who Have Difficulty Lighting a Campfire Making a fire gets easier the more you do it, but it can be difficult for novice campers. Campfires and barbecues are two of the best parts about camping and the outdoors. In this article, we'll introduce how to use a chimney starter so that those new to the outdoors and those who are finding it difficult to start a fire, can do so with ease. Video Introduction This video, titled "The Easiest Way to Start a Campfire|How to Light Charcoal Without Fail Even for Beginners" (1番簡単な火おこしのやり方|初心者でも絶対に失敗しない炭に火をつける方法), was uploaded by "Izu no Nushi Tsuri" (伊豆のぬし釣り). If you're like most campers you've probably struggled to light a fire at some point when camping or enjoying the outdoors. With the help of this video, you can learn how to easily light a campfire using a chimney starter. What is a Chimney Starter? Source :YouTube screenshot Chimney starters are also called charcoal starters. They're an excellent tool for easily starting a fire using the chimney effect (stack effect). In the video, a Uniflame Charcoal Starter is used. The video shows how easy it is to start a fire, even if you're new to using a chimney starter. This video shows how to start a fire without failure using a chimney starter. Using Oga Charcoal - Long Lasting But Hard to Start Photo:Oga Charcoal Although oga charcoal burns long and can be used for 2 to 3 hours, it can be difficult to light. In this video they use said oga charcoal. If you can master how to use it, you can start building fires efficiently. How to Use a Chimney Starter Source :YouTube screenshot So, without further ado, let's take a look at how to use a chimney starter. ・Stand the chimney starter up vertically and place the coals inside in an upright position. By placing the coals upright, they will burn more efficiently due to the rising air currents. [Video] 0:06 - Placing charcoal in the chimney starter ・Place the igniter under the chimney starter and light it. Underneath the chimney starter, there's a space for the igniter. After lighting the igniter, place the chimney starter on top of the igniter so that the flames rise into it. Then just let it sit for about 20 minutes. It's incredibly easy. [Video] 0:55 - Lighting the igniter The fire spreads from the igniter to the charcoal placed on top. Even a novice outdoorsman can light oga charcoal with a chimney starter. The idea behind the chimney starter is to use the air flow and the rising air currents to stimulate combustion. If you use the chimney starter to light a fire when you arrive at your campsite, you can start the BBQ (barbecue) when you've finished setting up your tent and other equipment. Use Air Flow to Efficiently Start a Fire Photo:A campfire When it comes to camping, outdoor cooking is what it's all about. Family campers and solo campers alike can enjoy cooking a variety of different foods. Some experienced campers make their own chimney starters using the chimney effect. However, beginners should start with a commercially available chimney starter. A chimney starter can start a fire in a short time and can be conveniently packed. The stainless-steel design also makes it rust-resistant. Summary of How to Use a Chimney Starter In this article, we introduced how to light charcoal using a chimney starter. You may have been surprised at how much easier this method can be. If you're struggling to build a campfire or not feeling confident about your fire making skills, it might be a good idea to have a chimney starter so you can enjoy your time camping in the outdoors while relaxing around a fire and eating delicious barbecue instead of worrying about getting your fire started. For some people, building a fire is one of the best parts of being outdoors, but if you prefer to prioritize mealtime over the time spent on starting a fire, consider picking up a chimney starter. -
Video article 12:11
A Beginner's Guide to Setting Up a Tent. Using the Popular Montbell Stellaridge Tent
Things to Do- 166 plays
- YouTube
A Camping Guide for Beginners Japan's camping boom was sparked by the Corona pandemic. Even people who had never been interested in camping before began to show interest in the activity. In this article, an advanced camper carefully demonstrates how to set up a tent for beginner-level campers. Video Introduction This video, titled "Setting Up a Tent for Beginners (Stellaridge) [Sora no Shita]" (初心者のためのテント設営(ステラリッジ)【そらのした】), was uploaded by "Outdoor Gear Rental Sora no Shita" (アウトドアギアレンタルそらのした). Tools Needed to Set Up a Tent Source :YouTube screenshot If you're new to camping or other outdoor activities, let's first review what you'll need to set up your tent. [Video] 0:08 - What you need to set up a tent Below is a list of tools needed to set up a tent. ・Tent ・Tent poles ・Stakes ・Four guy lines ・Flysheet ・Guy line tensioners ・Groundsheet It's important to make sure you have these items before assembling your tent, let alone leaving for camping so you don't get stuck with a half-assembled tent when camping. Assembling the Body of the Tent Source :YouTube screenshot Now, let's look take a look at the steps to set up a tent. 1. stand upwind from the tent and unfold the body of the tent. The trick is to keep the door of the tent as far downwind as possible. [Video] 0:12 - Unfolding the body of the tent. 2. Fasten the poles together. The poles are connected together with bungee cords, so they are easily connected. [Video] 0:45 - Connect the tent poles 3. Thread the poles through the sleeves attached to the tent diagonals so that the two poles are crossed. 4. Connect the poles to the rings. Connect the ends of the poles to the rings at the four corners of the tent. Connect the two adjacent poles first. [Video] 2:45 - Connecting the poles to the rings at the tent's corners. [Video] 2:53 - A close-up view on how to connect the poles to the corner rings. From the third pole, the poles will start to bow when connecting them. Connect the poles to the rings while keeping the poles in contact with the ground. This keeps the tent from standing makes it stable when setting it up. [Video] 3:15 - Connecting from the third pole 6. When the fourth pole is connected the poles will bow and the tent will stand up at this point. You've now finished setting up the body of the tent. Once the tent is standing, it can be easily moved, so at this stage, it may be moved to a place where you'll actually be sleeping in it. When deciding on a place to set your tent up, consider whether the ground is level and free of unevenness, as well as distance from facilities, such as restrooms, shade from trees, and vantage points. How to Anchor a Tent Source :YouTube screenshot Once you've decided where you want to position your tent, it's time to secure it in place. 1. hammer the stakes into the ground. If the ground is hard, use rocks or other objects to hold the tent in place instead of trying to force the stakes into the ground which can cause them to bend or break. [Video] 4:13 - Hammering the stakes 2. Next we'll secure the tent with ropes. Take out the four guy lines and secure the tent. There are loops located about halfway up the tent sleeves, to which the guy lines will be tied. The key is to use a bowline knot, as reef knots can be difficult to untie. If you don't know how to tie a bowline know, be sure to watch the video to learn how. Make a loop in the middle of the guy line and pass the end of the guy line through the loop. Then, pass the end of the guy line through the loop again, and pull it through to complete the knot. [Video] 5:40 - How to Tie a Rope Knot (Bowline Knot) How to Set Up a Fly Sheet Source :YouTube screenshot 1. Check the position of the zipper and apply the flysheet with the zipper facing the entrance of the tent. [Video] 8:12 - Hanging the flysheet over the body of the tent 2. Pass the guy lines attached to the body of the tent through the slits in the flysheet. The video shows how to thread the guy lines through the slits in the flysheet, so beginner campers should be sure to watch this part. [Video] 9:03 - Threading the guy lines through the flysheet slits 3. Connect the four corners of the flysheet to the four corners of the body of the tent as shown in the video. Pass the poles through the rings attached to the four corners of the flysheet. [Video] 10:35 - Connecting the body of the tent to the flysheet 4. Secure the entrance of the tent with stakes. After that, the tent sides are also tensioned with stakes to create space and improve airflow in the tent. 5. Secure the guy lines with stakes or rocks to finish setting up the tent. In this case, the use of guy line tensioners makes it easier to create tension. Things a Beginner Outdoorsman Should Know Photo:Camping equipment Next, we'll go over some things that a beginner outdoorsman who will be camping for the first time should know. First of all, it's essential to prepare tools for camping, practice setting up a tent, and research the location where you'll be camping. Although this sounds obvious, beginners to camping should start by getting their tent and other equipment all ready to go. Research how much you need to spend to get started camping. After you have a complete set of equipment, what you don't want to do is spend so much time setting up your tent when you arrive that you have no time to enjoy the camping trip itself. After purchasing a tent, we recommend that you watch videos and practice setting up your tent. Camping is a great way to enjoy nature and it's not like staying in the city; there are dangers to be aware of. Care should be taken to avoid dangerous areas, such as cliff bottoms. In general, you should enjoy outdoor activities, such as camping, in a safe place. Depending on the weather, rivers may rise and other environmental disasters can occur. This is not limited to beginners in outdoor activities. You should gather necessary information on the weather and surrounding conditions to the best of your ability in advance. Summary If you're a beginner outdoorsman who is just starting to camp, be sure to refer to the video and learn the steps for setting up a tent. Whether or not you can enjoy camping will depend on whether or not you can set up your tent without hassle. In Japan, there are many attractive campgrounds where you can enjoy nature and explore the outdoors. There are many outdoor activities and camping experiences in Japan that you won't find in other parts of the world. We hope you have a great time camping in Japan! -
Video article 3:36
Camping in Japan - How to Clean Up After a Campfire! Key Points for Campfire Cooking in Japan!
Things to Do- 63 plays
- YouTube
Only You Can Prevent Wildfires Japan is currently experiencing an outdoor boom. As an island nation surrounded by the sea, Japan is also blessed with abundant nature. Because of this, it's possible to travel from the heart of Tokyo to a campground surrounded by nature in just a couple hours, and new styles of camping, such as solo camping, are on the rise. Camping is a lot of fun, but it's important to remember to clean up after your campfire to prevent wildfires and other accidents. In this article, we'll take a look at how to clean up a campfire. Video Introduction: Cleaning Up After a Campfire Photo:A campfire This video, titled "How to Clean Up After a Campfire at a Campground" (キャンプ場での焚き火の後片付け方), was uploaded by "Hiro, Camping" (ヒロ、焚き火). Campfires are used for a variety of purposes, including cooking and warmth. Some people simply like relaxing and getting lost in the flames of a campfire. That being said, cleaning up after a campfire is a necessary part of a safe and enjoyable camping trip in Japan. If you fail to clean up after a campfire, it can cause wildfires and other problems for many people. It's important to extinguish fires properly to protect our rich natural environment. Some Campgrounds Allow Open Flame Cooking, Others Don't Some campgrounds allow campfire cooking, while others do not. Be sure to check if the campground you're using allows open flame cooking. If open flame cooking is not allowed, you'll need your own campfire pit, fire sheet, etc. How to Clean Up Charcoal and Ashes After a Campfire Source :YouTube screenshot First, any coals and wood should be burnt down as much as possible. The extinguished coals and ashes can then be placed on a 60-micron aluminum foil. After that, clean up the surrounding area, picking up anything that has dropped under the fire pit. Restore the area to its original state as best as possible. [Video] 0:08 - Picking Up Ashes Water can then be poured over the collected charcoal and ashes. From there, you can wrap the remains in the aluminum foil compactly, removing as much air as possible. Then, wrap that in another sheet of foil and finally, place it in a plastic bag. If ashes from your campfire are scattered nearby, be sure to pick them up as well. Leaving ashes behind is a known cause of environmental pollution. The ashes, as well as the remaining charcoal will not decompose and be replaced by soil, so please do not bury them in the ground. After gathering the remaining ashes, pour water over them. Check the temperature of the ground around you just to be sure as well. Reducing the risk of fire as much as possible will not only protect you, but also other campers and the environment. Dispose of garbage from any meals you made while camping, as well as ashes and charcoal from campfires, in areas designated by the campground. Camp Fire Cleanup Summary Photo:Campfire remains When building a campfire at camp, clean up after the fire properly. Don't leave any ashes or coals behind with the mistaken belief that they will decompose. Failure to ensure that you clean up after a campfire could lead to a wildfire or other major problems. Keep in mind that even the slightest amount of carelessness can lead to a major accident. Everyone has their own way of enjoying camping and other outdoor activities, but remember that you're in a public place and should observe rules and manners. If you go to a campground that prohibits open flame cooking, don't forget to prepare a fire pit and other outdoor equipment. Please make sure to keep the cleanup of bonfires in mind with the video introduced here, and by all means, enjoy the rich nature of Japan while camping! -
Video article 7:37
A Female Solo Camper Introduces a Campground in Hokkaido! Check Out the Attractions of Bubetsu Forest Camping Field via Video!
Things to Do Food & Drink Nature Travel- 58 plays
- YouTube
A Female Solo Camper at Bubetsu Forest Camping Field: Video Introduction This video, titled "[Hokkaido Women's Camping] Bubetsu Forest Camping Field" (【北海道キャンプ女子】ブウベツの森キャンプ場), was uploaded by "Keco Cam 🏕🏔ʕ•ᴥ•ʔ" (けこキャン 🏕🏔ʕ•ᴥ•ʔ). Bubetsu Forest Camping Field: Information About the Campground in Hokkaido, Japan View this post on Instagram This post was shared by Bubetsu Forest Camping Field (@bubetsu.forest.camping.field) Bubetsu Forest Camping Field opened in Hokkaido in July 2020 in Shiraoi, Hokkaido, a town rich in nature. It is a handmade campground that was originally built by professional forestry workers. There are 13 auto-camping sites, 3 pet-friendly sites, 30 free sites, and 2 BIG sites. This cozy campground is popular with a wide range of campers, including beginner campers, solo campers, family campers, and women's campers. Since Bubetsu Forest Camping Field has only been open for a short time, reviews say that facilities such as restrooms and cooking facilities are new and clean. Although it is not a large campground, the quiet forest is comfortable and allows visitors to settle in and enjoy themselves. The ground at the site is covered with a thick layer of volcanic gravel, which is said to prevent puddles from forming. Furthermore, a wood-chopping station is available at the campground, and firewood can be used as much as you like free of charge. You can also enjoy a relaxing campfire. Those who wish to bring their pets camping can also rest assured that there are pet-friendly sites available. Reservations for Bubetsu Forest Camping Field must be made at least one day in advance, so please make reservations online or by phone. Tents, Camping Gear, and Supplies for Women's Solo Camping! View this post on Instagram This post was shared by Tentmark Design (@tentmark2011) Many female campers enjoy solo camping at Bubetsu Forest Camping Field as well. The video creator, Keco Cam, introduces some of her favorite camping gear in the video. One of the best parts about camping is the delicious food. Having useful kitchenware will make your camping experience more enjoyable. Women's Solo Camping Gear ・Tent: tent-Mark Designs CIRCUS TC ・Bedding mat: Hilander Inflator Mat (with pillow) ・Cot: FIELDOOR Wooden outdoor cot ・Rack: Hilander Wooden 3-tier Rack 600 ・Generator: Smart Tap Portable Power Station PowerArQ mini Red ・Cooker: Snow Peak Aluminum Personal Cooker Set, Chums Hot Sandwich Cooker ・Lantern: Snow Peak Hozuki Lantern ・Cutting Board: JUICY Of the above, the most notable is JUICY's cutting board, which is made to order and made from high-quality wood. In the video, the cutting board is used to cut asparagus and other vegetables, and is also used as a potholder for hot dishes. [Video] 6:35 - JUICY Cutting Board By having your favorite camping gear with you, you can create your own original space and enjoy women's solo camping even more. Women's Camping and Delicious Camping Food! Some Quick and Tasty Recipes! This camp meal is an omelet rice! Shiraoi, Hokkaido is famous for its eggs, and in the video they use fresh eggs from an egg vending machine and frozen chicken rice to make a delicious rice omelet. Here's the recipe. [Ingredients] ・Eggs: 2 ・Frozen chicken rice: 1 bag ・Ketchup: to taste 1. Stir-fry frozen chicken rice in a frying pan over heat. 2. Transfer the fried chicken rice to a Sierra cup and pack it in tightly. 3. Put the chicken rice (shaped like the Sierra cup) back in the pan. 4. Pour egg around the chicken rice, and finally pour ketchup over the rice. You can also watch the video to see how to make the simple, yet delicious camping meal. [Video] 5:06 - How to Make A Simple Camping Rice Omelet There are many different kinds of camping food, such as barbecue and curry, but as shown in the video, using frozen food is an easy way to make camping food. There's something about cooking in nature that makes this type of food taste better than it does at home. Also, while it's fun to cook camping meals with friends, the best part of camping solo is that you can cook whatever you want, whenever you want. Is Solo Camping in Japan as a Woman Dangerous? Things to Be Careful Of! Source :YouTube screenshot If you're a woman looking to do some solo camping, we recommend that you choose a location and be thorough with security. Let's look at some points to keep in mind. ・Choose a campsite with a resident caretaker Some campgrounds do not have a resident caretaker. Some campgrounds are not staffed, especially at night, so if you are planning to camp solo, choose a campground with a full-time caretaker. ・Set up your tent in a public place. When setting up your tent, you may be tempted to choose a quiet place to enjoy your time alone, but we recommend that you set up your tent in a place where there is a lot of pedestrian traffic. It's also a good idea to set up as close to family campers as possible to protect yourself from any campers looking for any women camping alone. ・Avoid posting on social networking sites in real time Be careful about social networking sites such as Instagram and YouTube. Posting photos on social networking sites in real time can expose your whereabouts. ・Prepare security goods and locks Always have some emergency supplies, such as a personal alarm, by your bedside, and lock your tent when you go to bed, so that if something should happen, you can immediately warn others of danger. Summary This time we introduced a video about solo camping for women. In winter, Bubetsu Forest Camping Field in Hokkaido is covered with snow and has different scenery in spring and summer. There are also hot springs in the area, so it's a good place to stretch your legs. In addition, there is a barbecue restaurant where you can enjoy Shiraoi beef, a specialty of the area, and a Shiraoi beef store that sells beef directly to customers. With Japan's recent camping boom, women's solo camping has become increasingly popular. The appeal of solo camping is that you can enjoy the luxury of having nature all to yourself with your favorite camping gear. The light of a lantern at night and the sunlight filtering through the lush hardwoods is sure to create a photogenic atmosphere to post on Instagram. Despite all of the enjoyment, women's solo camping can be dangerous. To enjoy camping safely, please keep in mind the precautions we introduced above. Bubetsu Forest Camping Field is a good spot for camping beginners and female solo campers. If you're planning on camping in Hokkaido, consider checking it out! ◆Bubetsu Forest Camping Field◆ 【Address】110-2, Ishiyama, Shiraoi 【Hours】10:00 – 16:00 【Telephone】080-4044-3388 【TripAdvisor】Bubetsu Forest Camping Field https://www.tripadvisor.com/Attraction_Review-g1120904-d21149822-Reviews-Bubetsu_Forest_Campground-Shiraoi_cho_Shiraoi_gun_Hokkaido.html -
Video article 15:31
20 Camping Manners for Beginner Campers in Japan! Learn Proper Manners to Enjoy the Outdoors and Nature!
Things to Do- 49 plays
- YouTube
Japan's Camping Manners Camping is a leisure activity that allows people of all ages to enjoy a priceless time in nature. Japan is currently experiencing a camping boom. However, the sad reality is that some campgrounds have closed down due to lack of good manners, such as campers not picking up their trash. In this article, we'll go over Japanese camping manners to be careful of. Camping Manners Video Introduction This video, titled "20 Camping Manners for Beginners and New Campers Alike! [How to Get Started Camping: Camping Manners]" (キャンプ初心者さん、これからキャンプを始める方に伝えたいキャンプマナー20選 嫌だ!〜こんなキャンパー〜【キャンプのはじめかた:キャンプマナー編】), was uploaded by "Camp Lab" (キャンプ研究所). The video introduces useful camping etiquette, and is recommended for those who are just starting to enjoy outdoor activities, such as camping, as well as experienced campers. 20 Camping Manners to Know When Camping in Japan Photo:Camping manners Although manners vary from country to country and campground to campground many of these are useful no matter where you're camping. There's no one better to learn from than an advanced camper who's been doing it for years, someone who has experienced bad camping manners themself. Let's take a look at these 20 camping manners to keep in mind when camping in Japan! 1. Choose a Campsite After Checking In It's bad camping etiquette to have your friend or other campers that you came with hold a site for you while you check in. It's standard etiquette that you should only choose a campsite after you finish checking in to the campground. [Video] 1:16 - Choosing a Campsite 2. Set Your Tent Up Away From Other Campers Photo:A campground Setting up a tent right next to an already pitched tent is bad manners, especially when the site is large and there are many other places to set up a tent. Moreover, setting up a tent in such a place may spoil the scenery for other campers. When choosing a place to set up your tent, you need to consider the scenery of the tents that are already set up, as to not obstruct their view. [Video] 1:36 - Setting Up Your Tent 3. Avoid Cutting Through Other Campsites Care should also be taken to avoid entering other plots. While it's OK if you just cut a corner through a campsite, you should avoid doing it too frequently and avoid crossing through the middle of a campsite to avoid disturbing other campers. [Video] 1:56 - Other Campers' Plots 4. Avoid Taking Up Too Much Space It's also a violation of camping etiquette to take up too much space in a free site. This is a common sight at group campsites, where group tents are set up so far apart that other campers cannot easily fit in between them and will have to find other places to pitch their tents. On busy days, it can be difficult to find a place to pitch your tent. When setting up your tent, please be sure to take into consideration the crowded conditions, and make sure that the distance between tents is the same as other campers. [Video] 2:19 - Avoid Taking Up Too Much Space 5. Avoid Late Night Setups and Early Morning Takedowns Photo:A campground at morning Any activity that interferes with other campers' peaceful sleep late at night or early in the morning is also taboo. Driving stakes into the ground while others are sleeping can be disturbing. Even if you unintentionally arrive at the campground late at night, consider the time before loudly setting up. [Video] 2:56 - Late Night Setups/Early Morning Takedowns 6. Don't Leave Children Unattended Do not leave small children unattended. Campsites can be dangerous places, and they could get into some serious trouble. You wouldn't want to see them get seriously injured or badly burned by a campfire or other fire because you lost sight of them. [Video] 3:28 - Camping With Children 7. Be Careful When Playing With Flying Objects, Such as Balls, Frisbees, Drones, Etc. Photo:A drone Playing with flying objects is another thing to be careful of. When playing with balls, frisbees, drones, etc., you should always be careful to make sure that no one is around. Be sure to play in designated areas. You wouldn't like it if someone else's frisbee kept flying into your campsite, right? [Video] 4:16 - Flying Toys 8. Avoid Trouble With Your Kids At campsites, in order to avoid trouble, parents may need to find a place for their children to play in advance, or if the campsite does not have an open space, you might need to take measures to avoid your children from being scolded, such as not bringing play equipment that is unsuitable for that location (i.e., flying toys in small areas). [Video] 5:13 - Be Aware of Your Children 9. Avoid Causing Noise Pollution Noise is a common cause of trouble, as loud noises can be annoying. Adjust the volume when enjoying music or movies, and be considerate of the time of day. Remember that the campground is a public place. [Video] 5:40 - Noise Pollution 10. Be Careful When Consuming Alcohol Photo:Enjoying drinks while camping The video also touches on drinking manners. Don't mistake the campground for a bar/izakaya and overdo it. It's important to be aware of the time of day, and to be aware that you may disturb other campers while they're sleeping. Video] 6:35 - Manners for Consuming Alcohol 11. Keep the Cooking Area Clean It's bad camping manners to make a mess in the cooking area. Leaving food scraps and other debris in the cooking area drains is disrespectful to other campers. When washing cooking utensils, bring detergent, sponges, and plastic bags. [Video] 7:22 - Keeping the Cooking Area Clean 12. Be Careful of Sparks From Campfires Photo:A campfire When enjoying a campfire, be careful of sparks. Sparks can fly not only on your tent, but also to neighboring campers' tents and other gear. Sparks may scorch your tent or other items, so please be careful. [Video] 8:07 - Campfire Sparks 13. Open Flame Cooking Is Not Allowed at All Campgrounds Don't perform open flame cooking in an area where open flame cooking is prohibited. It's a violation of both manners and rules. It may even lead to a wildfire in some places. [Video] 9:07 - Check if Open Flame Cooking Is Allowed 14. Don't Burn Garbage in Campfires Burning garbage in a campfire is another violation of camping manners. Burning trash creates unwanted smoke and odors. [Video] 9:44 - Don't Burn Garbage in Campfires 15. Be Respectful Even When Staying in a Car Photo:Sleeping in a car Be careful not to leave the engine running overnight when staying in a car. The noise can disturb other campers. Overnight stays in a car should be done in a parking lot. [Video] 10:18 - Manners for Overnight Stays in a Car 16. Manners Regarding Pets The video touches on manners regarding pets as well. It's bad manners to release pets without a leash. Pets can bite other campers and cause major problems. [Video] 11:04 - Pet Manners 17. Be Aware of Your Surroundings When Setting off Fireworks Do not disturb others with fireworks. Sparks may fly and scorch tents and other objects. [Video] 11:56 - Fireworks Manners 18. Separate Garbage Properly Photo:Camping manners In Japan trash is separated by type. Be sure to properly separate trash, even at campsites. [Video] 12:26 - Separating Trash 19. Leave Your Campsite Cleaner Than It Was When You Got There It's also bad manners to leave your campsite messy when you're finished camping. Make sure you don't leave behind any garbage or charcoal. Try to leave your campsite cleaner than it was when you arrived. [Video] 12:48 - Clean Your Campsite 20. Everyone Has Their Own Way of Enjoying Camping Everyone enjoys camping in their own way. It's also bad manners to impose your own values on other people. [Video] 13:12 - Camping Is Different for Everyone Enjoy Camping in Japan With Proper Manners! When camping, it's important to have good manners as well as to follow the rules of the campground. It's also important to gather information about prohibited items and equipment at the campground in advance. Trouble can be caused by violations of manners regarding garbage disposal, illegal dumping, noise in common spaces, and many other factors. When camping in Japan, it's important to respect nature, have good manners, keep other campers in mind to avoid any problems. -
Video article 5:54
CB Cans - A Cheap, Easy-To-Use, and Convenient Alternative to OD Cans When Camping IF You Know Their Limitations…
Things to Do- 21 plays
- YouTube
The Two Types of Gas Canisters for Camping in Japan Whether it be solo camping or family camping, the number of campers in Japan is increasing rapidly. Gas canisters, both CB cans and OD cans, are a must-have item when it comes to cooking while camping. In this article, we'll focus on the advantages of CB cans for beginners who aren't familiar with the differences between Japan's different gas canisters. Video Introduction: CB Cans - Readily Available at 100-Yen Shops All Across Japan This video, titled "[Gas] The Difference Between CB and OD Cans (Which is Better for Camping? Explaining the Key Differences Between the Two)" (【ガス】CB缶とOD缶の違いについて(キャンプでは結局どっちがいいのか? 使い分けのポイントについて解説)), was uploaded by "sugita outdoor channel" (杉田アウトドアch / sugita outdoor channel). Sugita, the camper in the video, enjoys solo camping and auto-camping in small groups. He explains the advantages of CB cans, which are cheap and easily obtainable in Japan, and how they're different from OD cans. CB Cans Photo:A gas stove A CB can, short for "Cassette Gas Bombe," is a gas canister often used in household stoves in Japan. It has the following characteristics: ・Pros The advantage of choosing CB cans is that they are inexpensive, costing only about 100 yen per canister. Their thin and compact shape makes them easy to store, and they can be easily purchased at convenience stores and supermarkets in Japan. Furthermore, in the past, there were not many burners that could be used with CB cans, but the number of burners compatible with CB cans has increased dramatically in recent years, making them more accessible. ・Cons When the temperature of the canister drops below 5°C, a pressure drop occurs that causes the output of the can to decrease. In severe conditions, such as below freezing temperatures, CB cans may become unusable. Those planning to camp in winter should be especially careful. [Video] 0:42 - CB Cans OD Cans Photo:An OD can An OD can, short for "Outdoor can," is a gas canister designed for outdoor use. Compared to CB cans, which are long and narrow, OD cans are characterized by their sturdier shape. ・Pros OD cans can be used in colder conditions, such as during the winter or when climbing high-altitude mountains. Those camping in the dead of winter or climbing mountains at high altitudes will want to bring OD cans with them. ・Cons OD cans are more expensive than CB cans, costing about 500 yen per can, and they are larger than CB cans, making them difficult to store. Another disadvantage is that they are difficult to obtain, being purchasable only at outdoor specialty stores or online. Useful Items to Have With CB Cans Photo:Solid fuel Sugita, the video creator, says that he has never experienced any trouble using CB cans when camping. However, he mentions that he actively prepares so that he can avoid problems when using CB cans. In order to prepare for situations where you can't use a CB can, such as on a cold morning, here are some useful items you can take with you. ・A Heater To keep the CB cans in usable condition, they should be kept from the cold as much as possible. To aid in this, a heater is a useful item to have. Even in the worst-case situation where a CB can is not available, you can still boil water on the top of the heater. It's also a good idea to protect the gas canister by wrapping a cloth around it to prevent it from getting cold in the open air. ・Solid Fuel You can also bring solid fuel just in case you need to boil water for making hot beverages. They're quite compact, so be sure to bring several. ・OD Cans It is a good idea to have at least one OD can with you in case of an emergency. It will also be useful in the early morning when the temperature is lower. ・Fire Starter It's hard to keep warm when it's cold. We recommend bringing items that can easily start a fire. Gas Canisters and Expiration Dates When storing CB and OD cans, care should be taken to avoid gas leaks and you should also be weary of expiration dates. Gas canisters deteriorate over time. While they have a long shelf life (approximately 7 years from the date of manufacture), you should be sure to check the manufacture date on the bottom of the can. Also, if there are any deformities or rusting on the lid or the cylinder, it's possible the cans are deteriorating at a faster rate than normal. Storing Gas Canisters Photo:A gas canister Gas canisters should be stored away from fire and direct sunlight, and in a dry place below 40°C (104°F). It's also dangerous to place them near cooking areas where fire is present, on the ground under the scorching sun, or in a car, even if you're camping or do other outdoor activities. Properly Disposing of Gas Canisters When disposing of CB or OD cans, be sure to use them up before discarding them. Whether or not to puncture the gas cans after they are used up depends on the local government. Check the disposal method of the local government in advance and dispose of the cans accordingly. Summary of Japan's CB Cans, a Convenient Piece of Camping Equipment CB cans are cheap, available at most supermarkets in Japan, and are very useful! However, if you purchase them without knowing how they work, you might find yourself in an undesirable or possibly even dangerous situation. Be especially careful when camping in winter. Don't forget to prepare other items to keep the gas canisters from getting too cold and also backup items in case it does happen. OD cans are another great item to have in case it gets colder than you were expecting. There are many awesome campgrounds in Japan. Enjoying hot meals and warm drinks while camping in the crisp, clean air of winter is truly a unique experience as well. Be sure to check the weather conditions on the day of your camping trip so you can be well equipped and ready to go! -
Video article 14:41
[WORKMAN] Reviewing 5 Pieces of Camping Equipment Under 1,000 Yen! A Full Set of Gear for Beginners!
Things to Do- 19 plays
- YouTube
WORKMAN's Camping Equipment WORKMAN is known in Japan for working wear, winter clothes, safety shoes, etc. However, in recent years, WORKMAN's outdoor products have also been attracting attention. In this article, we introduce a video review of five pieces of WORKMAN equipment. A WORKMAN Camping Gear Review for Beginners! This video, titled "Reviewing Five Pieces of Workman's New 2021 Spring/Summer Camping Gear! Lots of Gear for Beginner Campers!" (ワークマンの2021春夏新作キャンプギア5選をレビュー!これからキャンプを始める初心者向けのギアが満載だった!), was uploaded by "SLOWCAMP." Workman, well-known for its work clothes, also offers a full lineup of outdoor gear! There is a wide variety of fashionable and useful items available. In this article, we'll introduce 5 pieces of camping gear all available for under 1,000 yen! For beginners who are just getting into camping, expensive camping gear can be a bit of a hurdle. Being able to get cheap, but reliable gear will ensure you can have a good time. The Easy-To-Use 'Compact Hammer' Source :YouTube screenshot This simple and compact hammer costs 680 yen (tax included). The video also compares its size and other features with a standard stake hammer. Despite its small size, it's a highly rated hammer due to the deep indentations on the handle, which allow for a firm grip. The shape of the hammer, however, is not designed for removing stakes. In the video, you can see how the stakes are hammered into the ground. [Video] 0:22 - Compact hammer The Fine-Pitched 'Hybrid Saw' Source :YouTube screenshot The Hybrid Saw, which combines a saw and a box cutter into one, costs 980 yen (tax included). It's made with a firm grip, making it easy to hold and cut with. Compared to a Daiso saw, the pitch of the blade is finer. The saw cuts better than its slender appearance would leave you to believe! The fine pitch of the blade makes the cuts clean and neat. Even hardwoods can be cut with no problem. It can also handle branches and firewood quite well. [Video] 6:00 - Cutting a Branch With the Hybrid Saw The box cutter can be used in a variety of situations. In the video, it's used to make wood shavings for making fire. [Video] 2:54 - Hybrid Saw 'Wide Multi Hook' Carabiners for Hanging Objects Source :YouTube screenshot The carabiner with hook is 499 yen (tax included). Since space is limited inside a tent, hanging camping gear on ropes is a good way to save space. The Wide Multi Hook is useful for such situations. Check out the comparison with a 100-yen product in the video! [Video] 7:40 - Wide Multi Hook Nylon 'Para Mate' Paracord Source :YouTube screenshot The 4mm x 15m nylon Para Mate paracord costs 350 yen. It's mainly used for securing tents and putting up tarps. In the video, you can see it being attached to a stake hammer or saw as a cord. Para Mate paracord can also be used for other purposes, such as wrapping it around the handle of a sierra cup to protect it from the heat of a fire, or to protect and reinforce gear such as axes. [Video] 9:16 - Para Mate Paracord '2way All In One Bag' for Organizing Gear Source :YouTube screenshot The 2way All In One Bag (980 yen, tax included) is useful for storing compact camping gear. Thanks to the shoulder belt, it can be used as a shoulder bag or hung from the waist. [Video] 11:50 - 2way All In One Bag Storing Camping Gear How do you store your camping gear? As you continue to go camping, the amount of gear you have tends to increase as well. It's important to think about how to store your gear so that when you feel like camping, you're not left trying to remember where you put it. First, make room for a dedicated shelf for your camping gear. Arrange your gear at the right height on each shelf for a clean look. Compact camping gear should be stored in storage bags or other containers according to their purpose so that they don't fall apart. Some camping gear can even be displayed decoratively. Displaying your camping gear neatly can also keep you in high spirits while thinking about your next camping trip. Summary of Camping Gear for Beginners Solo camping is popular in Japan these days. Reasonably-priced but practical camping gear is easy to prepare and less burdensome. If you're thinking about going camping, be sure to check out this video to help you choose the right camping gear! -
Video article 16:16
10 Pieces of Camping Cookware All Under 10,000 Yen! Practical and Cost-Effective Cookers! Everything You Need to Get Cooking!
Things to Do- 39 plays
- YouTube
The Best Cooker for Making Delicious Camping Food Camping is becoming extremely popular in Japan. It's also attracting attention from people who have never camped before. One of the pleasures of camping is eating delicious food in the outdoors. Unfortunately, it can be surprisingly expensive to prepare cooking equipment from scratch. In this article, we'll introduce practical cookware that can be purchased for less than 10,000 yen. Video Introduction This video, titled "[Under 10,000 yen] 10 Pieces of Camping Equipment: Cookware Ver., 2020 Edition" (【1万円以下】おすすめキャンプ道具10選 調理器具編2020年版), was uploaded by "Camp Lab" (キャンプ研究所). The channel uploads a variety of videos for beginners and intermediate campers. 10 Pieces of Useful Camping Cookware for Under 10,000 Yen Photo:A family camping Many people in Japan have gotten hooked on camping after watching the hit anime Laid-Back Camp. Camping equipment differs from ordinary daily necessities in that it's used outdoors. In particular, safety, price, and the feel of cookware are incredibly important when camping. Many family campers travel to campsites via car, but they still hesitate to purchase bulky and expensive camping utensils. This video introduces 10 pieces of camping cookware that all cost less than 10,000 yen (nly one item exceeds 10,000 yen). The video also explains why each piece of cookware is good for camping. The First Step in Making Delicious Camp Meals Is to Choose the Right Cookware Photo:Cooking while camping Camping offers an extraordinary experience by putting you in a slightly less convenient environment in the great outdoors. Eating is a major part of the fun of camping. Camping cookware is designed to be easy to use and carry outdoors, with various innovations and functionality in mind. Putting a bit of thought into your cookware can help you enjoy camping as a leisure activity. Hopefully with this video/article you can find some cookware that meets your needs. And with that out of the way, let's introduce the camping cookware shown in the video. 10 Cookware Recommendations From an Advanced Camper Photo:A single burner The person behind Camping Laboratory, the channel introducing the cookware in the video, is an advanced camper and camping influencer in Japan. As such, his selection criteria is quite strict, making this video great for both beginners and experienced campers alike. Be sure to take a look at it to see all of the different camping cookware introduced. ・SOTO ST-310 Single Burner Set Compact but offers high firepower, and works great as a gas burner for BBQ or use with grills! It's also compatible with CB cans which is a nice touch. This is a highly recommended piece of equipment for beginners it doesn't require you build a fire to start cooking. [Video] 1:38 - SOTO ST-310 Single Burner Set ・Cooker Stand When using the above gas burner, a cooker stand can be placed over the top of it to stabilize large pots and pans. It can also be folded for easy storage! [Video] 2:17 - Cooker Stand ・SOTO Stainless Steel Dutch Oven A thick stainless steel Dutch oven. This is the one item on this list that exceeds 10,000 yen. (Price quotes are around ¥20,000 for a 10-inch oven) Compared to cast iron cookware, it can be scrubbed with detergent and naturally dried, making it easy to maintain. Because of this it's recommended for outdoor beginners. A Dutch oven can also be used as a smoker! [Video] 3:39 - SOTO Stainless Steel Dutch Oven ・Uniflame Camping Cauldron If you're looking to cook tasty white rice in style, this is the cooker for you. The shape of the pot is very attractive. [Video] 7:15 - Uniflame Camping Cauldron Photo:A hot sandwich ・Coleman Hot Sandwich Cooker It comes with a set of handles and a case, making it easy to store and inexpensive. The cooker creates a nice branding on the bread and sandwiches can be easily eaten after cooking thanks to being cut in half. [Video] 8:12 - Coleman Hot Sandwich Cooker ・Lodge Skillet Very popular as a stylish frying pan in restaurants and as a household item. It's a versatile piece of cookware for outdoor cooking. Meat (or fish) and vegetables can be grilled together and served directly, using the skillet as a plate. The thick material retains heat and can be used for cooking over an open flame. It can be used to cook some delicious meats. [Video] 9:36 - Lodge Skillet ・Coleman Fireplace Kettle Although kettles are sold at Daiso and other 100-yen shops in Japan these days, you'll still want to use a specialized camping kettle for camping meals. This kettle is a good choice for those who are just getting into camping, as it offers both an affordable price and stylish appearance. [Video] 11:58 - Coleman Fireplace Kettle ・Snow Peak Cooker - Trek 900 A lightweight cooker made of aluminum. This is a versatile piece of camping cookware that can be used as a pot for stew, a mess tin, a percolator, and a Sierra cup all in one, making it a useful piece for solo campers. It's lighter than a stainless-steel percolators as well. [Video] 12:11 - Snow Peak Cooker - Trek 900 ・Coffee Mill A must for those who want to grind coffee beans and for a fresh cup of coffee. Although slightly difficult to use at first, it's reasonably priced and nothing beats freshly ground coffee. [Video] 12:52 - Coffee Mill ・Barbecue Skewers This is not a piece of cookware, but rather a utensil for enjoying camping. It can be used by children as well, as they enjoy roasting marshmallows or other tasty snack on the skewer and roast it over the fire. [Video] 14:17 - Barbecue Skewers Summary The equipment you'll need will depend on what kind of cooking you want to do when camping. Having information from advanced campers who can explain the cooking utensils that they have actually used and enjoyed, along with the reasons why they were selected, is incredibly helpful if you're a beginner-level camper. Be sure to check out the video to see the different pieces of cookware. Enjoy cooking in the great outdoors and happy camping! -
Video article 10:53
How to Clean Your Camping Gear! Make Your Pitch-Black Kettle Shine Like New!
Life & Business Things to Do- 28 plays
- YouTube
Keeping Your Camping Gear Clean After long periods of being used, cookers and other tools used when camping can get quite dirty. This time, we'll show you how to keep kettles and other cooking utensils that have turned black from direct heat clean. Video Introduction Photo:A burnt mess tin This video, titled "Camping Gear Maintenance by a Solo Male Camper in His 20s Who Camps Every Week" (週一でソロキャンプする20代男子ソロキャンパーによるキャンプ道具のお手入れルーティン), was released by "Japanese campers YURUHARU." It shows how to properly clean your camping gear. After enjoying some delicious cooking in the great outdoors, your cookware will inevitably start to feel some wear. If left as is, it may become unsanitary or break and become unusable. After you're finished camping, it’s important to clean your cookware properly. Cleaning Kettles and Other Camping Gear With Sodium Sesquicarbonate Source :YouTube screenshot Use sodium sesquicarbonate to remove dirt and burnt or dry oil that has stuck to your gear from cooking when camping. Check the instructions and dissolve the sodium sesquicarbonate in hot water. Soak the camping kettle or pyramid grill in the solution for 10 to 30 minutes, then polish it with a sponge. Persistent stains are easier to remove after soaking them in the solution. Once the stains are removed, your gear will be as shiny as clean as a whistle. [Video] 1:17- Cleaning camping gear with sodium sesquicarbonate Use a Polishing Agents for Aluminum, and Scrubbers for Skillets Source :YouTube screenshot Large aluminum mess tins that cannot be cleaned with sodium sesquicarbonate can be cleaned with polish and an abrasive sponge. Grills can be wiped clean and skillets can be cleaned with a scrubber to keep them clean and lasting longer. It's also important to check the batteries in electric lanterns and wipe down gasoline lanterns if you have any. [Video] 4:58 - Polishing with abrasives Caring for Wooden Tables Most noticeable stains can be sanded off using sandpaper. After that, drying oil is applied to complete the maintenance. How to Dry Camping Equipment Photo:Lunch at a campground After washing camping equipment, dry it thoroughly in a well-ventilated place after wiping it dry with an absorbent towel. Tents, sleeping bags, and blankets should also be dried in the shade, and stakes and stake hammers should be lightly cleaned and stored in their cases. Summary of How to Clean Your Camping Gear In this video, we introduced the basics of how to clean your camping gear. Since camping is enjoyed outdoors, weather and other factors can lead to your gear becoming quite dirty. Although it may be a bit tedious to clean, it's a good idea to clean and maintain your equipment after camping so that you can enjoy it comfortably on your next camping trip. The cleaning methods for cookers and other equipment vary depending on the material they're made from, so be sure to perform the appropriate maintenance according to the material, be it aluminum, titanium, etc. Camping gear is an important part of camping and so it's important to take care of it so that it can be used for a long time. -
Video article 4:11
Spice up Your Outdoor Meals With a Mess Kit and Make Camping More Fun! Basic Tips on How to Use a Mess Kit for Camping and the Secret to Making Delicious Camping Rice!
Things to Do- 51 plays
- YouTube
Learn How to Make Delicious Camping Rice With a Mess Kit in This Video! This video, titled “Cooking Rice with a Mess Kit” (飯ごうでご飯を炊こう), was uploaded by “Yamanakako Village Tourism Division” (山中湖村観光課). The camp ground introduced in the video is Sonei Yamanakako Camping Ground, located at the foot of Mt. Fuji. The video shows how to cook rice in a mess kit using meltwater from Mt. Fuji. When going camping, try bringing a mess kit to make your own camping meals. How to Cook Rice With a Mess Kit Mess kits are aluminum cookware often used by soldiers or when camping to cook food. As you can see in the video, they can also be used to cook rice! A typical mess kit in Japan has an outer lid and an inner lid which can be used to measure rice. First, wash the rice and add an appropriate amount of water to the mess kit. Wash-free rice is useful when you don’t have enough water to wash the rice (or just don’t feel like washing it). The correct way to cook rice is to let it soak up water for about 30 minutes and then put it over the fire. Cook the rice over low to medium heat until it comes to a boil, and then reduce the heat to low. Make sure to pay attention to time and heat level. After cooking the rice, turn the mess kit upside down and let it steam for 10 minutes. This can be seen at 3:11 in the video. Tips to Make the Most of Your Mess Kit While Camping In Japan, basic camping goods can be purchased at 100-yen shops such as Daiso all across the country. A digital scale or measuring cup are useful for measuring rice, water, and other ingredients precisely. Also, be sure to prepare ample food and necessary tools, including tinder and plates. If you want to reduce the aluminum smell of the mess kit, you can cook the rice using the water you used to wash it. There are many different types of cookware that you can use when camping, so be sure to look for what suits your needs best. Summary of Cooking Rice With a Mess Kit If you remember the steps shown in the video, you can enjoy delicious rice when camping. Mess kits are also useful for making arranged recipes, such as jambalaya and oden. You can rent a mess kit at the Sonei Yamanakako Camping Ground shown in the video, so be sure to make a reservation if you want to enjoy a fun camping experience. -
Video article 7:31
How to Cook Rice with a Mess Tin! 6 Tips to Make Tasty, Fluffy Rice Using Solid Fuel!
Things to Do Food & Drink- 377 plays
- YouTube
The Basics of Camp Cooking in Japan: Rice Rice, the staple food of the Japanese people, is also popular when camping. In this article, we'll introduce a video how to cook rice using a mess tin. Learn about mistakes advanced campers have already made so you can avoid making them yourself! Video Introduction This video, titled "[Mess Tins] Tips to Avoid Mistakes When Cooking Rice" (【メスティン】メスティン自動炊飯で失敗しないポイントとは), was uploaded by "Second Lieutenant Nya [Demoted to Rave Reviews]" (ニャア少尉【絶賛降格中】). The video introduces how to cook rice without fail using a mess tin. It's a must-see for outdoor and camping beginners in Japan, as well as for those who have never successfully cooked rice with a mess tin. Check it out! Mess Tins - A Popular Piece of Camping Dishware Photo:Camping gear A mess tin is a piece of cookware used during camping and backpacking. Shaped like a lunch box with a handle, they're made of aluminum for high heat conduction and can be heated with a single burner. They're also compact and easy to store. They can be used for smoking foods, pasta, and even arranged recipes using cooked rice and bread. They're a popular cooking utensil for outdoor enthusiasts with a variety of cooking methods, such as simmering, steaming, baking, etc. The first time you use a mess tin, it's recommended that you file and deburr it, as they can have rough spots on them. Some campers also recommend seasoning to prevent burning and other problems. 6 Tips for Cooking With a Mess Tin Photo:Rice soaked in water The video explains 6 tips to avoid mistakes when using a mess tin for outdoor cooking and camping. Let's take a look! ・Allow Water to Permeate the Rice Thoroughly After washing your rice, you'll want to soak the rice in water for at least 30 minutes during summer and 1 to 2 hours in winter in order to allow the water to penetrate the rice. [Video] 0:48 - Preparing the rice ・Solid Fuel (25g) Next is the solid fuel. Use 25g of solid fuel so that the fire won't go out in the middle of cooking. [Video] 1:24 - Solid fuel ・Next is the water. Be careful with the amount of water so that your rice isn't hard when you're finished cooking. In the video, water is added until the middle of the rivet of the mess tin for 1 cup of rice, but note that the height differs by manufacturer. [Video] 1:54 - Adding water ・Use a Wind Screen Fourth, use a windbreak to keep the heat and temperature consistent. The wind outside can make it difficult for the fire to reach the mess tin, resulting in uneven cooking, so be sure to use a wind screen. [Video] 2:24 - Wind screen ・Place a Weight on Top of the Mess Tin Lid The lid may come off when the pressure inside the mess tin rises. It's recommended that you put a weight on the lid to prevent it from coming off. [Video] 2:41 - Weights ▪ Steaming Remove from heat once steam starts to spill out or there's any bubbling sounds. To prevent the temperature from dropping too low, place the rice in a temperature retaining bag and let it steam for 10 minutes to make it fluffy and delicious. [Video] 3:52 - Steaming Warming Up Canned Goods With a Mess Tin! Source :YouTube screenshot The video shows how you can place a weight on top of the lid to prevent it from opening while the rice is cooking. In the video, canned food that is eaten with rice was placed on top of the lid instead of a weight. When the rice is done cooking, the canned food is also warmed up, so you can kill two birds with one stone! Summary of Mess Tins for the Outdoors & Camping In this article, we introduced a video of how to cook with a mess tin. A mess tin is a cooker that is handy for outdoor cooking, such as when camping, because it allows for easy outdoor cooking due to its versatility. Whether you're cooking with a mess tin for the first time or have used a mess tin before but experienced some failures, be sure to refer to this video to make some delicious rice! -
Video article 47:28
Introducing the 7 Best Single Burners for Outdoor Camping! Compact, Versatile and Convenient Gear! Check Out This Video to See the Amazing Performance of These Wind-Resistant Burners!
Things to Do- 30 plays
- YouTube
About the Video Showing the Single Burners This video, titled “Seven Single Burners | Comparing Popular Brands | Beginner Friendly | Choose OD Gas or CB Gas,” was uploaded by “solo camp & camp cooking in Japan TANA channe.” The video introduces single burners that can be used for camping or other outdoor activities, while going over how to choose them, as well as how each is used. A single burner is a piece of camping gear that can be used outdoors to boil water, cook camping meals, and more. They're a must for any solo or group camping trip! The Single Burners Recommended in the Video Source :YouTube screenshot The 7 single burners introduced in the video are as follows: ・Soto Shinfuji G'z G-stove STG-10 (Soto Shinfuji G'z G-ストーブSTG-10) (Video ~5:01) ・Soto Regulator Stove ST-310 (Video ~14:06) ・Coleman F-1 Power Stove JCM-S106A (Video ~21:27) ・Primus P-153 Ultra Burner (Video ~25:53) ・Iwatani Primus 2243 BUrner IP-2243PA (Video ~32:23) ・Snow Peak HOME &CAMP Burner Silver GS-600SL (Video ~36:40) ・EVERNEW AL Titan grate for Stove EBY253 (Video ~42:30) Although not listed here, manufacturers such as Iwatani also sell single burners. OD cans (outdoor cans) and CB cans (cassette gas bombe cylinders) can be used as fuel for single burners. Easy-to-Use Single Burners, as Shown in the Video! Photo:A single burner In addition to camping and mountain climbing, single burners can also be used as emergency equipment in times of disaster, typhoons, earthquakes, and other emergencies. Partition or unified single burners can be easily purchased at home centers or outdoor supply stores, and have relatively low running costs. The reason for their popularity is that they have sufficient heat, can be easily used for everything from boiling water to outdoor cooking, and are easy to use and maintain. Uses and Precautions for the Single Burners Shown in the Video Photo:A campground at night Lighters needed to light the burners can be found at supermarkets and convenience stores. Campers may use gas, kerosene, solid fuel burners, alcohol burners, and white gas lanterns for outdoor cooking and light. Also, if you have an igniter cartridge, you don't need a lighter to use it. However, while convenient to use, you need to be careful about fire accidents and gas leaks due to incomplete combustion. Summary of the Single Burner Introduction Video The single burners shown in the video are compact, portable, wind-resistant and very convenient. If you have a griddle and a stove, you can cook some delicious camping food. If you want to enjoy the outdoors to the fullest, then definitely consider picking up a handy single burner like the ones shown in the video! -
Video article 2:12
Tokamachi in Niigata Prefecture Is the Number One Tourist Spot to Experience Beautiful Scenery! Skiing, SUP, Rafting... There’s Plenty of Activities to Enjoy!
Local PR Things to Do Nature- 63 plays
- YouTube
Introducing Tokamachi, Niigata! This is a video to promote outdoor tourism in Tokamachi, a city located in the southern part of Niigata prefecture. Here, we will introduce you to some of the nature-rich sightseeing spots in the Shinanogawa area of Niigata Prefecture. The video introduces a variety of outdoor activities in various spots and seasons, including rivers, plateaus, and snowy mountains. There's sure to be something for everyone! Outdoor Locations in Tokamachi, Niigata Photo:glamping If you want to go camping in Tokamachi city, we recommend the beautiful Daigonji Kogen Camping Ground or the Fushikurojoseki Camping Ground. You can see the scenery at each campground at 0:29 in the video. Besides that, there are also facilities where you can enjoy the popular activity "glamping" around Tokamachi. There are various outdoor activities to enjoy in Tokamachi city, such as cycling along the Shinanogawa river, SUP (Stand Up Paddle Boarding) at the Shinanogawa river, canoeing, and rafting down the amazing Shinanogawa river. These can be seen at 0:39 in the footage. Known as one of the areas of Japan that has extremely heavy snowfall, there are many famous tourist spots where you can enjoy winter activities in Tokamachi city. It's been designated a special heavy snowfall area, so you know the snow will be great! You can also try cross-country skiing in the scenery of the great outdoors, or airboarding and snow biking at the Matsunoyama Onsen Ski Resort. These winter activities are shown from 1:24 in the video. Appealing Tourist Spots in Tokamachi City ©Koichi_Hayakawa Modifying In addition to Chotokuji Temple, which is famous for Senju Kannon (the thousand-armed Goddess of Mercy), the stone Buddha of Hachi, where approximately 200 stone Buddhas are enshrined, Suwa Shrine and Matsuo Shrine, Saieiji Temple, and Jinguji Temple, a nationally renowned sight and national monument, and Tashiro no Nanatsugama, are all must-see tourist spots that show the history of Tokamachi city. You can also visit the ruins of Oida Castle, which was home to a local wealthy family during the Kamakura period. At the Tokamachi Museum, you can see the flame-shaped earthenware that was found in the area. Kiyotsu Gorge, the Hoshitoge rice terrace fields, and the beech forest, given the name Bijinbayashi, are all secret tourist spots overflowing with natural beauty. The Art Festival of the Earth - Echigo-Tsumari Art Triennial, one of the world's largest art festivals, attracts many visitors as well. When you visit Tokamachi city of Niigata prefecture, be sure to try the local cuisine. The Kashiwazaki Tai Chazuke (sea bream rice with tea), Soba inari, and Hegi soba are famous local specialties. Traditions of Tokamachi City In Tokamachi, Shinbo Kodaiji Bushi, which is said to be the root of Japanese folk music, has been passed down since ancient times. Akakura Kagura, which has been passed down from one generation to the next in Akakura Village, is a Shinto ritual within which you can feel the traditions of Japan. Tokamachi Kouta, which was made for the commercial of the traditional "Akashi Chijimi," is performed at the Tokamachi Summer Festival. In the city, the Tokamachi Snow Festival is held in the winter season and it's always a lively event. There are places where you can experience making Tsumariyaki, a traditional craft of Tokamachi, using soil from the area. Tokamachi city is also the second largest producer of silk fabrics after Kyoto, and is even called “Kimono town” for having many kimono and fabric shops. Accommodations in and Around Tokamachi If you're traveling to Tokamachi, we recommend staying at Hikari no Yakata, a hotel built by James Turrell in the image of Junichiro Tanizaki’s book “In the Praise of Shadows.” There are also many appealing hot spring inns in the city, so choose the one that suits you best. Summary of Tokamachi, Niigata Source :YouTube screenshot In this article, we introduced the outdoor activities in Tokamachi, Niigata Prefecture as well as tourist attractions and traditional performing arts that are featured in the video. We hope you enjoyed reading about some of the attractions of Tokamachi, as it has a lot to offer. As you can see in the video, Tokamachi city, where the magnificent Shinanogawa river flows, is a great place to visit for those looking to actively experience nature. This video introduces many outdoor activities, such as skiing and SUP. Find anything you're interested in? It might be difficult deciding what to do when there's so many options! 【Official Website】Tokamachi, Niigata Prefecture Town Hall Website http://www.city.tokamachi.lg.jp/english/index.html -
Video article 2:56
Uenohara, Yamanashi: A 1-Hour Day Trip Destination From Tokyo. Nature, Local Cuisine, and Hot Springs to Unwind From Your Travels. The Beautiful Uenohara Awaits Your Arrival!
Local PR Travel- 151 plays
- YouTube
Uenohara Tourism Promotional Video This video is a promotional video on Uenohara, titled "Uenohara - It's Closer Than You Think! Guy's Trip" (実は近いぞ上野原。男たちのアクティビティー編), produced by the Uenohara Tourism Board, in which the destination is explored by three young male travelers. Located on the extreme eastern edge of Yamanashi Prefecture, Uenohara has an estimated population of 23,160 (July 2019). It is also known as the location for the Teikyo University of Science. The video portrays the three young men enjoying the diverse tourist experiences in Uenohara while highlighting the beautiful natural environment. The natural beauty of Uenohara is sure to get you fired up for a journey into the wilderness. And why not go? It's only an hour from Tokyo. Uenohara Is a Great Place to Visit! Does Uenohara sound familiar to you? Probably not unfortunately... Too bad... because Uenohara is such a great destination! The three travelers in the video seem to be having a really great time in Uenohara. This article is to give more detailed information about the places in Uenohara that appear in the video, so be sure to follow along. Source :YouTube screenshot First up, we have Mt. Yaeyama which can be seen at 0:12 in the video. Mt. Yaeyama is easily accessible by car (15mins from Chu-o Ko-soku National Highway, Uenohara IC) and there are parking lots at the foot of the mountain. The recommended activity in Yaeyama is hiking. A 20-minute hiking trail leads to an observation deck where you can even see Mt. Fuji, when the weather is nice. Then they visit Fudo no Taki (a waterfall) from 0:44. Being showered with negative ions, you may get the chance to encounter wild animals. After being immersed in Mother Nature, the travelers go to have lunch at the local market, Yuzurihara Furusato Cho-jukan. "Cho-ju" means longevity in Japanese, and Yuzurihara is known as a village whose residents have a long lifespan. You can try their "healthy diets" in the restaurant that supports their longevity, with meals such as homemade Tofu, Miso, Yuba, etc. Liked Even by Hollywood Stars?! "Seida no Tamaji," a traditional local dish with small potatoes boiled in Miso, is introduced from 1:16. Uenohara's Mascot character "Tamaji-maru" represents this popular local dish. Source :YouTube screenshot Satisfied With Lunch? Time for a Swim! The travelers try fishing at local campground at 1:27 (The campsites in Japan are often more like a forest park offering outdoor activities). Surrounded by vast landscapes, Uenohara features many campsites. Catching and cooking fresh trout on the grill is a great way to spend the day and enjoy the fruits of your labor. After a good time fishing, they head to "Nagai Saka Manju store" from 1:57, which sells a famous speciality of Uenohara- Saka Manju (Manju is a bun filled with sweet bean paste). Saka Manju, although pronounced Saka, actually comes from the word "Sake" a type of Japanese alcohol. It is a type of Manju where "Koji" is used to produce fermentation in the dough, which gives it a unique taste and smell. There are a variety of flavor filled options you can choose from, such as miso, salt, or takana (pickled mustard leaf). After getting their fill of outdoor activities, the travelers bathe in the hot springs to relieve the wearies of their travels. The sauna at the day visit spa, Akiyama Onsen, appearing from 2:17, is a steam sauna where you can work up a nice sweat. It also has a swimming pool to cool down afterwards. The quality of the hot spring is high carbon dioxide gas alkaline. Akiyama Onsen is easily accessible from the JR Uenohara Station. A pickup shuttle bus is also available. You can stay overnight in Akiyama Onsen as well, as there are plenty of hotels in the area. It's time to wrap up the trip -- The three travelers enjoy taking a nice open-air bath. Festivals and Events in Uenohara Photo:Uenohara Tsukimigaike Benzaiten Festival Uenohara boasts a year-round event calender: Spring - Kotaneishi Shrine Fire Festival, Oome Cherry Blossom Festival, Gundari Shrine Grand Festival, Hirano Takyuyoson Campsite Trout Fishing Championship, Katsuragawa Festival, Yaeyama Trail Race. Summer - Tsukimigaike Zaibenten Firework Festival, Akiyama Furusato (Local) Festival, Mushono Dainenbutsu, Suwa Shrine Festival, Ushikura Shrine Grand Festival, Nishihara Fujio Lion Dance. Fall - Yuzurihara Lion Dance performed for the gods, Nishihara Furusato Festival, Gundari Shrine Autumn Festival, Uenohara Commerce and Industry Festival. Winter - Agricultural and Forestry Festival, Ushikura Shrine Setsubun Festival, Mushono Dainenbutsu. Other Tourist Attractions in Uenohara Photo:Sagami River cherry blossoms The natural environment in Uenohara provides travelers with a view of the colors of season - pastel pink and fresh green in spring time, or majestic autumn colors. Mt. Nijurokuya, one of the 100 most famous mountains in Yamanashi; Mt. Gongen, one of the three mountains in Kitatsuru, and also one of the 100 most famous mountains in Yamanashi; Mt. Mikuni, where you can see beautiful Mt. Fuji from the top of the mountain; the clear waters of Sagami River; and Tsurukawa Gorge. The 500-year-old Gundari Shrine is famous for warding off evil spirits and for good luck in match-making. There are many sightseeing spots where you can feel the history of the city, such as Aonori Temple, where you can enjoy vegetarian cuisine as well. Aogoke Temple serves traditional Bhuddist cuisine, known as Shojin Ryori, to the visitors. Uenohara features many golf courses too, including "Maple Point Golf Club" and "Olympic Country Club." One of the most popular Service Areas on the Chuo National Highway, the Dangozaka Service Area, is also a part of Uenohara (Every Service Area in Japan has unique characteristics selling local products) and is famous as a tourist attraction. A Summary of Uenohara So what'd you think of Uenohara? Hopefully we were able to convey some of what it has to offer. Wilderness awaits you, just an hour from the heart of Tokyo! 【Tripadvisor】Uenohara https://www.tripadvisor.com/Tourism-g1021450-Uenohara_Yamanashi_Prefecture_Koshinetsu_Chubu-Vacations.html